QRCodeChimp’s bulk creation module allows you to create digital business cards in bulk. Just upload the data in a spreadsheet and obtain the digital business card in bulk.
But what about editing digital business cards in bulk? You can do that too, and it’s easier than you think!
Here’s how to edit digital business cards in bulk.
Part 1: Editing existing bulk records
Follow these steps to edit records in the existing bulk.
Step 1: Log into your QRCodeChimp account and go to the Dashboard.
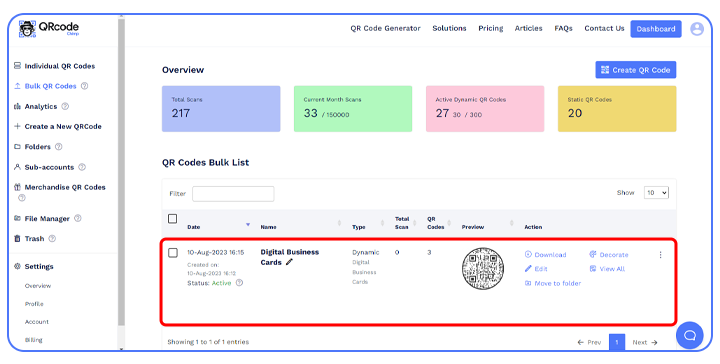
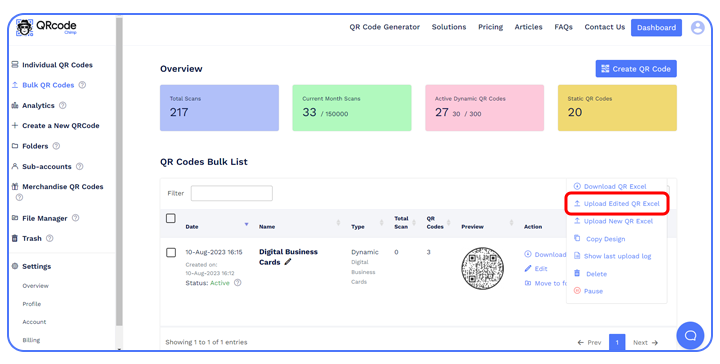
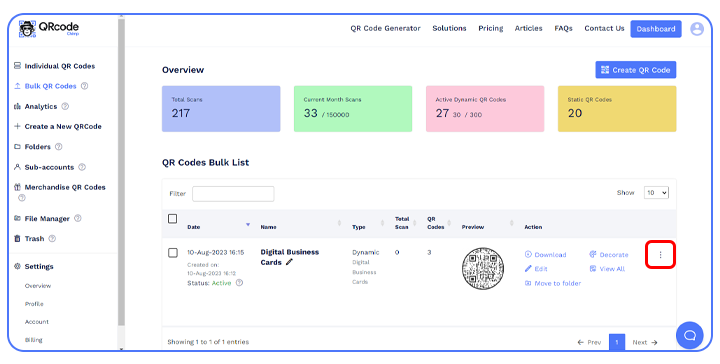
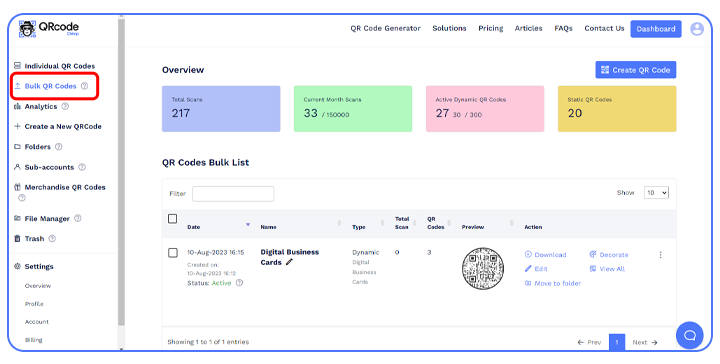
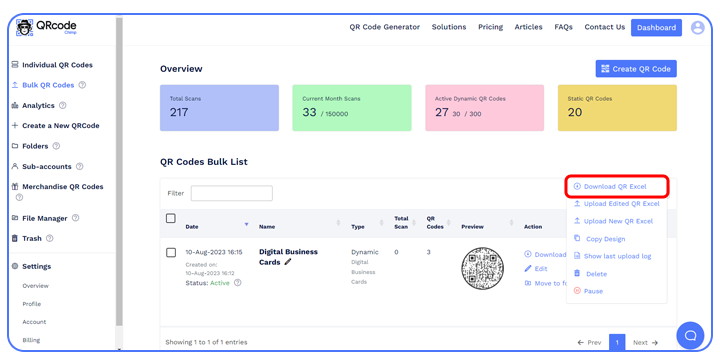
Step 2: Click ‘Bulk QR Codes’ in the left panel to open the QR Codes Bulk list.

Step 3: Find the bulk you want to edit and click ‘more options (3 dots)’ in the Action column.

Step 4: Click “Download QR Excel.” The Excel file containing the bulk digital business card data will be downloaded.

Step 5: Open the Excel sheet and make the changes as needed.
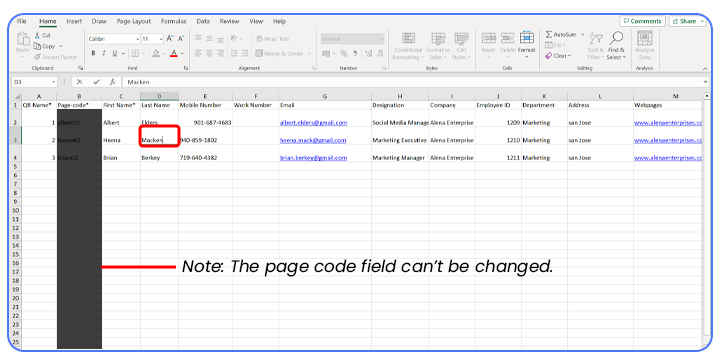
Note: The page code field can’t be changed.
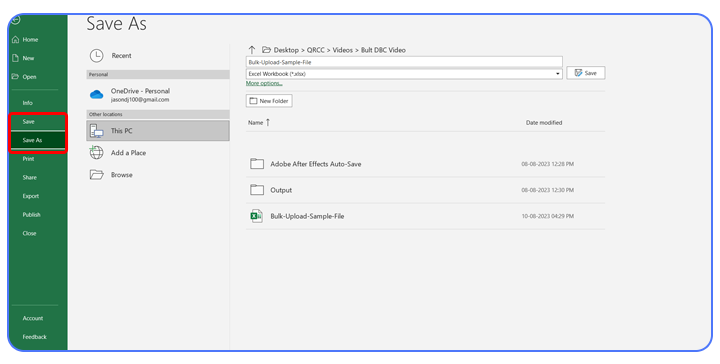
Step 6: After making all the changes, save the Excel file.
Step 7: Return to the bulk in the QR Codes Bulk list.
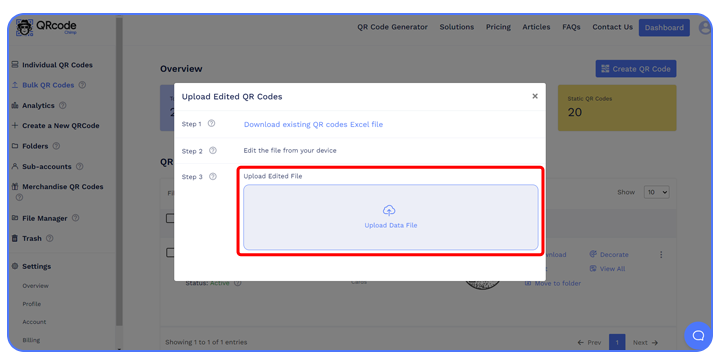
Step 8: Click “More options” and then “Upload Edited QR Excel.”
Step 9: Click ‘Upload Data File’.

Step 10: Select the edited Excel file and wait for the validation popup to appear.
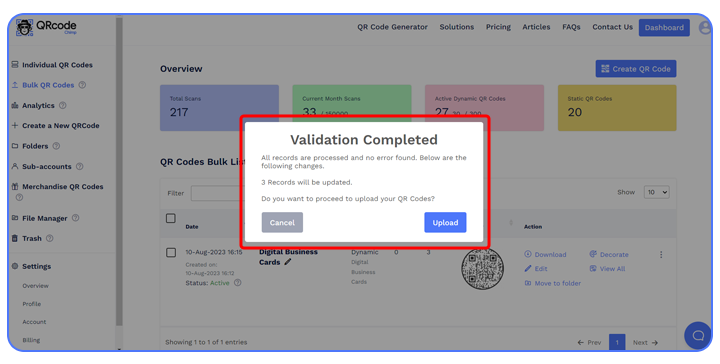
Step 11: Once you receive the ‘Validation Completed’ popup, click “Upload.” You’ll receive a confirmation popup, and the processing will begin.
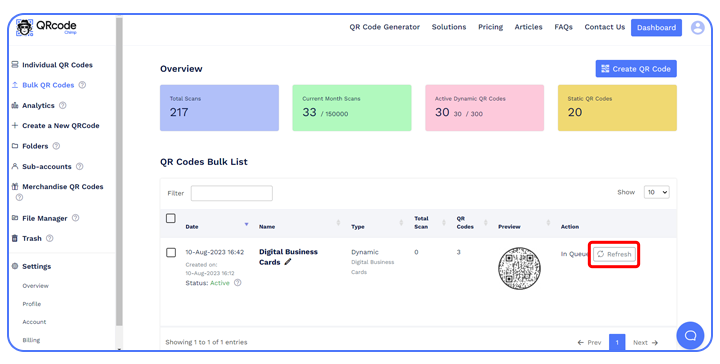
Step 12: Click ‘Refresh’ in the Action column after a few minutes.
That’s it. The edited Excel file will be uploaded, and the digital business cards in the bulk will reflect the changes.
Part 2: Adding new entries to the existing bulk
Follow these steps to add new entries to your existing bulk.
Step 1: Log into your QRCodeChimp account and go to the Dashboard.

Step 2: Click ‘Bulk QR Codes’ to open the QR Codes Bulk list.

Step 3: Find the bulk you want to edit and click ‘more options (3 dots)’ in the Action column.
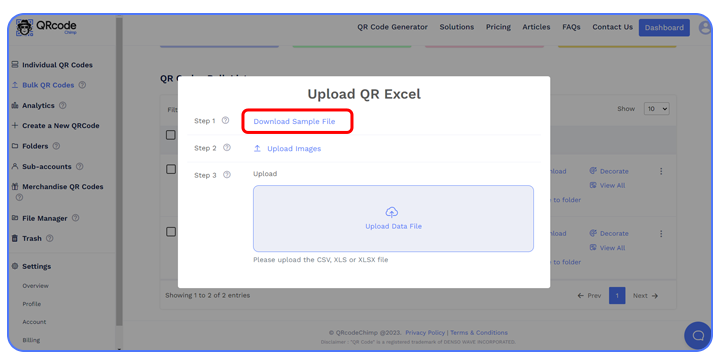
Step 4: Click “Upload New QR Excel.” The Upload QR Excel popup will appear.

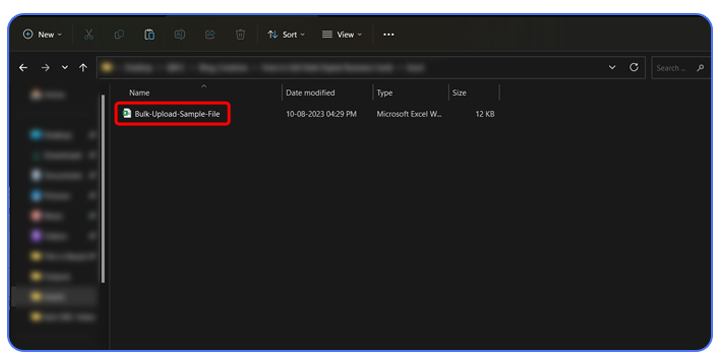
Step 5: Click “Download Sample File.” The sample Excel file will be downloaded.
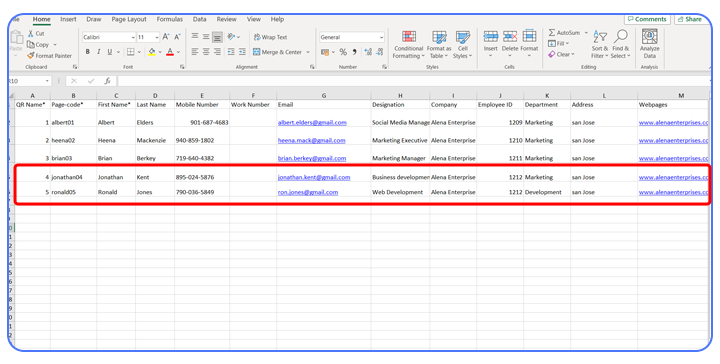
Step 6: Add the new entries to the Excel file and save it.
Step 7: Return to the bulk in the QR Codes Bulk list.

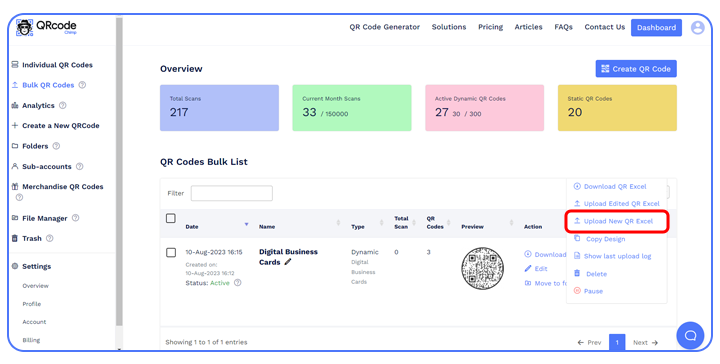
Step 8: Click “More options” and then “Upload New QR Excel.”
Step 9: Click “Upload Data File.”
Step 10: Select the Excel file containing the new entries.

An Upload QR Excel popup will appear, and you’ll see 2 Upload Setting options.
Update Existing: Select this option if you have a new Excel file that also contains digital business cards from the previous and you want to update them. Existing digital business cards will be detected from their short URLs.
Skip Existing: Select this option if you only want to add new digital business cards to the list and don’t want to make any changes to the existing digital business cards.
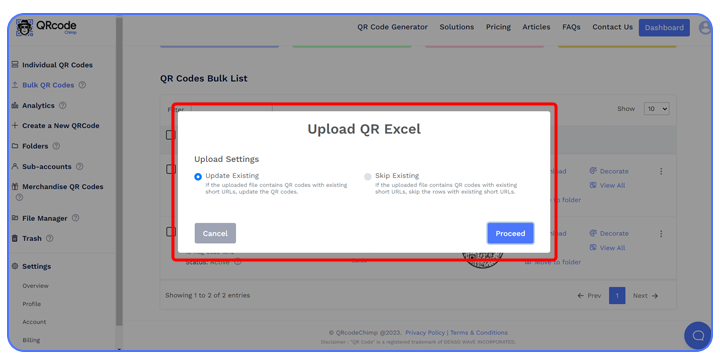
Note: If the new Excel sheet doesn’t contain the short URLs of any existing digital business card, you can choose any option.
After selecting an option, click “Proceed.”
Step 11: Once you receive the Validation Completed popup, click on “Upload.”

You’ll receive a confirmation popup. Click on OK, and the process will begin.

Step 12: Click Refresh in the Action column after a few minutes.

That’s it. The edited Excel file will be uploaded, and the new digital business cards will be added to the bulk.
Part 3: Add new sections or edit the base template
You can also edit the base template of the digital business card. Follow these steps:

Step 1: Log into your QRCodeChimp account and go to the Dashboard.
Step 2: Click ‘Bulk QR Codes’ to open the QR Codes Bulk list.
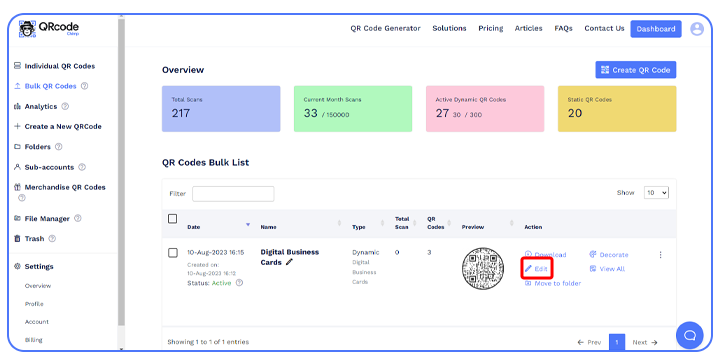
Step 3: Find the bulk you want to edit and click “Edit” in the Action column. You’ll be redirected to the Digital Business Cards solution page.
Step 4: Adding a new section
To add a new section, scroll down in the Content tab and click “Add Component.”
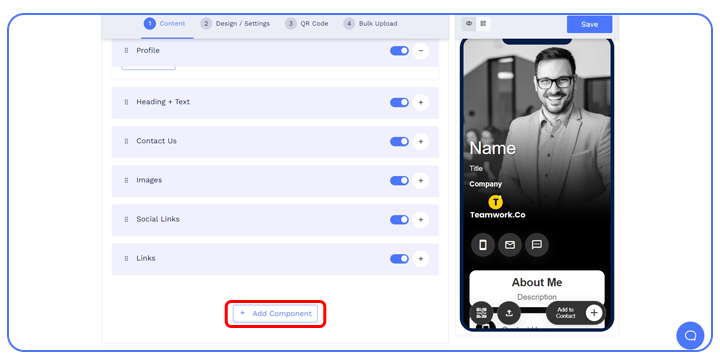
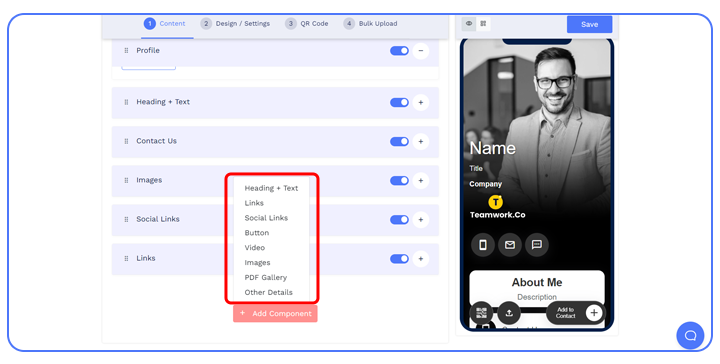
Step 5: Click the component you need to add.
Note: When editing the base template, leave all the information fields blank. If not, the data will be reflected in all the bulk digital business cards.
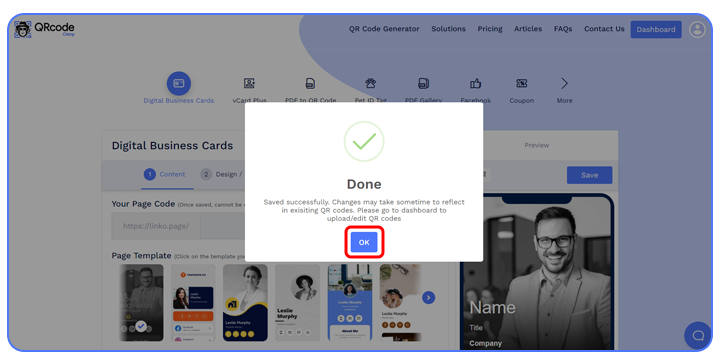
Step 6: Click “Save.” The “Change Existing Structure” popup will appear. Click “Continue.”

Step 7: Click “OK.” You’ll be redirected to the Dashboard, and the new QR code batch with the updated template design will start generating.
Step 8: To add data to the newly added component, download the QR Excel file, add the data, and upload it as explained in Part 1.
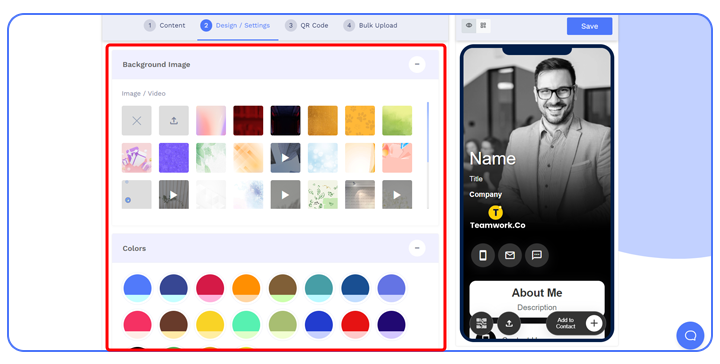
Step 9: To change the template design, move to the Design/Settings and customize the design as needed.
Step 10: Once done, click Save. The “Change Existing Structure” popup will appear.

Step 11: Click “OK.” You’ll be redirected to the Dashboard, and the new QR code batch with the updated template design will start generating.
That’s it. The new design will be updated on all the digital business cards in bulk.
Conclusion
Editing a bulk digital business card is easy and requires little time and effort. Just follow the steps discussed above to edit the bulk.
If you encounter any issues, our dedicated support team is here to help. Contact us at support@qrcodechimp.com, and our QR code experts will be more than happy to assist you.
If you haven’t yet created your digital business card bulk, create it now.
You may also like
Touchless Menu QR Code for Restaurants: A Practical Setup Guide
Learn how to create, place, test, and update a touchless menu QR code for your restaurant while giving guests convenient mobile menu access.
How To Create an RSVP QR Code for Any Event
Create an RSVP QR code using a customizable form, Event Ticket RSVP, Google Forms, or WhatsApp. Compare four methods and follow the steps.
How to Create, Design, and Share Event Ticket QR Codes
Learn how to create Event Ticket QR Codes individually, in bulk, or from form submissions, customize their design, and share them privately.
NFC Business Card Trends: What Businesses Should Know
See the latest NFC business card trends, from NFC-plus-QR cards and team management to lead capture, analytics, security, and adoption barriers.
Most Popular
Contact Sales
