QRCodeChimp Bulk Upload lets you create multiple QR codes at once by adding your data to a spreadsheet instead of creating each QR code individually.
Bulk Upload is available for all QRCodeChimp solutions except Smart QR. It supports CSV, XLS, and XLSX files and is available on Pro and higher plans.
The setup differs slightly between component-based and URL-based solutions. This guide walks you through both workflows, from configuring the solution and downloading the sample file to uploading your data, validating it, customizing the QR codes, and downloading the completed bulk.
Note: Always use the sample file generated for the QR code solution you are creating. The fields in the file vary by solution and, for component-based solutions, depend on the fields you configure on the page.
- How to set up bulk upload for component-based solutions
- How to set up bulk upload for URL-based solutions
- Continue with these steps for all solutions
- How to change the QR code design after creating the bulk
- How to download QR codes from a bulk
- Tips for a successful QRCodeChimp bulk upload
- Create multiple QR codes with one bulk upload
How to set up bulk upload for component-based solutions
For component-based solutions, follow the sequence shown in the QRCodeChimp interface:
Content → Design / Settings → QR Code → Save current setup → Bulk Upload → Download Sample File
Go to the Solutions page and select the component-based solution you want to create, such as Product QR Code, Multi-URL, or PDF Gallery. Turn on the Bulk Upload switch if it isn’t already enabled.
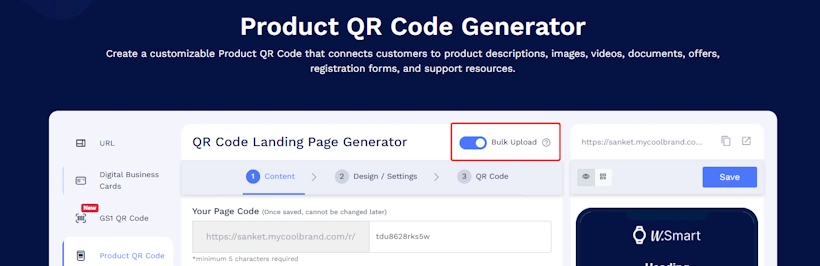
Step 1: Configure the content
Go to the Content tab and set up the page the way you want it.
You can add, remove, customize, and reorder the available components and fields.
Complete this step before downloading the sample file because the spreadsheet will reflect the fields configured on the page.
For example, if you add or remove a field before downloading the sample file, the corresponding spreadsheet fields will change accordingly.
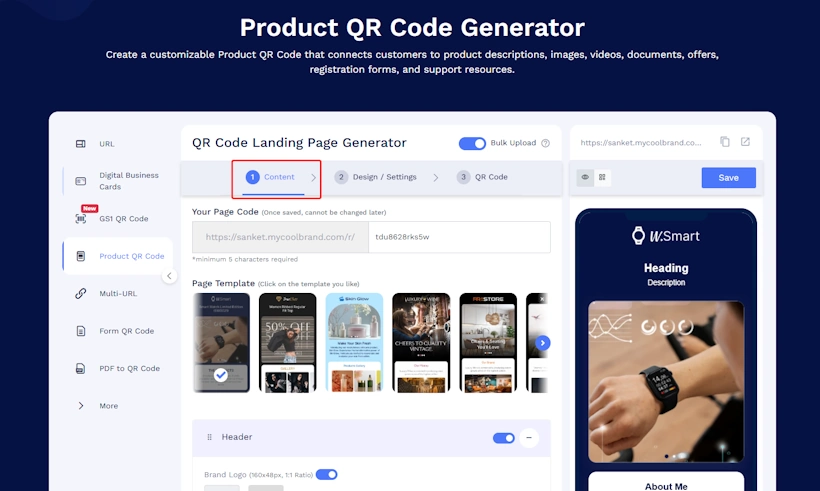
Important: Finalize the fields you need before downloading the sample file. If you change the page fields later, the previously downloaded file may no longer match the current page setup.
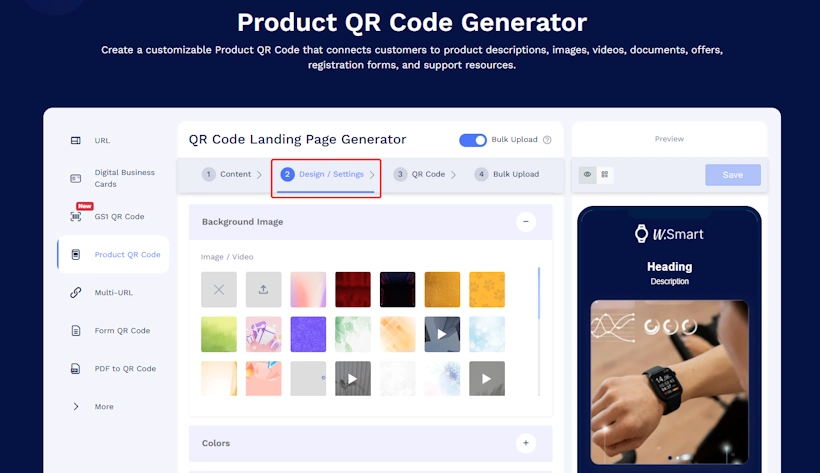
Step 2: Configure Design / Settings
Next, open Design / Settings.
Customize the appearance and available page settings as required.
These settings will apply to the pages created through the bulk upload.
Step 3: Customize the QR code design
Go to the QR Code tab and customize the QR code if needed.
You can customize elements such as:
- Colors
- QR code shapes
- Frames and stickers
- Custom text on stickers
- Logo
- Other QR code design settings
You can do this before saving the bulk, after saving it, or later.
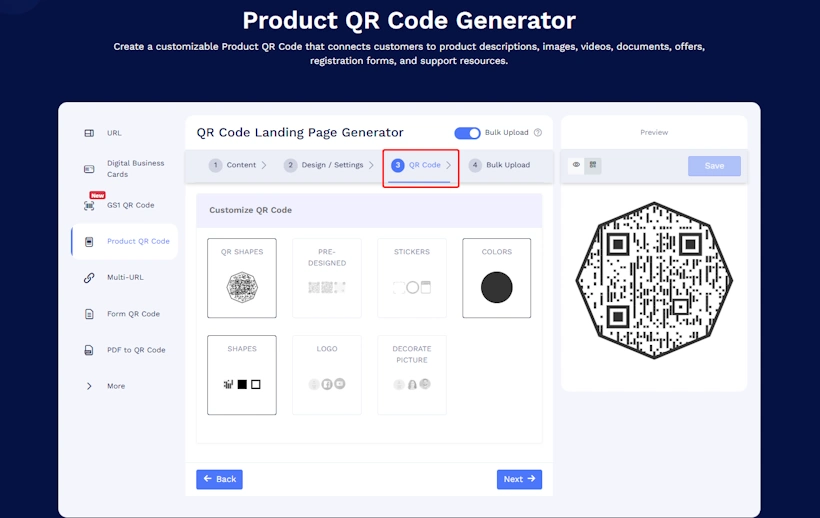
What matters is the design that is active when you upload the completed data file. That design will be applied to all QR codes created from that upload.
Step 4: Proceed to Bulk Upload and save your setup
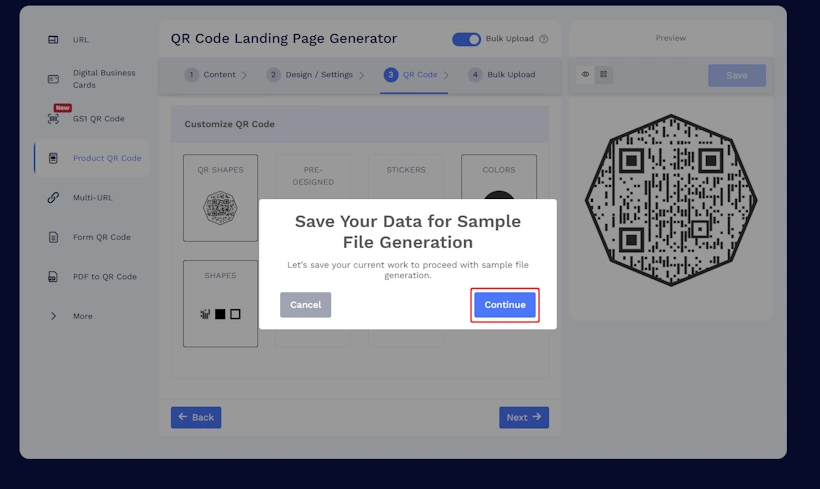
After configuring the Content, Design / Settings, and QR Code tabs, click Next or open the Bulk Upload tab.
QRCodeChimp will display a Save Your Data for Sample File Generation popup.
Click Continue to save your current setup before proceeding.
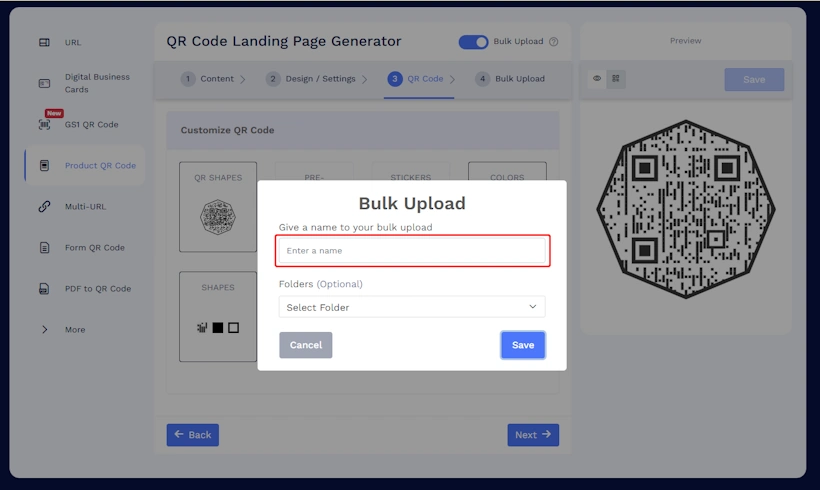
You’ll then be prompted to save the bulk. Enter a name for the bulk and choose the folder where you want to save it.
Once saved, you can proceed to the Bulk Upload tab.
Step 5: Download the sample file
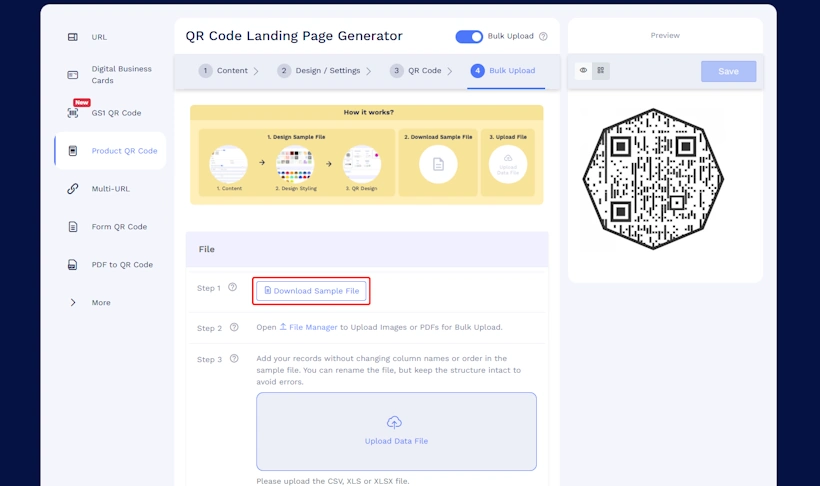
On the Bulk Upload tab, click Download Sample File.
For component-based solutions, the sample file is generated based on the fields you configured under Content.
That’s why the Content setup should be completed before moving to Bulk Upload.
How to set up bulk upload for URL-based solutions
URL-based solutions have a simpler setup because there are no page components to configure.
Step 1: Choose the solution
Go to the Solutions page and select the URL-based solution you want to create, such as URL QR Code, Google Maps, or PDF QR Code. Turn on the Bulk Upload switch if it isn’t already enabled.
Step 2: Customize the QR code design
Customize the QR code design if needed.
You can set the colors, logo, frame, custom text on stickers, shapes, and other available design elements.
The QR code design that is active when you upload the completed data file will be applied to all QR codes created from that upload.
You can also modify the QR code design later.
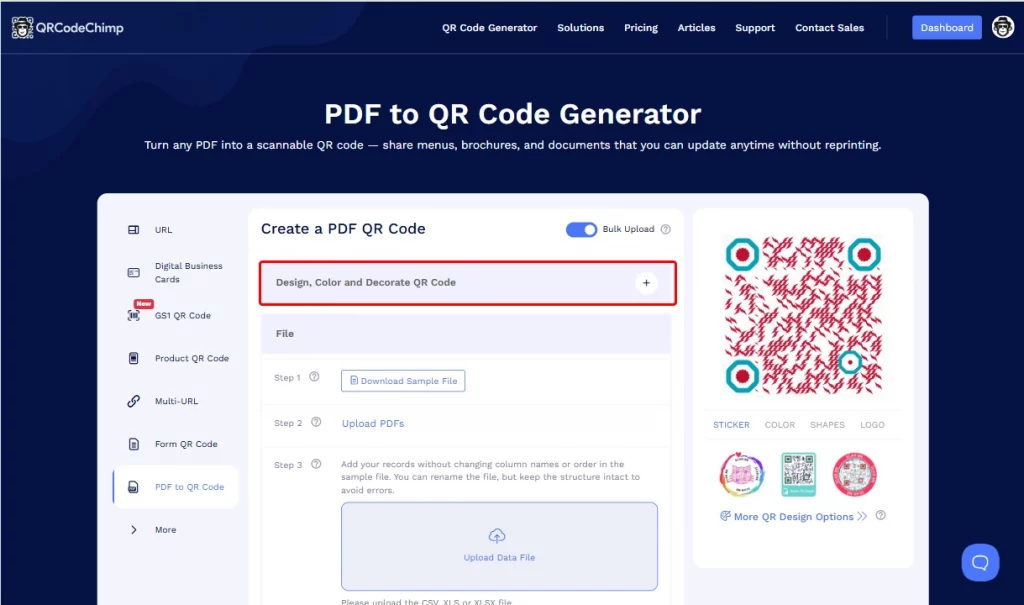
Step 3: Open Bulk Upload and download the sample file
Go to Bulk Upload and click Download Sample File.
QRCodeChimp will prompt you to save the bulk first.
In the popup:
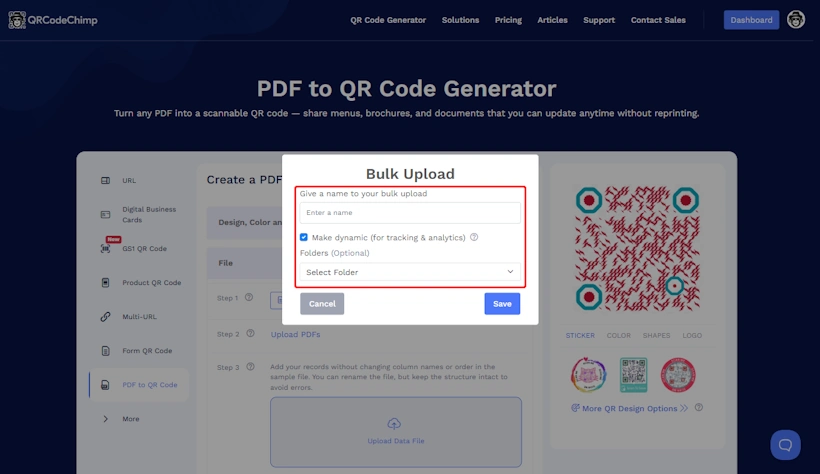
- Enter the bulk name.
- Choose the folder.
- Select static or dynamic if the solution supports both options.
Save the bulk and download the sample file.
Continue with these steps for all solutions
Once you’ve downloaded the sample file, the remaining process is largely the same.
Step 1: Add your data to the sample file
Open the downloaded file and add the information for each QR code in a separate row.
QRCodeChimp supports:
- CSV
- XLS
- XLSX
Complete all required fields and keep the required spreadsheet structure unchanged.
The fields will vary depending on the QR code solution you’re creating.
Using the Page-code field
Some dynamic QR code solutions include a Page-code field.
If your sample file contains this field, each record needs a unique page code.
You can either enter a unique value manually or use AUTO, where supported, to let QRCodeChimp assign one automatically.
Do not leave a required Page-code field blank.
Adding images
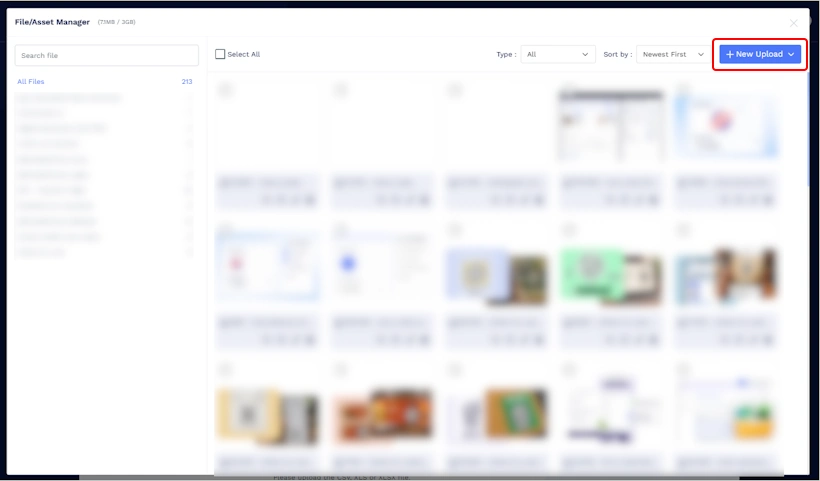
If the sample file requires image URLs, upload the images to the File Manager in QRCodeChimp.
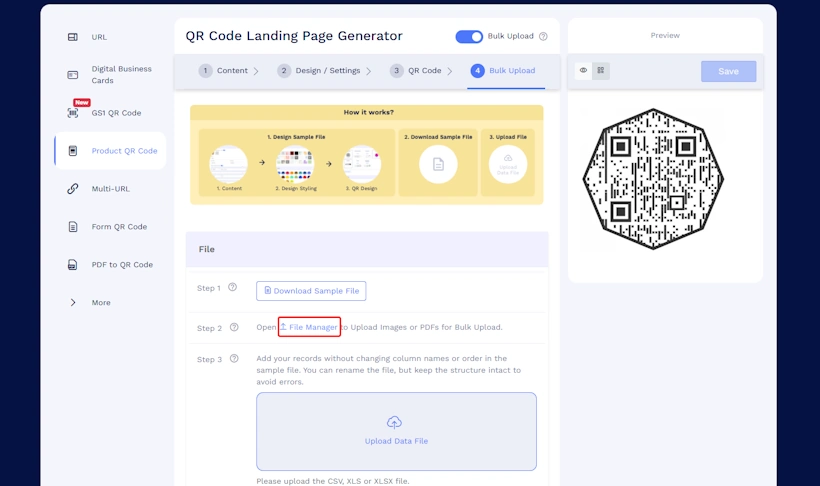
Copy the corresponding image URL and paste it into the appropriate field in the spreadsheet.
Before uploading, review the spreadsheet for missing fields, incorrect URLs, duplicate values, or other data errors.
Step 2: Review the QR code design
Before uploading the completed data file, check the QR code design one more time.
The design currently configured will be applied to all QR codes created from the file you upload.
If you want the entire bulk to use a particular logo, frame, sticker, custom sticker text, color scheme, or other design, finalize it before continuing.
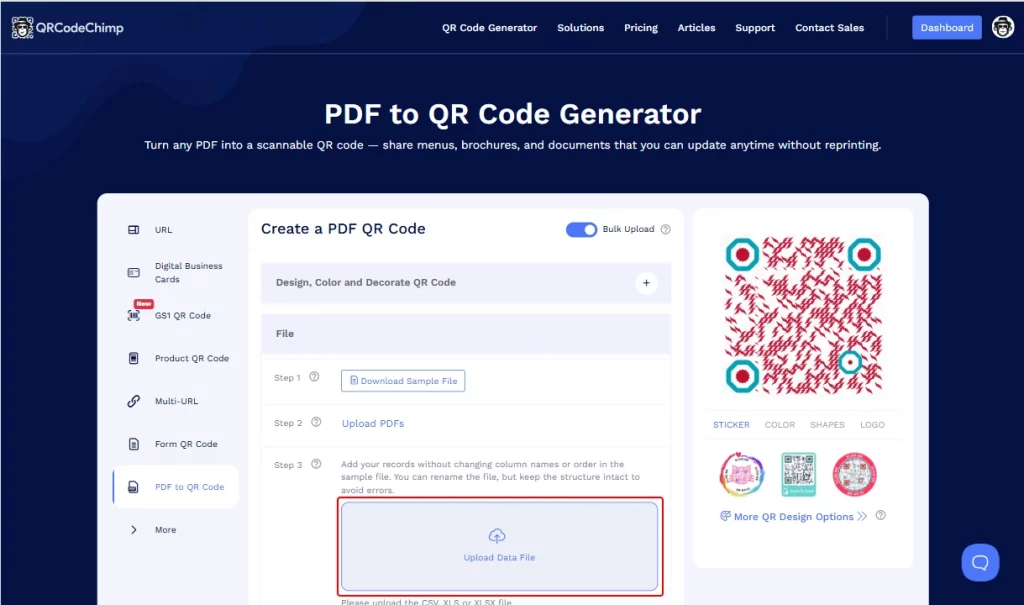
Step 3: Upload the completed file
Return to the saved bulk and upload the completed CSV, XLS, or XLSX file.
Step 4: Review the field mapping
QRCodeChimp displays the field mapping for the uploaded spreadsheet.
Check that each spreadsheet column is mapped to the correct QR code field.
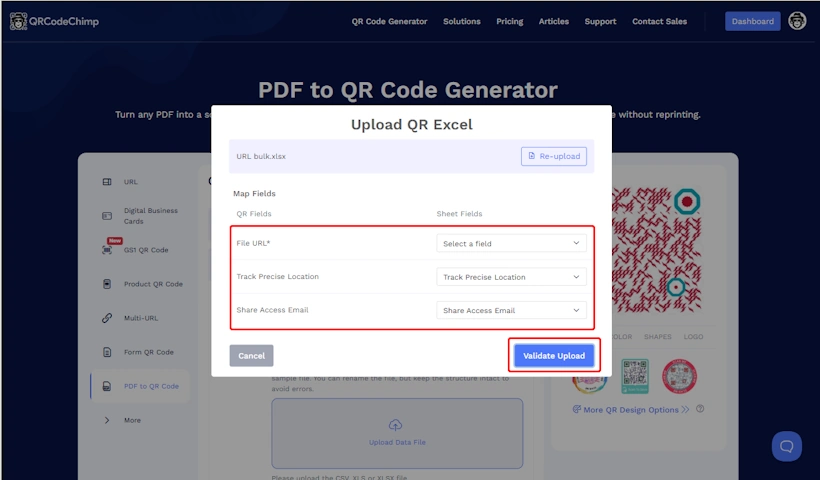
For example, an URL column in your spreadsheet should map to the corresponding URL field.
Correct any mismatches before proceeding.
Step 5: Validate the data
QRCodeChimp validates the spreadsheet before creating the QR codes.
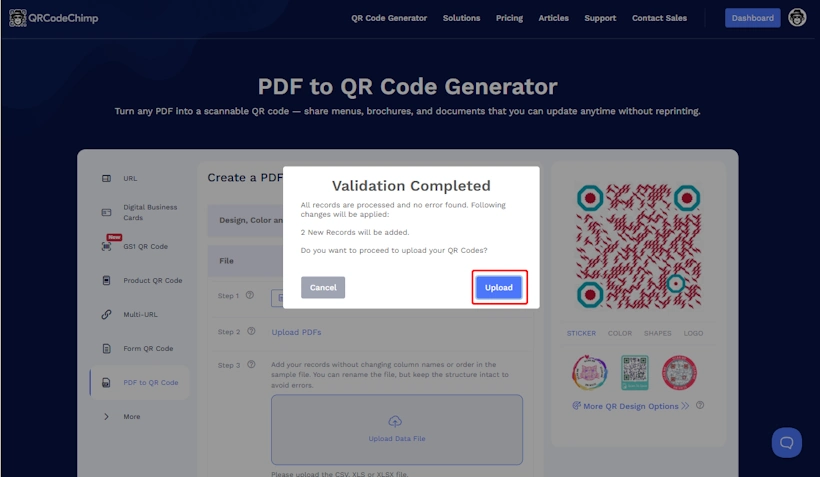
If validation errors appear, review the affected records, correct the data in your spreadsheet, and upload the file again.
Step 6: Complete the bulk upload
Once the data passes validation, complete the upload.
The QR codes will be created using the QR code design that was configured at the time the file was uploaded.
You can access the completed bulk from:
Dashboard > Bulk QR Codes
Depending on the number of QR codes being created, processing may take some time.
How to change the QR code design after creating the bulk
You can change the QR code design even after the bulk has been created.
Change the design for all QR codes in the bulk
To update the QR code design for the entire bulk:
- Go to Dashboard > Bulk QR Codes.
- Find the required bulk.
- Open the Decorate option.
- Make the required changes.
- Save the design.
The updated design will be applied to the QR codes in that bulk.
Customize an individual QR code
You can also customize a specific QR code without changing the design of the other codes.
- Open the required bulk.
- Click View All.
- Find the QR code you want to customize.
- Open the QR code Decorate option.
- Make the changes and save.
How to download QR codes from a bulk
You can download the entire bulk or individual QR codes.
Download the entire bulk
- Go to Dashboard > Bulk QR Codes.
- Find the required bulk.
- Click Download.
- Choose the available QR code size and file format.
- Download the QR codes.
Download an individual QR code
- Open the required bulk.
- Click View All.
- Find the QR code you want to download.
- Click Download.
- Select the required size and available file format.
Before printing or distributing a large number of QR codes, test a few codes to confirm that they scan correctly and open the intended content.
Tips for a successful QRCodeChimp bulk upload
A few checks can make the process smoother:
- For component-based solutions, configure the Content fields before downloading the sample file.
- Always use the sample file generated for your current QR code solution and setup.
- Keep required spreadsheet columns and fields unchanged.
- Complete all mandatory fields.
- Use AUTO where supported if you want QRCodeChimp to assign page codes automatically.
- Check URLs, email addresses, phone numbers, and image URLs before uploading.
- Review the field mapping carefully.
- If the solution supports both static and dynamic QR codes, choose the appropriate option when saving the bulk.
- Finalize the QR code design before uploading the data if you want the same design applied to all QR codes being created.
- Test a few QR codes before printing or distributing them at scale.
For more guidance on preparing your spreadsheet, choosing between static and dynamic QR codes, understanding bulk limits, and troubleshooting errors, read How to Generate QR Codes in Bulk.
Create multiple QR codes with one bulk upload
QRCodeChimp Bulk Upload lets you configure your QR code solution once and create multiple QR codes from a spreadsheet.
For component-based solutions, start by configuring the page fields and settings. Then customize the QR code design, save the bulk, download the sample file, and add your data.
For URL-based solutions, the setup is simpler. Once the sample file is prepared, upload your data, review the mapping, fix any validation errors, and create the entire bulk at once.
The QR code design that is active when you upload the data file will be applied to all QR codes created from that upload, and you can still change the design later if needed.
You may also like
How to Create a Circular QR Code With Logo + Best Practices and Mistakes to Avoid
Learn how to create a circular QR code (round or circle) with your logo, plus best practices, scannability tips, and mistakes to avoid. Free to start on QRCodeChimp.
How to Group Cards in QRCodeChimp Entra ID Setup
Learn to organize digital business cards effectively using QRCodeChimp Entra ID grouping. Simplify card management by group, filter, or all-in-one.
Steps to Integrate Microsoft Entra ID (Azure AD) with QRCodeChimp
Learn how to connect Microsoft Entra ID with QRCodeChimp to automate digital business card creation, improve security, and simplify onboarding.
How to Combine Multiple Links Into One Link
Combine multiple links into one shareable link and QR code. Use it in bios, emails, messages, or print, and update your links anytime.
Most Popular
Contact Sales