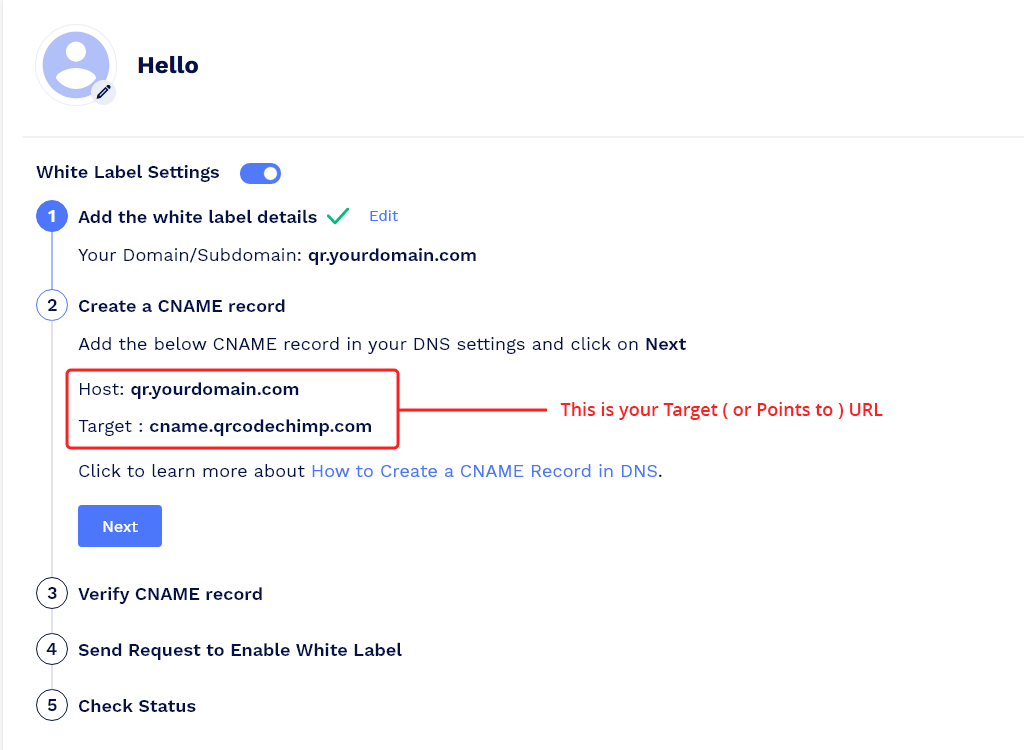
The white labeling feature allows you to change the scanning and landing page URLs. You can use your branded URL (like profile.YourCompany.com) instead of the default URLs to give your users a branded experience. To use a white-label URL, you need to create a CNAME record for it in your domain host’s settings.
Here’s a quick guide for creating a CNAME record in your domain hosts. We have covered AWS, GoDaddy, Google, HostGator, BlueHost, Namecheap, Hetzner, Cloudflare and Shopify in this guide.
- Who needs to create a CNAME record?
- What is a CNAME record?
- How to Add a CNAME Record in AWS?
- How to Add a CNAME Record in GoDaddy?
- How to add a CNAME Record in Google Domain via Google Cloud?
- How to Add a CNAME Record in HostGator?
- How to Add a CNAME Record in Bluehost?
- How to Add a CNAME Record in Namecheap?
- How to Add a CNAME Record in Hetzner?
- How to Add a CNAME Record in Cloudflare?
- How to Add a CNAME Record in Shopify?
- Conclusion
Who needs to create a CNAME record?
When you use a URL containing a different domain name, you need to create a CNAME record for it in the domain host’s settings.
You need to perform this step only once after you add a different domain in the White Labeling section in your Account. Without completing this step, the QR codes will redirect users to an error page.
Adding a CNAME record is quick and easy, but the process can be different for each hosting provider. Follow the steps discussed below to create a CNAME record in your domain’s DNS settings.
What is a CNAME record?
The CNAME (canonical name) record is a resource record used in the Domain Name System (DNS) to map one domain name (alias) to the canonical domain name (primary domain).
If you run multiple services with different subdomains, you must create a CNAME record in your domain DNS settings to point the URL to the primary URL. When you create a CNAME record, the URL in the record becomes an alias for the primary domain.
For example, let’s say your canonical URL (main URL) is “example.com.” The most common example of an alias domain name, in this case, will be “www.example.com.”
If you want “www.example.com” to point to “example.com,” you need to create a CNAME record for “www.example.com” in your DNS settings.
The same goes for other alias URLs, like qr.example.com, m.example.com, web.example.com, app.example.com, etc.
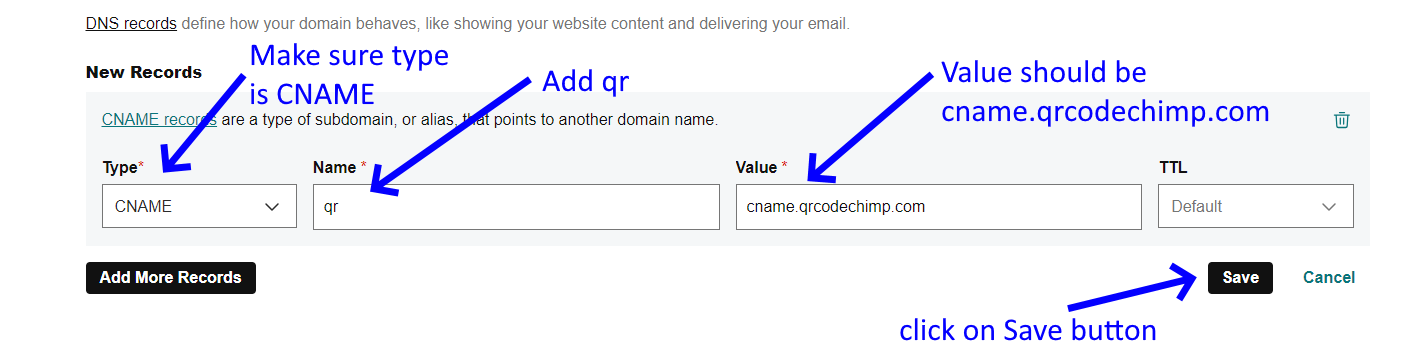
For QRCodeChimp White labeling, you will have to point your subdomain (e.g. qr) to Target (or Value), which is cname.qrcodechimp.com.
How to Add a CNAME Record in AWS?
Follow these steps to create a CNAME record in AWS:
- Log into your AWS account.
- Go to https://console.aws.amazon.com/route53/home?#
- Go to “Registered domains” and click on your domain name.
- Click on “Manage DNS” and then on your domain name. A list of DNS records will appear.
- Click on “Create Record Set.” A new interface will open.
- Fill in the needed fields, including the Name, Type, TTL, Value, and Routing Policy.
Note: Select the “Alias” option as “No.”
- Click on “Create.”
That’s it. A new CNAME record will be added.
How to Add a CNAME Record in GoDaddy?
Follow these steps to add a CNAME (alias) record in GoDaddy:
- Sign in to your GoDaddy account.
- Go to the list of your domain and names and click on the domain name you want to access. The Domain Settings page will open.
- Click on Manage DNS to open the zone file. Now, click on “Add” and set the type to CNAME.
- Enter the CNAME record details, including the Name, Value, and TTL. Then, click on Add Record to save the CNAME record.
That’s it. The CNAME record will be updated in less than 48 hours.
How to add a CNAME Record in Google Domain via Google Cloud?
Here’s how to add a CNAME record for websites hosted on Google Cloud:
- Head to the Cloud Identity Setup Wizard and copy the CNAME record.
- Visit your domain host website and log into your domain’s account.
- Select the domain, and go to the section containing the domain’s DNS records. This section could be called Manage DNS, DNS Management, Name Server Management, etc.
- Find the CNAME records for the domain.
- Paste the CNAME record you copied earlier in the records section.
- Save your changes.
That’s it. Depending on the domain host, the changes could take up to 72 hours to reflect.
How to Add a CNAME Record in HostGator?
Follow these steps to add a CNAME record in Hostgator:
- Log into your Hostgator cPanel.
- Head to Domains, and then click on Zone Editor.
- Click on the “+CNAME Record” button.
- Enter the needed details, including the Name and CNAME.
- Click on “Add a CNAME Record” to save the changes.
That’s it. Your CNAME record will be created.
If you’re a Web Hosting Manager or Plesk user, visit this page for specific steps to add CNAME records.
How to Add a CNAME Record in Bluehost?
Follow these steps to create a CNAME record in Bluehost:
- Log into your Bluehost hosting account.
- For the Legacy interface, go to the Domains section and click on DNS Zone Editor. For the Rock interface, go to Domains and click on Zone Editor.
- Select your domain name. Then, scroll down and click on Add DNS Record.
- Enter the record name in the Host Record field.
- Click on the Type drop-down menu and click on CNAME.
- Enter the URL that the CNAME record should point to in the “Points To” field.
- Update the other fields as needed or leave them to default.
- Click on Add Record to save the changes.
That’s all. The new CNAME record will be added.
How to Add a CNAME Record in Namecheap?
Follow these steps to create a CNAME record in Namecheap:
- Sign in to your Namecheap account.
- Head to Domain List from the left side menu. Find the domain name and click on the “Manage” button next to it.
- Go to Advanced DNS and click on Add New Record.
- Select the Type as CNAME Record and fill in the Host, Value, and TTL fields.
- Click on Save All Changes.
That’s it. The new CNAME Record will be created.
How to Add a CNAME Record in Hetzner?
Follow these steps to add a CNAME record in Hetzner:
- Log into your Hetzner account.
- Select the DNS zone for which you want to create a CNAME record.
- Click on Records and select the type CNAME from the dropdown menu.
- Fill in the needed fields, including the Host, Alias, and TTL.
- Click on “Add record” to create the record.
The newly created record will be visible in the record list.
How to Add a CNAME Record in Cloudflare?
Follow these steps to create a CNAME record in Cloudflare:
- Log into your Cloudflare dashboard and select your account and zone.
- Navigate to DNS > Records and select Add record.
- Select CNAME as the record type and fill in the CNAME record details.
- Click on Save to save the record.
The new CNAME record will appear in the DNS records list.
How to Add a CNAME Record in Shopify?
Follow these steps to create a CNAME record in Cloudflare:
- Log into your Shopify dashboard.
- Select your domain from the left menu.
- Head to the DNS settings page.
- Click on the “Add custom record” button.
- Click on the “CNAME record”
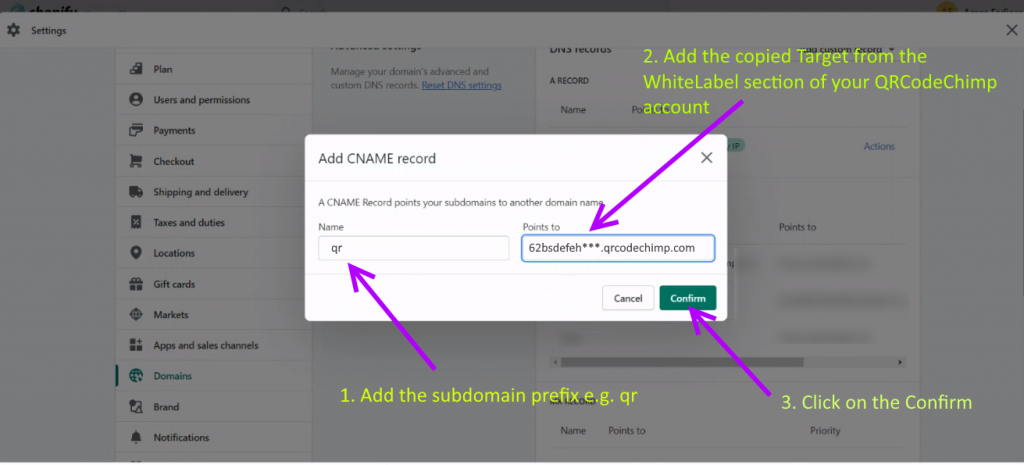
- Enter the “qr” under Name and your Target URL under “Points to” as explained in the pictures below
- Click on the Confirm button
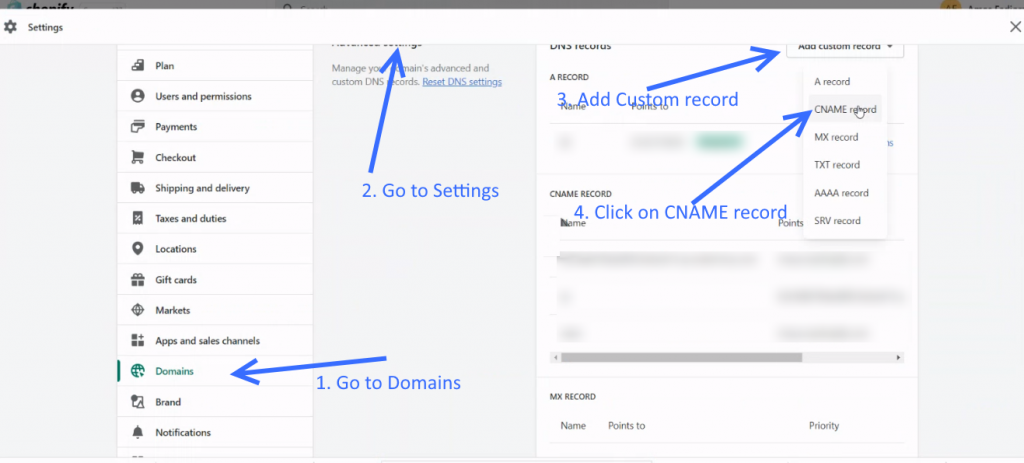
The new CNAME record will appear in the DNS records list.
Conclusion
Creating a CNAME record is different for each domain hosting provider, but the process is similar overall. If the steps for your domain host aren’t mentioned above, follow these general steps: Sign in to your domain host provider, open your domain’s settings, and look for DNS management settings. There, you’ll find the option for creating DNS records.
Need more help? Feel free to contact us at support@qrcodechimp.com.
You may also like
How To Create an RSVP QR Code for Any Event
Create an RSVP QR code using a customizable form, Event Ticket RSVP, Google Forms, or WhatsApp. Compare four methods and follow the steps.
How to Create, Design, and Share Event Ticket QR Codes
Learn how to create Event Ticket QR Codes individually, in bulk, or from form submissions, customize their design, and share them privately.
QR Code Printing Requirements: What to Check Before the Print Run
Learn how to print QR codes that scan reliably. Check size, resolution, format, contrast, quiet zone, material, placement, and proof testing.
Dynamic QR Codes: How They Work and When to Use Them
A dynamic QR code lets you change where a printed code points, without reprinting it. Here is how dynamic QR codes work, what they track, and when to use one.
Most Popular
Contact Sales
