In lead generation, timing is everything. If you wait too long to respond to a form submission, you risk losing a valuable prospect. With SMS integration in forms, QRCodeChimp ensures you’re instantly notified the moment someone fills out your form, so you can follow up fast, close deals quicker, and never miss an opportunity.
In this guide, you’ll learn how to set up SMS alerts at both the account and form levels and take your lead response game to the next level.
Let’s get started!
How Does SMS Integration Work with QRCodeChimp Forms?
You can connect QRCodeChimp forms to your third-party SMS API to automatically send text messages when someone submits a form. This is done by integrating a direct SMS API, such as Twilio, Nexmo, or others, allowing real-time communication without relying on third-party automation tools.
Here’s how it works:
You create a form in QRCodeChimp and integrate your SMS API with it.
A user scans the QR code, fills out the form, and submits it.
The form submission triggers a call to your SMS service API.
The SMS service sends a message, such as a confirmation, alert, or custom response, based on the submitted data.
Although QRCodeChimp doesn’t send SMS messages directly, it supports direct integration with third-party SMS APIs. This makes it easy to automate real-time communication like follow-ups, alerts, or user confirmations, right after someone submits your form
SMS API Integration Options
SMS API integration can be configured in two ways – at the account level or at the individual form level, giving you the flexibility to manage notifications based on your campaign needs.
1. Account-Level Integration
When SMS integration is set up at the account level, your third-party API settings are automatically applied to all newly created form QR codes. This is ideal for businesses that want SMS alerts enabled by default across multiple campaigns.
- All new form QR codes inherit the account-level SMS configuration automatically.
- You can customize each form’s settings individually—such as editing the SMS message—without affecting the global account-level setup.
- SMS notifications can be turned off for specific forms if not required.
2. Form-Level Integration
Alternatively, you can configure SMS API integration for selected forms only. This allows you to enable SMS notifications for specific campaigns while leaving others without alerts.
This method provides greater control, especially when different campaigns have different notification requirements.
📌Important: QRCodeChimp supports integration with third-party SMS APIs, which are readily available from various providers. You’ll need to maintain an active subscription with the provider to keep receiving SMS notifications for form submissions.
Step-by-step instructions for SMS integration in forms on QRCodeChimp
Here is the detailed step-by-step process for setting up SMS integration at the account and individual form levels on QRCodeChimp.
Method 1: SMS API integration at the account level
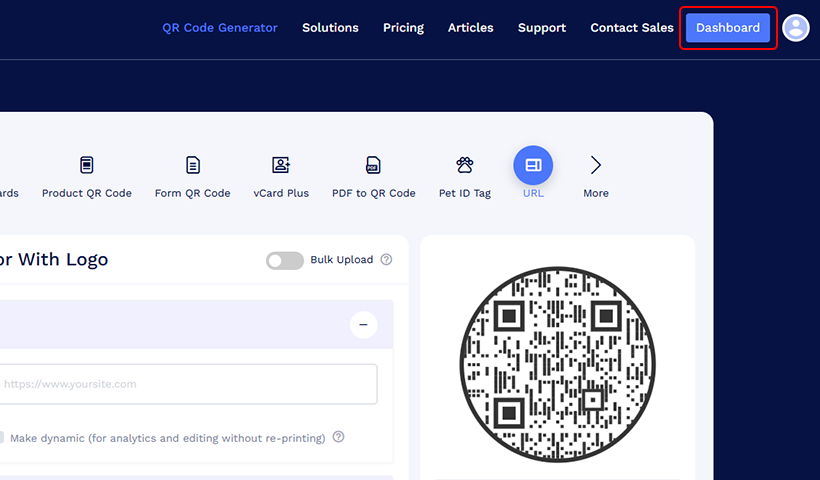
Step 1: Go to Dashboard
Log in to QRCodeChimp and navigate to ‘Dashboard.’
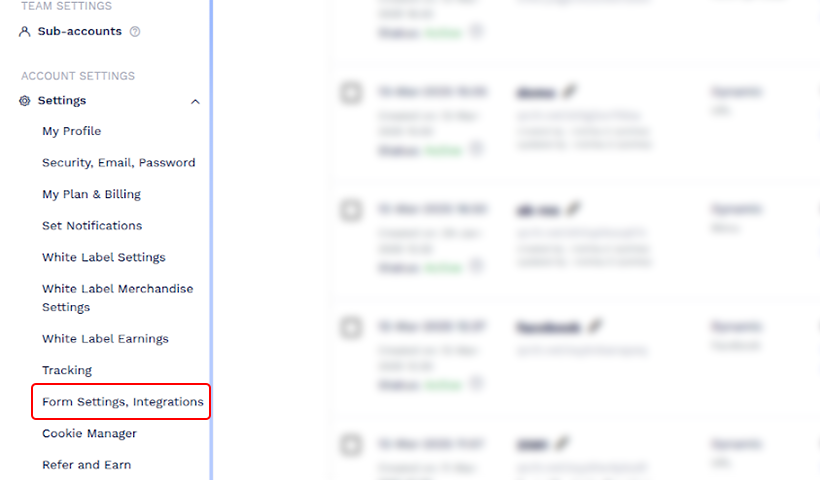
Step 2: Go to ‘Form Settings, Integrations’.
Find the ‘Form Settings, Integrations’ option under Account Settings on the sidebar and click it.
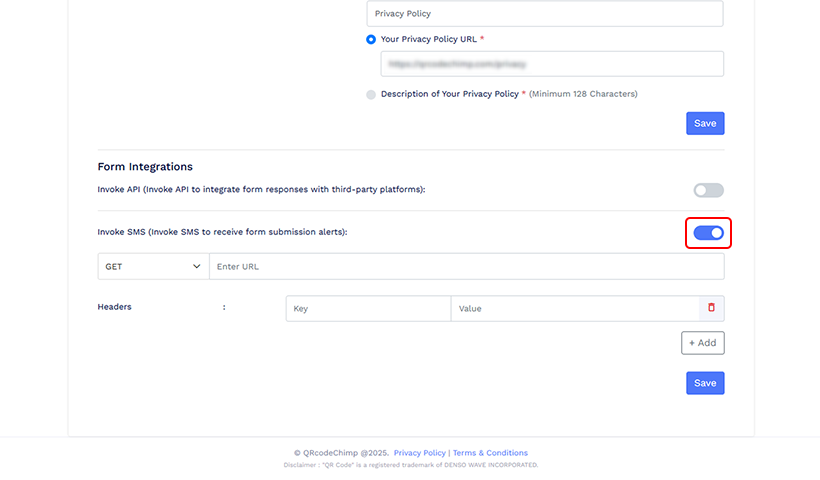
Step 3: Enable Invoke SMS
Enable ‘Invoke SMS’ by turning on the toggle.
Step 4: Integrating SMS API
Select the required HTTP method (POST or GET) and paste your SMS API URL. POST is used for real-time, customizable requests, while GET retrieves pre-configured data. And paste your SMS API URL.
Note: Your SMS API service provider will provide the HTTP method that you need to use.
⏩ If your API uses the POST method
- Select
POSTas the request method and enter your SMS API URL. - Fill in the Headers section based on your SMS provider’s requirements.
- Choose the Content Type: Select either
application/jsonorapplication/x-www-form-urlencoded, as specified by your SMS service provider. - Enter Parameters in the Body field, including the sender, receiver, and message content—formatted according to your API’s syntax.
- Click Save to store your API configuration.
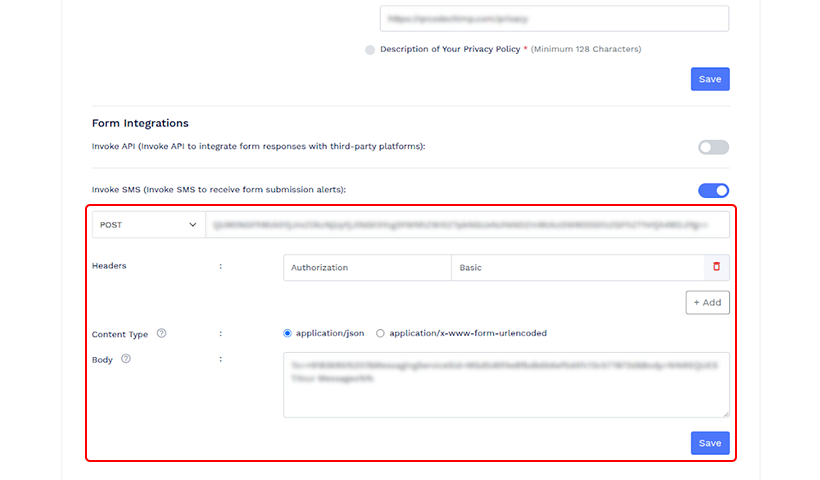
Note: Under POST, you’ll get a dynamic API, which allows you to use dynamic body text (syntax) and content type to send data in the body to the servers.
⏩ If your API uses the GET method
- Select
GETas the request method and enter your SMS API URL. - In the Headers section, add the required Key-Value pairs as specified by your SMS service provider.
- Click Save to store your API configuration.
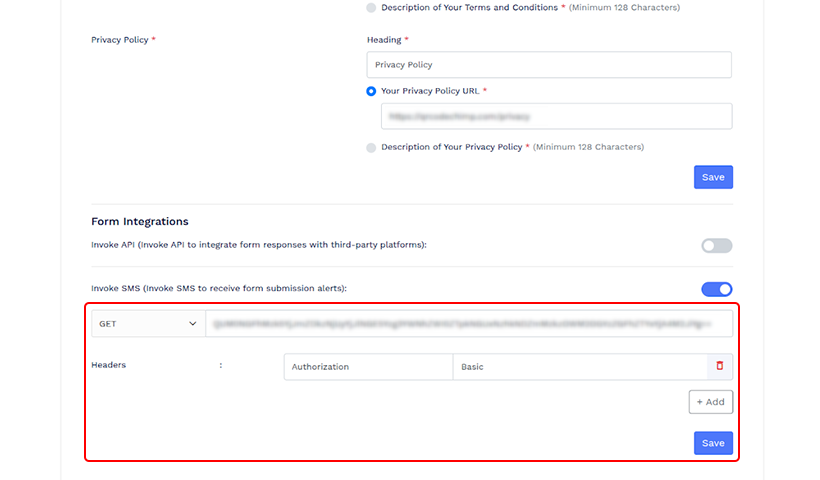
Note: The GET method has a static API (pre-generated information). The ‘Key’ and ‘Value’ are the sources for authenticating the API.
Step 5: Click on Save
Click ‘Save’ to save the SMS API integration for forms. Now, you’ve completed setting up SMS notification at the account level, and you’ll receive an SMS alert for every form submission.
📌Heads up: Modifying SMS integration settings at the account level won’t impact forms that already have SMS invocation enabled. You must manually reapply the new settings to each such form.
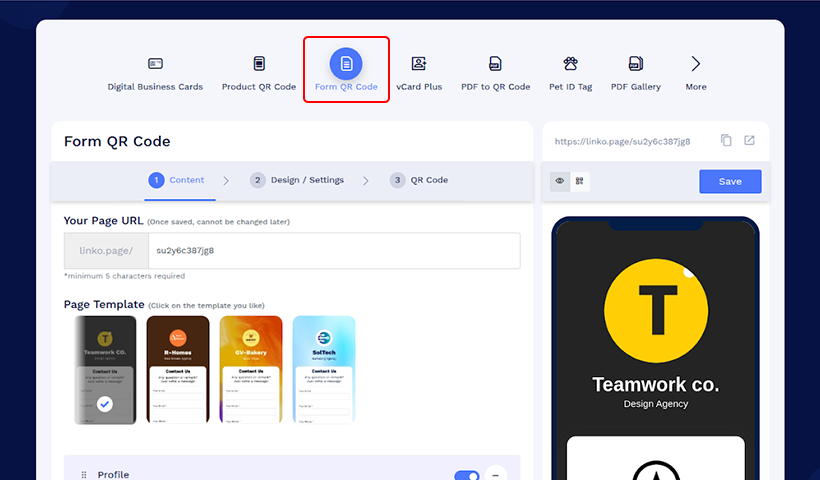
Method 2: SMS API integration at the form level
To integrate SMS at the form level, log in to QRCodeChimp and navigate to the form QR code solution.
Step 1: Create a form
Choose a form page from templates or create a new form by adding relevant questions/labels.
Read on: A complete guide to generating a form QR code for a detailed explanation of each step.
Step 2: Add a terms and privacy policy
Set the terms and privacy policy.
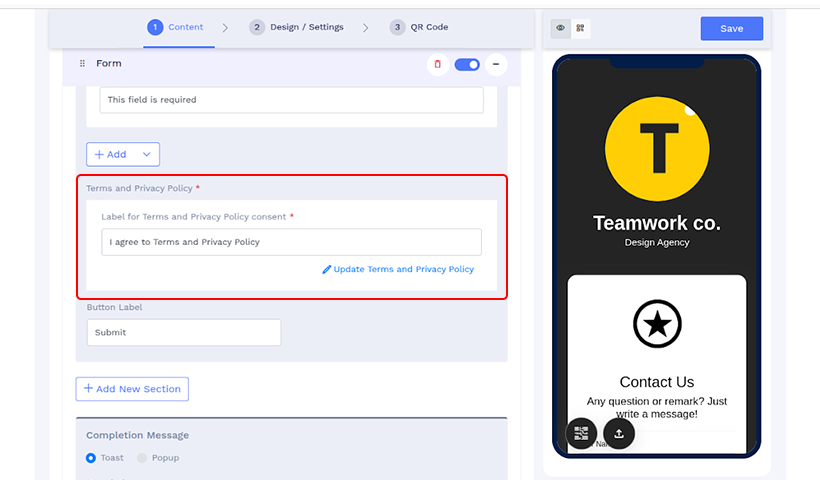
Note: If a privacy policy has already been added at the account level, those settings will be carried over automatically and appear pre-filled in the Terms and Privacy Policy section.
Step 3: Set up Invoke SMS under ‘Form Integration Settings’
Make sure the ‘Invoke SMS’ toggle is turned on. Follow the instructions mentioned in Step 4 of SMS API integration at the account level.
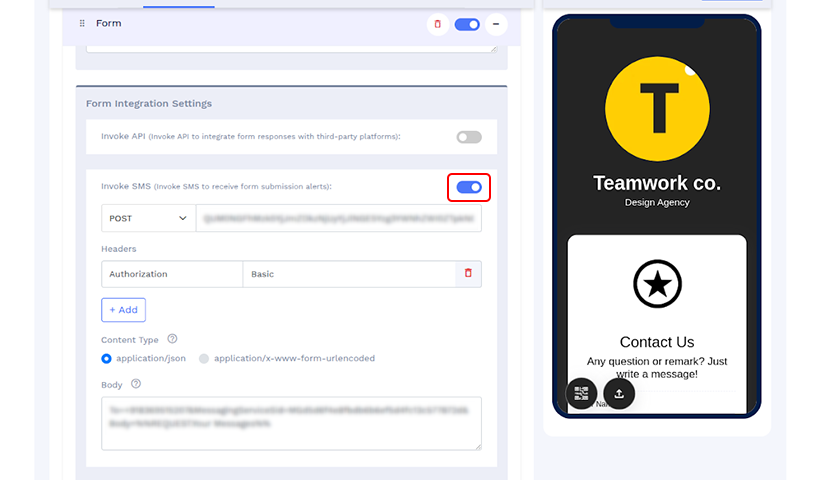
Note: The information will be pre-filled if you have already completed ‘Form Integration Settings’ at the account level.
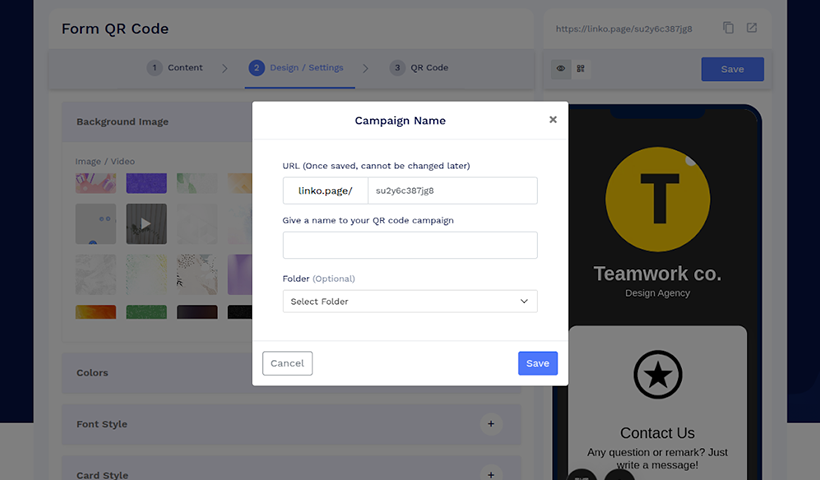
Step 4: Save your Form
Give a campaign name and choose a folder to save the form QR code.
Example: Integrating Twilio SMS API with QRCodeChimp
Twilio is one of the most popular SMS API providers, so we’ll use it as an example to demonstrate API integration at the QR code level.
The same configuration steps can also be applied for Account-level SMS API integration.

1. Select POST from the method drop-down and enter Twilio’s Messaging API URL. The URL format is:
https://api.twilio.com/2010-04-01/Accounts/[Account SID]/Messages.jsonReplace [Account SID] with your actual Account SID from your Twilio dashboard.
Note: Please check Twilio documentation for the latest API URL.
2. In the Headers section, enter 'Authorization' in the Key field.
3. Log in to your Twilio account at console.twilio.com and locate your Account SID and Auth Token.
4. Concatenate the two values in the format:AccountSID:AuthToken
(e.g., ACxxxxxxxxxxxxxxxxx:your_auth_token)
5. Convert the concatenated string to Base64 format using any Base64 encoder.
6. In the Value field for the Authorization header, type Basic (with a space) followed by your Base64 string.
Your header should look like:Authorization: Basic BASE64_ENCODED_STRING

7. In the Content Type section, select:'application/x-www-form-urlencoded' as required by Twilio.
8. Configure The Body field
Twilio API requires the following parameters:
- To – The recipient’s mobile number.
- From – The sender’s Twilio phone number.
- MessagingServiceSid – Required if From is not specified. You can find this ID in your Twilio account.
- Body – The content of the SMS message you want to send.
👉 Here’s an example of Twilio’s syntax used in the Body field under the Invoke SMS section:
MessagingServiceSid=MGa107bd83b8d554da6031f274xxxxxxxx&To=+9180078xxxxx&Body=You have received an enquiry from %%FORM.Your Name%%, %%FORM.Your Phone%%
Breakdown of each element/parameter of the above example
Each parameter should be separated by ‘&’.
➡️ Add the recipient’s phone number
If you, as the creator/owner of the QR code form, want to receive form submission notifications, provide your phone number. To do so, you must enter your mobile number after ‘To=’. For example, if you’re a resident of the US and your number is +19XXXXXXX10, do this ‘To=+19XXXXXXX10’.
➡️ Add sender’s phone number
You need to use your Twilio phone number in this parameter. If your Twilio phone number is +18XXXXXXX36, add this – ‘From=+18XXXXXXX36’.
➡️ Or add service ID
If you are not using a Twilio phone number in the From parameter, you must include your MessagingServiceSid instead. You can find this ID in your Twilio console.
MessagingServiceSid=MGa107bd83b8d554da6031f274xxxxxxxx
➡️ Body/message(Message content)
The ‘Body’ parameter contains the text message content that will be sent to the recipient.
If you want to include user-submitted form data in the SMS, you must use the exact field labels as variables in the following format:
%%FORM.YOUR_LABEL_NAME%%
Make sure each variable is wrapped with double percent signs (%%) at the beginning and end.
Example:

Body=You have received an enquiry from %%FORM.Your Name%%, %%FORM.Your Phone%%.
⚠ Important: Variable names are case-sensitive. For example, if the label in your form is Your Name, using the variable as %%FORM.Your name%% (with a lowercase “n”) will not work. The system will only fetch the value if the variable exactly matches the label, including case.
So if one user entered the information as shown in the image above.
The recipient will receive an SMS as below.
“You have received an enquiry from Jessica Hernandez, 954-293-1885.”

Note: Remember to keep the message short, as most SMS service providers allow 160 characters.
How do you view or export form responses on QRCodeChimp?
On QRCodeChimp, you can view or export form responses collectively and individually. Read this article to learn how to download your collected form responses.
Conclusion
Enabling SMS notifications for form QR codes can streamline lead generation without missing a single opportunity. You can use the feature for target campaigns using a form-level option or automatically integrate it for all forms using an account-level method. With instant notification, businesses can speed up their follow-up processes and convert them from prospects into customers.
Frequently asked questions
Who will receive the SMS notification?
After the form submission, an SMS notification will come to the phone number integrated in the API or the syntax in the body. Also, users who submit the form can receive the notification.
What information should be included in the form for lead generation?
Name, email, and phone number are vital information that should be collected when using forms for lead generation. Include a “message” section in the form to know the user’s queries or needs.
You may also like
Approval-Based Digital Business Cards: A Smarter Workflow for HR Teams
Discover how approval-based digital business cards help HR teams ensure branding consistency, prevent misuse, and manage employee cards at scale.
Best Digital Business Card Makers for 2026 – Secure, Enterprise, and Scalable
Discover the best digital business card platforms for 2026. Compare the top 8 solutions with features like branding, CRM integration, analytics, and enterprise-grade security to find the right fit for your team or business.
How a Consumer Electronics Brand Fixed Its Post-Purchase Gap Using Form QR Codes
Learn how a consumer electronics brand improved warranty registration and post-purchase engagement using Form QR Codes. Discover the strategy, implementation, and results.
QRCodeChimp’s Analytics Dashboard: A Step-by-step Guide
A guide to QRCodeChimp’s analytics dashboard. Leverage the unique advanced features and metrics to optimize your marketing campaigns.
Most Popular
Contact Sales
