Picture this: someone scans your QR code at a trade show, submits their details, and before they leave the booth, the lead is already sitting in your Monday.com board, tagged and ready for follow-up. No spreadsheets, no copy‑paste, zero delay. That is the promise of a smooth Monday.com and QRCodeChimp Integration.
As a QRCodeChimp user, you already capture leads through forms. Yet without an automatic hand‑off to Monday.com, valuable prospects can slip through the cracks or pile up in email notifications you never open. Automating that transfer means:
- Instant lead visibility for sales and marketing
- Consistent data quality because every form field maps to the right column
- Time saved on manual entry and error fixing
In the next few minutes, you will learn exactly how to link your QRCodeChimp lead form to Monday.com using a simple Zapier workflow:
- Set up a webhook trigger in Zapier.
- Connect your QRCodeChimp form to that webhook.
- Create a Monday.com action that adds each new lead as an item.
- Map fields, test the flow, and hit Publish.
What you need before starting
Think of this integration as setting up a production line: each station must be ready before you hit the green button. Make sure you have the following pieces in place.
Your essential accounts
| Tool | Why do you need it | Quick check |
|---|---|---|
| QRCodeChimp account | Hosts your lead‑capture form and generates the QR codes you share. | Can you log in and edit forms? |
| Monday.com account | Receives new leads as items, allowing your team to act immediately. | Do you have a board ready for leads? |
| Zapier access | Acts as the conveyor belt that moves data from QRCodeChimp to Monday.com. | Is your Zapier plan active? |
A ready‑to‑send lead form
- Form built in QRCodeChimp with the fields you want (name, email, phone, etc.).
- Webhook/API trigger enabled, allowing the form to push data as soon as someone submits.
Once these pieces are ready, the rest of this Monday.com and QRCodeChimp Integration guide becomes a ten‑minute job instead of a frustrating afternoon.
How to find your Monday.com API token
- Sign in to Monday.com in your browser.
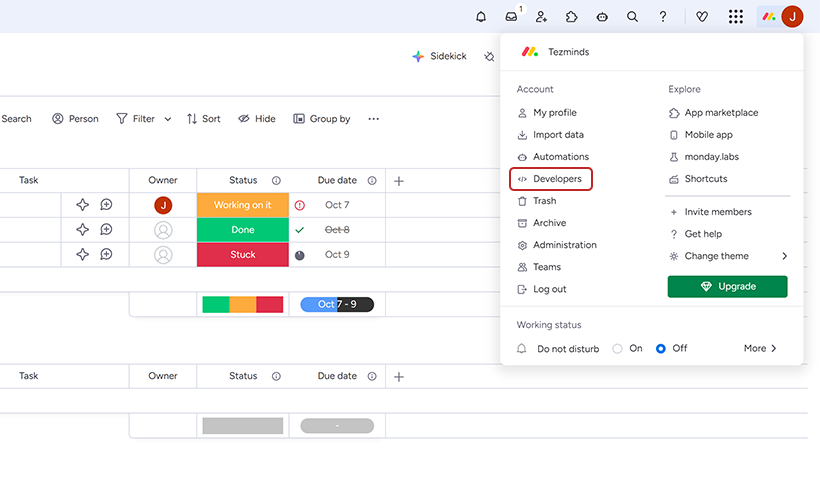
2. Click your profile avatar in the upper‑right corner.
3. Select Developers from the menu.
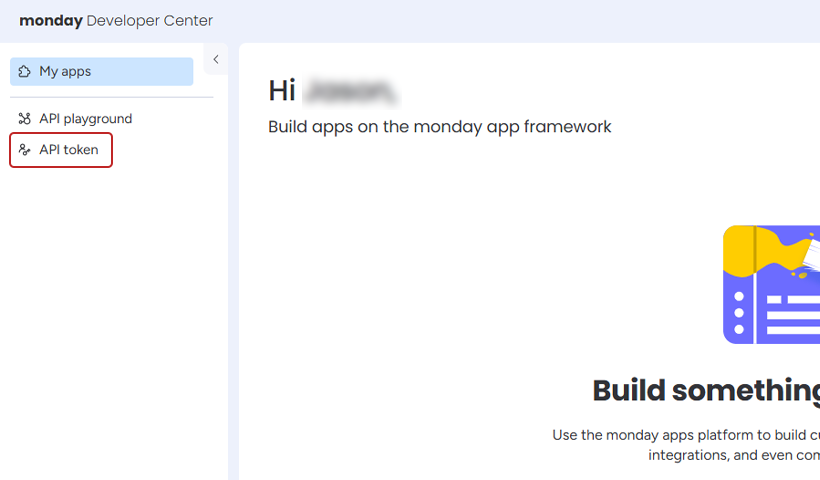
4. In the left panel, select API tokens.
5. Copy your API v2 token and store it in a secure location.
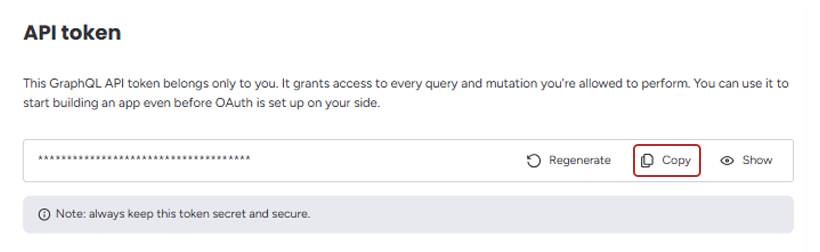
6. Paste the token into Zapier when prompted to connect your account.
With the token in place, Zapier can send every new QRCodeChimp lead straight to the right Monday.com board.
How to connect QRCodeChimp to Monday.com: A detailed walkthrough
This section provides a meticulous, step-by-step guide to building the automated bridge between QRCodeChimp and Monday.com. The process is divided into three logical parts: configuring the form in QRCodeChimp to send data, creating a Zapier trigger to receive that data, and setting up a Monday.com action to process it.
Part 1: Configuring your form in QRCodeChimp to send data
QRCodeChimp allows you to direct form submissions to an external service in two different locations. Choose whichever location fits your workflow; both end up at the same result: turning on the Invoke API switch.
| Where you turn it on | When to use it | Navigation path |
|---|---|---|
| Account-level (Method 1) | Ideal when every form in the account should push data to the same endpoint. | Dashboard → Account Settings → Form Settings, Integrations → toggle Invoke API1 |
| Individual form (Method 2) | Perfect when only one specific form needs integration or when different forms must call different endpoints. | Dashboard → create or edit a Form QR Code (or any QR code with a form component) → scroll to Form Integration → toggle Invoke API1 |
Once the toggle is enabled (in either location):
- Select Post, optional Headers, and the Body appear.
- Leave this tab open; Zapier will provide the webhook URL that you paste into the API URL in the next section of the guide.
(Note: Add or remove key-value pairs to match your form fields.)
Part 2: Creating the Zapier trigger to catch your lead data
- In a new browser tab, log in to the Zapier account and click the Create Zap button.
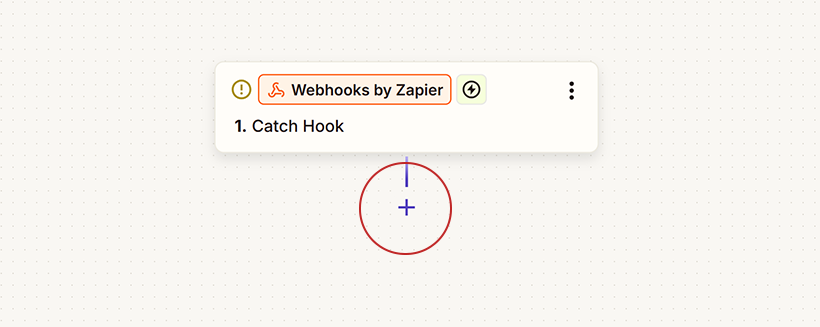
- In the Trigger configuration step, search for and select Webhooks.
- For the Trigger Event, choose Catch Hook from the dropdown menu and click Continue. This instructs Zapier to generate a unique URL that will listen for incoming data requests.
- Zapier will now present a Custom Webhook URL. Click the Copy button to copy this URL to the clipboard.
- Return to the open QRCodeChimp browser tab. Paste the copied URL into the API URL field.
- Set the option to POST. This method is used for sending data to a server.
- In the Body section, it is necessary to map the form fields to the data that will be sent. The format must be Key=Value pairs separated by ampersands (&). For example: Name=%%REQUEST.Name%%&Email=%%REQUEST.Email%%&Phone=%%REQUEST.Phone%%.
The %%REQUEST.FieldName%% syntax dynamically pulls the value from the corresponding field in the submitted form. - Ensure the field names used here exactly match the labels in the QRCodeChimp form. After configuring the body, click Save.
- Crucial Step: To properly test the connection, it is essential to send sample data to the webhook. Open the live QR code form (by scanning the code or using its URL) and submit a test entry with realistic sample data (e.g., Name: “Test Lead,” Email: “test@example.com”). This action sends a real data packet to the webhook for Zapier to analyze.
- Go back to the Zapier editor and click the Test trigger button. Zapier will search for the data sent in the previous step.
A success message will appear, displaying the sample data it “caught” from the form submission. This confirms that the connection between QRCodeChimp and Zapier is functioning correctly.
Part 3: Setting up the Monday.com action to create a new lead
With Zapier now successfully capturing lead data, the final step is to configure the “Action” on what Zapier does with that data. The objective is to create a new item in a specified Monday.com board for every lead captured.
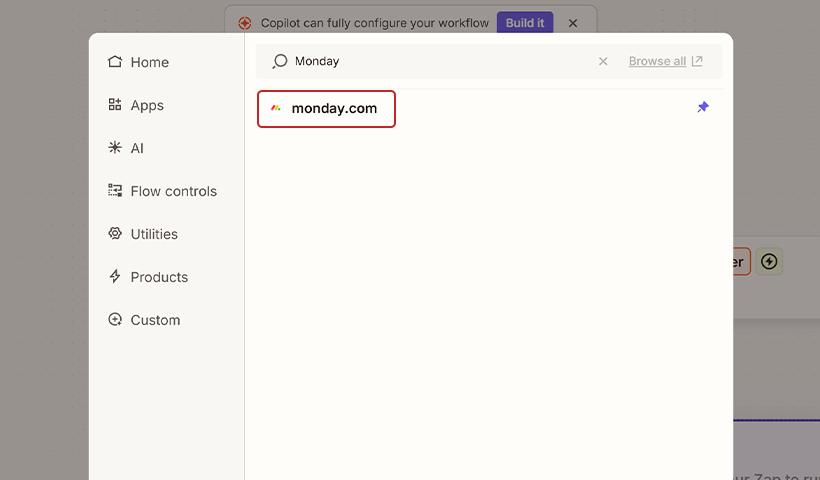
- In the Zapier editor, directly below the configured trigger, click to add an Action step.
2. Search for and select Monday.com from the list of available applications.
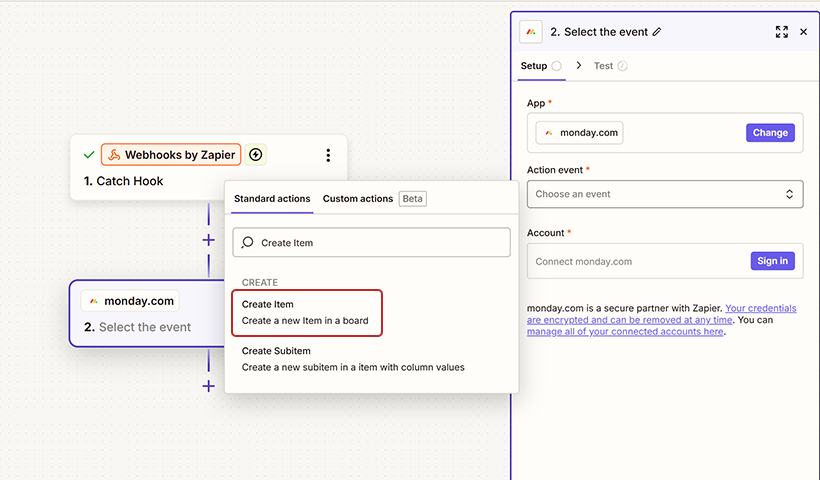
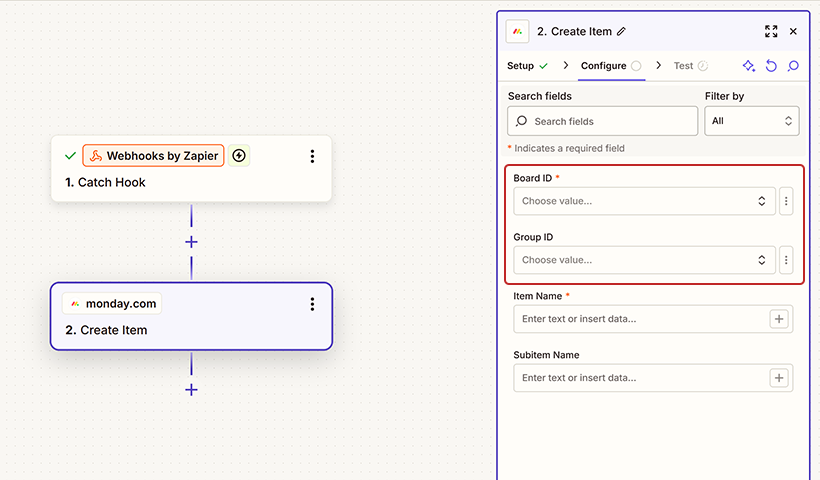
3. For the Action Event, choose Create Item and click Continue. This is the most common and direct action for adding new leads or tasks to a board.
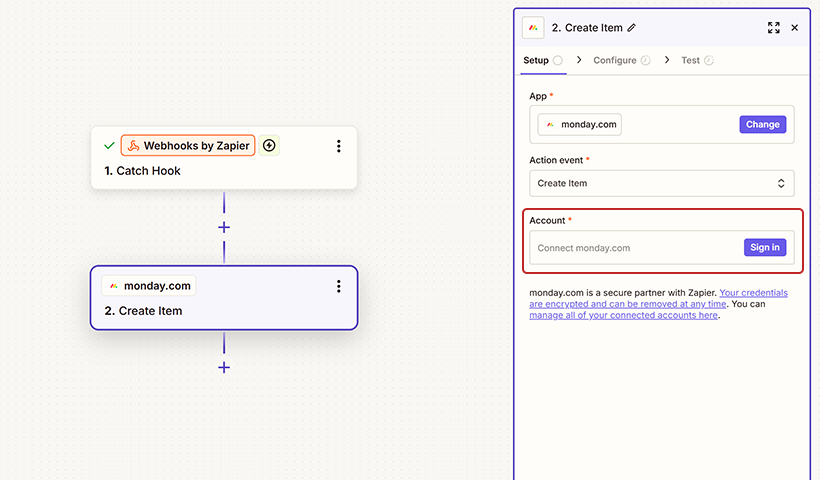
4. Zapier will prompt you to connect to a Monday.com account. Click Sign in and follow the on-screen instructions. This step will require an API v2 Token from Monday.com.
5. To find the Monday.com API key, follow these steps: In the Monday.com interface, click on the profile picture (avatar) located in the bottom-left corner of the screen, then select “Developers.” Inside the Developer Center, navigate to the Developer section on the left and click on My Access Tokens. The Personal API Token will be displayed; click to copy it and then paste it into the authentication window provided by Zapier.
6. After a successful connection, the action needs to be configured. Use the dropdown menus to select the specific Board and Group ID within that board where new leads should be created.
7. Mapping Fields: This is the most critical step in setting up the action. Zapier will display a list of fields corresponding to the columns on the selected Monday.com board. The task is to map the data received from the webhook trigger to these destination columns. Click into each field and select the appropriate data element from the “Catch Hook” trigger data presented in the dropdown.
The Zapier mapping interface can be intimidating for new users. The table below provides a clear example of how to connect the data captured by the webhook to the corresponding columns in Monday.com, demystifying the process.
| Monday.com Column | Zapier Data Field (from Webhook) | Notes |
|---|---|---|
| Item Name | 1. Name: Test Lead | This maps the lead’s name to the primary item name in Monday.com. |
| 1. Email: test@example.com | Maps the email field from your form to your “Email” column. | |
| Phone Number | 1. Phone: 555-867-5309 | Maps the phone field from your form to your “Phone” column. |
| Lead Source | (Type in static text: “QRCodeChimp Form”) | This is a pro-tip. A static value can be entered to automatically tag the source of every lead generated by this Zap, facilitating campaign tracking. |
| Status | (Select default status from dropdown: “New Lead”) | This ensures every new lead enters the pipeline with the correct initial status, ready for the first action. |
Export to Sheets
- After all necessary fields are mapped, click Continue.
- Zapier will present a summary of the action to be performed. Click Test action. This will command Zapier to send the sample data to Monday.com based on the mapping configuration.
- Navigate to the designated Monday.com board. A new item should appear, populated with the test data and perfectly mapped to the correct columns.
- If the test is successful and the data appears as expected, return to the Zapier editor and click Publish Zap. The automation is now live and will run automatically for every new form submission.
Best practices for managing your new leads in Monday.com
Setting up the integration is the first step toward a more efficient system. To fully leverage its power, it is essential to optimize the Monday.com environment for lead management. The following best practices transform a simple data repository into a strategic asset for driving sales and growth.
Customize your board to build a visual sales pipeline
Do not stop at simply collecting names and emails. The true power of Monday.com lies in its ability to be customized. Transform the board into a visual representation of the sales funnel by creating status columns with clear, sequential labels, such as “New Lead,” “Contacted,” “Meeting Scheduled,” “Proposal Sent,” and “Won/Lost.” This configuration allows for a clear visualization of “the journey of prospective customers through your sales pipeline,” helping the team to better “prioritize and strategize” their efforts. This creates the “visual, drag-and-drop sales pipeline” that makes modern lead management so effective and intuitive.
Use Monday.com automations for instant handoff and follow-up
While Zapier is responsible for getting the data into Monday.com, the platform’s powerful native automations can be used to trigger the next steps in the process, creating a powerful chain reaction. Set up automation rules within Monday.com, such as: “When an item is created, notify the #sales-leads channel in Slack” or “When status changes to New Lead, assign as the owner.” This directly implements a clear “lead handoff protocol,” a critical practice that ensures no high-value lead “falls through the cracks” and that the transition from marketing to sales is seamless.
Implement a simple lead scoring and nurturing system
It is a well-understood principle that not all leads are created equal. As lead volume increases, a system for prioritization becomes necessary. Introduce the concepts of lead scoring and nurturing directly within the Monday.com board. Add a “Lead Score” number column and use it to assign points based on the data submitted in the form (e.g., a higher score for a lead from a target industry or a larger company size). This score can then be used to prioritize follow-up efforts. Furthermore, add a “Next Follow-Up Date” column and use automations to set reminders for the assigned sales representative, ensuring that all leads are consistently nurtured through the sales funnel until they are ready to convert.
Regularly review and optimize your workflow
A lead management process should be a dynamic system, not a static tool that is set up once and forgotten. It requires regular monitoring and optimization. Use Monday.com’s dashboard and reporting capabilities to analyze lead data over time. Ask critical questions to refine strategy: Which QR code campaigns are generating the most qualified leads? What is the average time from lead creation to first contact? How many leads convert from each stage of the pipeline? This commitment to “data-driven decisions” and “real-time reporting” allows for the continuous identification of “areas for enhancement,” ensuring the entire process becomes more efficient and effective over time.
Wrapping up
With your Monday.com and QRCodeChimp integration live, every scan‑to‑form submission becomes an item on your board without you lifting a finger. No manual entry, no missed leads, no messy spreadsheets. Your team sees new prospects instantly and can start working with them the moment they arrive.
Next, tighten the loop. Add Monday automations to notify the right owner when a new lead is received, update the status to “Contacted” after the first outreach, or set an SLA reminder if no one updates the item within 24 hours. Create filtered views for hot leads, segmenting by source or campaign, and build a simple dashboard to track volume, speed to first response, and conversion rates.
You have removed the bottleneck between capture and follow‑up. Now use Monday to maintain the momentum: alerts, filters, dashboards, and playbook-level automations that convert raw scans into revenue.
Frequently asked questions
Does this setup require a paid Zapier plan?
You can start on Zapier’s free tier if you process fewer than 100 leads a month. As volume grows, upgrade to keep every lead flowing without interruption.
Will QR scans still work if I change the form fields later?
Yes. Your QR code links to the form URL, not the individual fields. Just remember to revisit Zapier and map any new fields to Monday.com so no data gets lost.
What happens if my Monday.com API token is revoked or rotated?
Zapier will pause the workflow and send you an email. Generate a fresh token in Monday.com, update the connection in Zapier, and your Monday.com and QRCodeChimp Integration will resume where it left off.
Can I route different QR codes to separate Monday boards?
Absolutely. Create a unique Zap for each QR code or campaign. Point each form’s webhook to its own Zap, then pick the target board for that Zap’s action.
Is the data secure while traveling through Zapier?
Zapier encrypts webhook traffic in transit and at rest. Only your authenticated Zap can see the payload, and the Monday.com token restricts access to your chosen workspace.
Can the integration update an existing item instead of creating a new one?
Yes. Swap the Zapier action from ‘Create Item’ to ‘Create or Update Item’, and use a unique field, such as email, to match incoming leads to existing records.
Will large attachments in the form come into Monday.com?
Zapier passes a file URL, not the raw file. Add a ‘File’ column in Monday and map it to the attachment field. Monday will fetch the file and store it in the item.
You may also like
How To Create an RSVP QR Code for Any Event
Create an RSVP QR code using a customizable form, Event Ticket RSVP, Google Forms, or WhatsApp. Compare four methods and follow the steps.
How to Create, Design, and Share Event Ticket QR Codes
Learn how to create Event Ticket QR Codes individually, in bulk, or from form submissions, customize their design, and share them privately.
QR Code Printing Requirements: What to Check Before the Print Run
Learn how to print QR codes that scan reliably. Check size, resolution, format, contrast, quiet zone, material, placement, and proof testing.
Dynamic QR Codes: How They Work and When to Use Them
A dynamic QR code lets you change where a printed code points, without reprinting it. Here is how dynamic QR codes work, what they track, and when to use one.
Most Popular
Contact Sales
