Missed calls, scheduling chaos, and endless back-and-forth cost your team time and money, and frustrate customers. The solution? A QR code for appointment booking. Not only does it simplify scheduling, but integrating it with Google Sheets means every booking logs automatically without requiring any manual entry.
Why does it matter? 82% of customers now book appointments via mobile devices, making accessibility essential.
In this guide, you’ll discover exactly how to build a seamless QR-powered appointment system using QRCodeChimp and Zapier. You’ll learn how to:
- Generate a branded, mobile-friendly booking form linked to a QR code
- Sync responses instantly to Google Sheets
- Automate reminders or confirmations using third-party integrations
By the end, you’ll be able to launch a powerful, time-saving booking process that keeps your schedule full and your customers happy.
Let’s dive into the processes.
Step 1: Design your QR code appointment booking form using QRCodeChimp
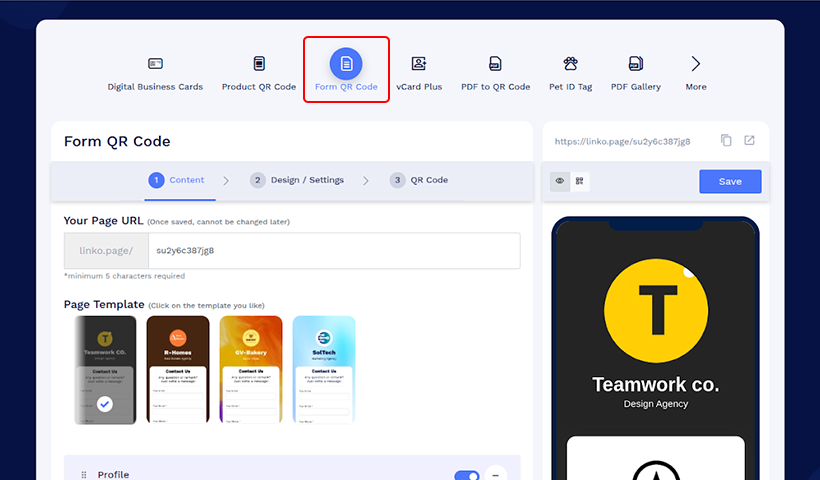
The first step is to create the digital form and QR Code that your customers will fill out. QRCodeChimp makes this process incredibly simple.
- Create a New Form: Log in to QRCodeChimp and navigate to the form QR code solution. Find the “Create New” section and start building the form, or choose the option “Use Form template” to select the pre-designed appointment form.
- Add Your Fields: Customize the form with all the details you need if you choose the “Create New” option. Think about what’s essential: customer name, email, phone number, service type, and of course, their preferred appointment date and time.
- Save and Finalize: Once you’re happy with the form, hit “Save” to lock in your design.
Now, with your form complete, your QR code is generated, which will serve as the gateway to your booking system. You can even customize the code’s colors and add your logo to match your brand.
Step 2: Prepare your Google Sheet for incoming data
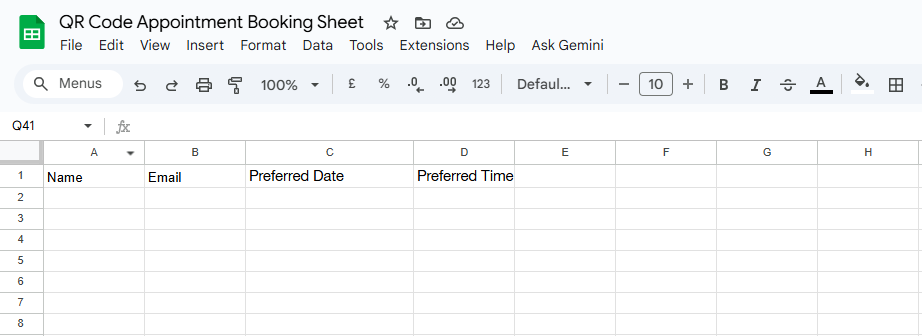
Next, you need a place to store the data received from the appointment form. Google Sheets is the perfect tool for this.
- Create a New Spreadsheet: Open Google Sheets and start a new file.
- Set Up Your Columns: Create headers for each field you included in your QRCodeChimp form.
For example, if your form has fields for “Name,” “Email,” and “Preferred Date and Time,” your Google Sheet should have columns with those exact titles. This is crucial for a smooth integration later.
Leave the spreadsheet open; we’ll need it for the next step.
Step 3: Connect the form to your spreadsheet with Webhook

By using Webhook, you can connect your QRCodeChimp Form to a Google Sheet. When a customer submits the form, the webhook sends that data directly to your spreadsheet, completely eliminating manual data entry.
Tools like Zapier or Make (formerly Integromat) are perfect for creating this connection. While the process is similar for both, let’s walk through it using Zapier.
- Create a Zapier Account: If you don’t have one, sign up for Zapier.
- Set Up a “Catch Hook”: Create a new Zap and choose “Webhook” as your trigger app. Choose the event as “Catch Hook.” Zapier will then provide you with a unique URL. This is the address where your form data will be sent.
- Paste the URL into QRCodeChimp: Go back to your QRCodeChimp form solution and find Form Integration Settings.
- Complete the API invoke setup by turning it on and pasting the URL you got from Zapier.
- Add Body with the required fields that your webhook needs to catch when the form is submitted. Refer to this article for a detailed setup guide for Zapier and QRCodeChimp.
- Test the Connection: Submit a test booking on your form. This sends a sample of the data to Zapier, allowing it to “catch” and recognize the fields you’ve created.
- Connect to Google Sheets: Now, set up the action part of your Zap. Choose “Google Sheets” and select “Create Spreadsheet Row” as the event. Connect your Google account, pick the spreadsheet you created in Step 2, and then match the fields from your form to the correct columns in your sheet.
- Activate the Zap: Once you’ve tested everything and confirmed the data is mapping correctly, activate your Zap.
Note: Discover how to integrate QRCodeChimp with Zapier and Make.com webhooks to automate your workflows.
Step 4: Final testing
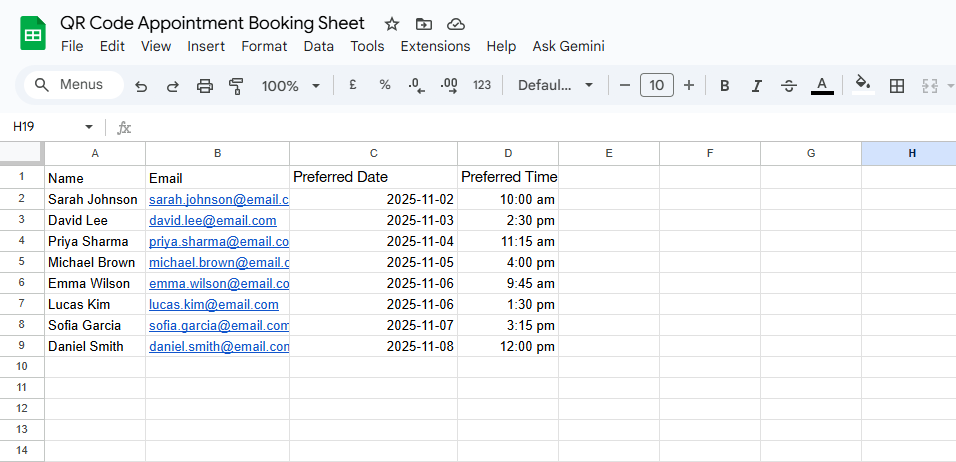
Your automated system is now ready to go! But before you share it with the world, it’s essential to do a final test.
- Scan the QR Code: Use your smartphone’s camera to scan the QR code you created.
- Fill Out the Form: Complete the booking form with your test data.
- Check Your Spreadsheet: If everything is working correctly, the data you just submitted should appear as a new row in your Google Sheet within seconds.
With a successful test, you’re ready to start sharing the QR code. You can print it on marketing materials, embed it on your website, or share it on social media.
Conclusion
By setting up this simple automation, you’ve transformed a tedious manual process into a streamlined, efficient system. Not only does the QR code make it incredibly easy for customers to book, but the automatic syncing to Google Sheets saves you valuable time and eliminates the risk of human error. This is a simple yet powerful way to boost your business’s efficiency and deliver a superior customer experience.
Frequently asked questions
Can I create a QR code for appointment booking for free?
Yes, you can create a QR code for appointment booking for free. QRCodeChimp offers freemium plans for users to try and test the solution before moving to paid subscription plans.
Is it possible to sync the QR code appointment response to Google Sheets?
Yes, every appointment response can be automatically synced to Google Sheets to help keep all your essential data organized.
Do I have to use Zapier or Make.com?
You can use any platform that supports webhooks. QRCodeChimp is designed to integrate with both Zapier and Make seamlessly.
Is this method secure for customer data?
Yes, the data is transferred from QRCodeChimp to your Google Sheet via a secure webhook. Always ensure you are using a strong password for your Google and Zapier accounts, and only share the QR code through trusted channels.
What kinds of businesses can use this system?
This setup is ideal for any business that relies on appointments, such as salons, gyms, freelancers, consultants, or even small event planners. It’s a versatile solution that can be adapted to many different needs.
You may also like
How Retail Stores Can Collect Customer Feedback Without Staff Prompts
Set up a feedback QR code for retail stores to collect customer feedback without relying on staff prompts. Learn where to place it and improve responses.
Are QR Codes Effective for Marketing? What Research Shows
Are QR codes effective for marketing? See what current research shows, what drives scans, and how to measure engagement, conversions, and ROI.
How Small Food Brands Can Use GS1 QR Codes to Turn Sourcing Claims Into Proof
Discover how GS1 QR codes for small food brands turn sourcing claims into proof, build shopper trust, and prepare for the 2027 checkout shift.
How to Write High-Converting QR Code Call to Action Phrases (50+ Examples)
Learn the CTA formulas, design tips, and 60+ examples that boost QR Code scans and conversions plus how to test and measure them using QRCodeChimp tools.
Most Popular
Contact Sales
