Picture the gate at your next event. Phones held up, QR codes glowing, a staff member deciding who gets in. What they need is an answer to three things: does this ticket belong to this event, is it still valid, and are there entries left?
That’s what validation checks do, in the second it takes to scan.
Skip it, or misconfigure it, and the cost shows up fast. Lines back up. A guest insists their ticket is real and nobody can prove otherwise. A shared ticket quietly lets in someone who never paid.
One thing to keep in mind before you configure anything: QR validation cannot prevent a screenshot. Nothing can. It controls which use of the ticket gets accepted. Once that’s clear, scan limits and lock behavior stop looking like settings and start looking like a system.
This guide covers how validation works, how to set scan and re-entry rules, how to validate tickets with QRCodeChimp, and what to do when a ticket doesn’t clear.
How event ticket validation works
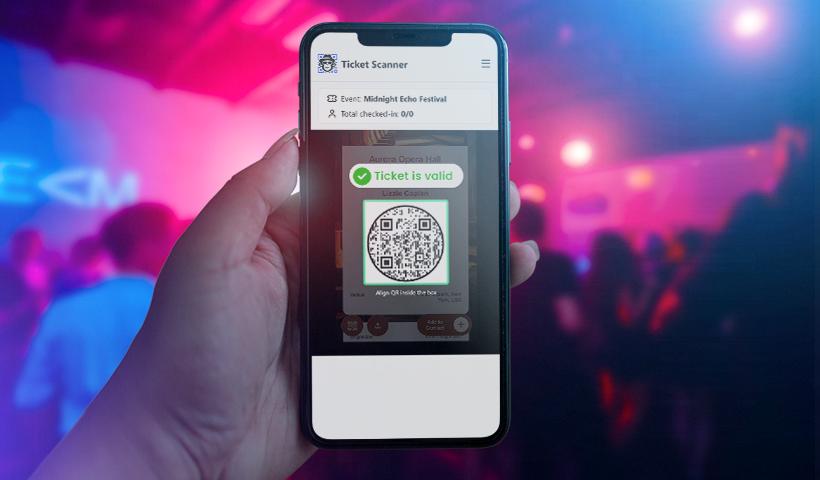
Every attendee gets an Event Ticket QR Code tied to an individual ticket record.
When an authorized team member scans it, the system checks whether the ticket belongs to the selected event, is active, has reached its permitted scan count, is currently locked, and its scan limit has reset for a new event day. The result appears on the team member’s device, and staff either admit the guest or follow the exception process.
Give every attendee their own ticket
One QR code shared across a group defeats the point. You cannot tell who has arrived, whether the code has been passed around, or how many entries should be left.
Issue a separate ticket per attendee whenever individual validation or attendance data matters. QRCodeChimp’s bulk upload handles this at volume, so a thousand unique tickets is the same amount of work as ten.
💡See how to create and design event ticket QR codes for the setup.
Validation confirms the ticket, not the person
A successful scan means the ticket met its conditions at that moment. It says nothing about who is holding the phone.
For private, paid, member-only, student, or employee events, put the attendee’s name or another identifier on the ticket and tell staff when to ask for supporting ID. Without that, possession of the code is the only credential.
What ticket validation can and cannot prevent
This is where most event teams form the wrong expectation, and then get caught out at the gate.
Validation reliably rejects attempts after a ticket hits its scan limit, flags tickets that are already used or locked, catches tickets that belong to a different event, applies your re-entry rules, restores permitted scans on later event days, and records accepted check-ins for attendance reporting. That is a lot and enough for most events.
What it cannot do is stop the image from being copied. A screenshot is just pixels, and no ticketing system can prevent someone from forwarding one.
Think of a single-entry ticket showing on two phones. Same QR code, same underlying record. If the copy gets scanned first, that entry is accepted. When the intended attendee turns up later, their own ticket reads as used, and they are standing at your gate genuinely confused.
So the accurate way to describe validation is this: it stops a ticket being accepted beyond its configured limit. It does not stop the ticket being shared. Everything else in this guide follows from that.
Set the right scan and lock rules
Your ticket settings should mirror your actual entry policy, and you should get them right before doors open rather than planning to adjust later. More on why in a moment.
Resist the temptation to pad the scan limit so exceptions are easier to wave through. A limit of three on a single-entry ticket means a copied ticket can be accepted twice before anything flags.
| Entry type | Scan limit | Reset the lock daily | Suits |
|---|---|---|---|
| Single entry | 1 | Off | Concerts, ceremonies, one-day conferences, private events |
| Controlled re-entry | Matches your re-entry allowance | Off | Venues where guests leave and return the same day |
| Multi-day | Entries permitted per day | On, with timezone and reset time | Festivals, multi-day conferences, campus events |
✔ Single-entry tickets
One successful validation, then the ticket locks. Any further attempt using that code is reviewed rather than automatically admitted.
✔ Controlled re-entry
Set the scan count to match your policy, then make sure staff know whether every return needs another scan and what to do once a ticket is spent. For tighter control, pair the QR code with a wristband or an ID check on re-entry.
✔ Lock only when scanned from owner/sub-account
This setting is worth understanding properly. With it enabled, the ticket only locks when the owner account or an authorized sub-account scans it.
That separates an attendee who opens their own ticket to check the venue address from actual admission. Without it, a guest who taps their own ticket on the train can burn their entry before they arrive.
✔ Multi-day events
Use Reset the lock daily rather than handing a three-day ticket a pool of three scans. A pooled allowance can be spent entirely on day one.
Set the timezone alongside the reset time. QRCodeChimp supports both, and the time zone matters more than it might seem when your event runs past midnight or your team is configuring tickets from a different region than the venue.
Why the settings need to be right before doors open
Once tickets are live, your only lever is raising the scan limit. There is no per-ticket reset.
On bulk-created tickets, raising the limit applies to the entire batch. So you cannot quietly fix one guest’s locked ticket without granting an extra admission to every ticket in the event. If a ticket locked because a copy was validated first, raising the limit to let the real attendee in also leaves that copy usable again.
This is the strongest argument for properly testing your configuration beforehand. Mid-event, the platform lever is too blunt to reach, and your exception process has to be human.
How to validate event tickets with QRCodeChimp
QRCodeChimp provides a browser-based event ticket validator app that helps staff validate tickets and manage check-ins efficiently. Staff can simply sign in, select the event, and start scanning without installing an app or switching between tools.
Step 1: Open the Validator app
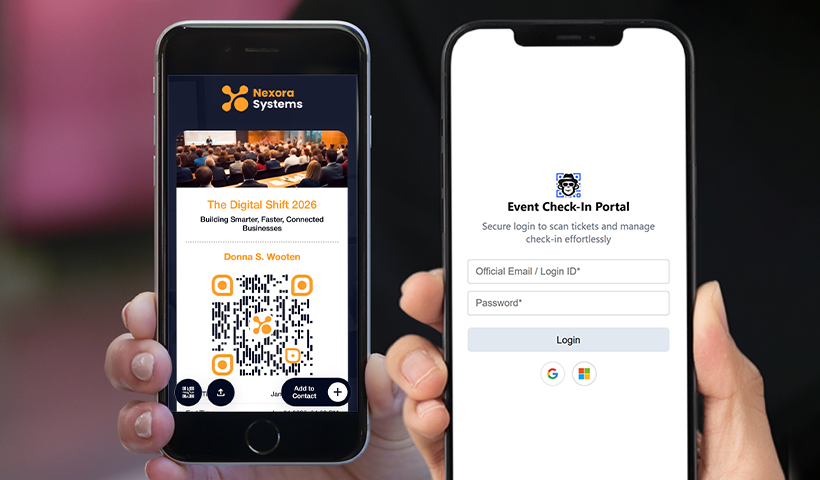
Sign in with the main account or an authorized sub-account. The Validator is reachable via this direct link or from the Other Details section of your QRCodeChimp profile, where you will also find a QR code that opens it. Sending that code to your entry team is the fastest way to get everyone set up.
Step 2: Select the event
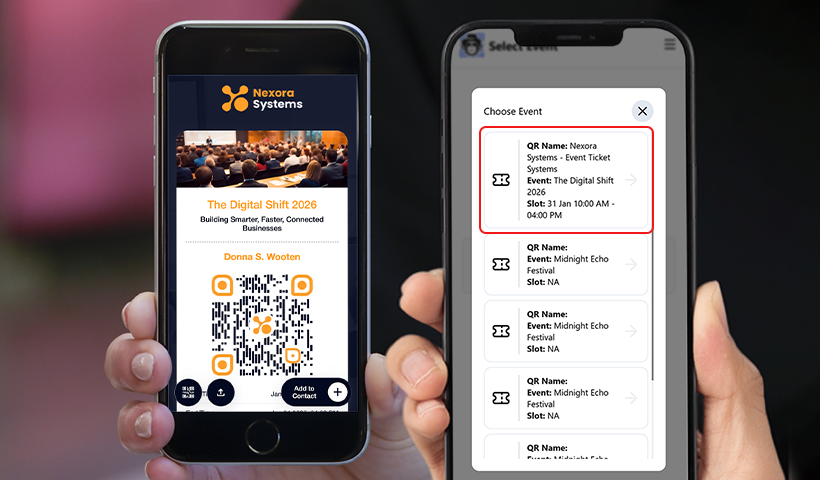
Every team member should confirm they have the right event selected before the first guest arrives. A valid ticket will read as invalid against the wrong event, and that is a confusing five minutes at a busy gate.
Step 3: Allow camera access
The browser will ask. If access was blocked previously, fix it in the browser or device settings before check-in starts, not during.
Step 4: Scan the ticket
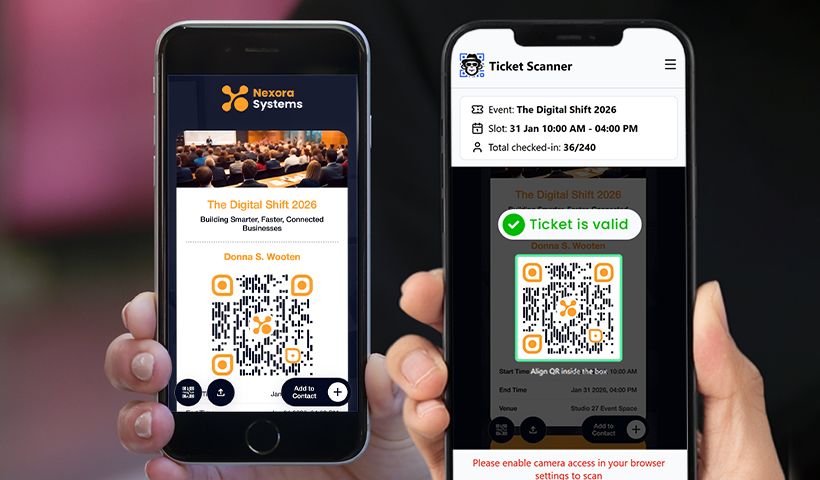
Ask the attendee to keep the code visible. The Validator returns the ticket’s current status.
Step 5: Follow the result
Admit on a valid result. Do not wave through a used, locked, or invalid ticket informally. That is what the exception process is for.
Step 6: Watch the live count
The Validator shows a running Total checked-in figure as tickets are accepted, so the entry team can see progress without leaving the screen. For the full attendee record and downloadable data, use the Event Ticket Report.
Give your team validation access
Multi-gate events should not run through one device or a shared password. Enable Share with Sub-accounts in the Event Ticket QR Code settings, and authorized users sign in with their own credentials to validate tickets for that event. Sub-accounts are available on Pro and above, as is the bulk upload you will be using to create the tickets.
The practical gain is that several gates can check in simultaneously, each staff member’s access is their own, and nobody is handing round the main account login. Confirm every assigned user can sign in and see the correct event before the day.
What each validation result means
Your staff will meet four outcomes. They should know what each one means before the first guest arrives, because working it out live is slow and looks unconvincing.
✅ Valid
The ticket is for this event and has remaining admissions. Admit as normal.
🔒 Used or locked
The ticket has hit its scan limit. That could mean the attendee already came in, the ticket was scanned at another gate, the limit is set lower than your intended re-entry allowance, or someone used a copy first.
A locked ticket is not proof of bad faith, and staff should not treat it that way. Check the attendee against your authorized record and follow the exception process.
❌ Invalid
Usually the wrong event is selected. Check that first, then whether the ticket belongs to a different event, whether the user is signed in to the right account, and whether the code is complete and readable.
⛔ Unreadable
Not the same as invalid. Ask the guest to increase the screen brightness, open the original ticket rather than a forwarded version, and hold the phone still. If it still will not capture, fall back to manual verification.
📵 If connectivity drops
Validation requires a live connection. If the venue network goes down, the Validator cannot check tickets until it reconnects, and scans are not queued for later.
Treat this as a real planning item rather than an edge case. Check signal at every entry point during setup, arrange a backup connection where coverage is weak, and keep an authorized guest list to hand so staff can verify people manually and record entries for reconciliation afterward.
Prepare your team before doors open
Good settings and a trained team are what make validation hold up under pressure. Because per-ticket correction is not available once tickets are live, the pre-event pass genuinely matters.
✔ Test the full flow
Create separate test tickets and run them through properly. Confirm the scan limit behaves as intended, check single-entry and re-entry outcomes, verify “Reset the lock daily” along with the timezone and reset time for multi-day events, confirm every assigned user can sign in and reach the correct event, test camera permissions on each device, and check network coverage at every gate.
Never test on real attendee tickets. A successful validation consumes one of their admissions, and you cannot return it without affecting the entire batch.
✔ Agree the exception process
Decide in advance who can authorize entry on a locked ticket, what attendee details staff should verify, how the decision gets recorded, and where guests go when gate staff cannot resolve it.
Because scan limits cannot be adjusted for a single ticket, the answer at the gate is human: check the person against your authorized record, admit or decline based on that, and log it. Staff should not be changing ticket settings mid-event.
✔ Send tickets privately
Attendee-specific tickets are sent via direct email or private message. Never post an individual ticket to a public page, a social account, or an open group chat, because at that point the scan limit is the only thing standing between you and whoever saw it first.
✔ Train on results, not just scanning
Anyone can point a camera. The useful skill is knowing what a locked result means and what to do next. Walk the team through all four outcomes before the event.
Validate event tickets with QRCodeChimp
Reliable validation comes down to three things: unique tickets per attendee, scan rules that match your entry policy, and a team that knows what to do when a ticket does not clear.
QRCodeChimp gives you all three. Create attendee-specific tickets in bulk, set scan limits and daily resets in the correct timezone, share validation access with your entry team through sub-accounts, and validate at the gate with the Event Ticket Validator, with live check-in counts.
Just remember what validation is actually doing. It is not stopping the code from being copied. It is deciding whether that code still gets you in.
Frequently asked questions
Can a QR code ticket be copied or forwarded?
Yes. Anyone can take a screenshot of a ticket and pass it on. Validation does not prevent that. It checks the ticket’s current status and controls whether another use can be accepted within the scan limit you set.
Does QR code validation completely prevent ticket fraud?
No. It controls repeated and unauthorized use through scan limits and status checks. It cannot confirm that the person presenting the ticket is the intended recipient, so add an identity check when that matters.
Can I reset a ticket that locked by mistake?
There is no per-ticket reset. You can raise the scan limit, but on bulk-created tickets that applies to the whole batch and grants an extra admission to every ticket in the event. At the gate, verify the attendee against your authorized record and admit them through your exception process instead.
Do I need to install an app to validate tickets?
No. QRCodeChimp offers a browser-based Event Ticket Validator which requires no installation on any device.
What happens if the internet drops during check-in?
Validation fails until the connection is restored, and scans are not stored for later sync. Check coverage at every entry point beforehand and keep an authorized guest list available as a fallback.
Can multiple staff validate tickets at once?
Yes. Enable Share with Sub-accounts and give each team member their own login. Sub-accounts are available on Pro and above.
Can attendees open their ticket without using up their entry?
Yes, if the ticket is set to Lock only when scanned from the owner/sub-account. Guests can view their ticket freely, and only a scan by your team counts as an admission.
You may also like
GS1 Application Identifiers Explained: GTIN, Batch, Serial, Expiry, and More
This guide explains the most important GS1 Application Identifiers used for product identification, traceability, retail, and packaging.
Steps to Integrate Microsoft Entra ID (Azure AD) with QRCodeChimp
Learn how to connect Microsoft Entra ID with QRCodeChimp to automate digital business card creation, improve security, and simplify onboarding.
How to Create One QR Code for Multiple Links
Learn how to create one QR code for multiple links. Add websites, social profiles, videos, PDFs, and more, then update links without reprinting.
How to Generate QR Codes in Bulk
Create hundreds of unique QR codes from one spreadsheet. Learn how to prepare your file, choose static or dynamic codes, fix upload errors, and download the whole batch.
Most Popular
Contact Sales