Managing employee identities across systems can quickly become complex, especially when access, roles, branding, and security must remain aligned.
Microsoft Entra ID (formerly Azure Active Directory) centralizes identity management. When integrated with QRCodeChimp, it automatically creates and updates your team’s digital business cards, ensuring every employee receives a correct, branded card from day one.
In this article, you’ll learn:
- How to connect Microsoft Entra ID with QRCodeChimp
- How to automate digital business card creation
- How to manage branding, grouping, and access at scale
Prerequisites
Before you begin, ensure you have admin access to Microsoft Entra ID and permission to configure enterprise applications. You will also need a QRCodeChimp ULTIMA (or higher) plan to enable this integration.
If you’re unsure about permissions, it’s best to check with your IT team before starting.
Integrate Microsoft Entra ID with QRCodeChimp
Start by connecting your Entra ID account to QRCodeChimp.
1. Log in to your QRCodeChimp account.
2. Go to ‘Dashboard’ → ‘Integration’ → ‘Active Directory.’

3. Locate Microsoft Entra ID and click ‘Integrate.’ You’ll be redirected to the integration process page.
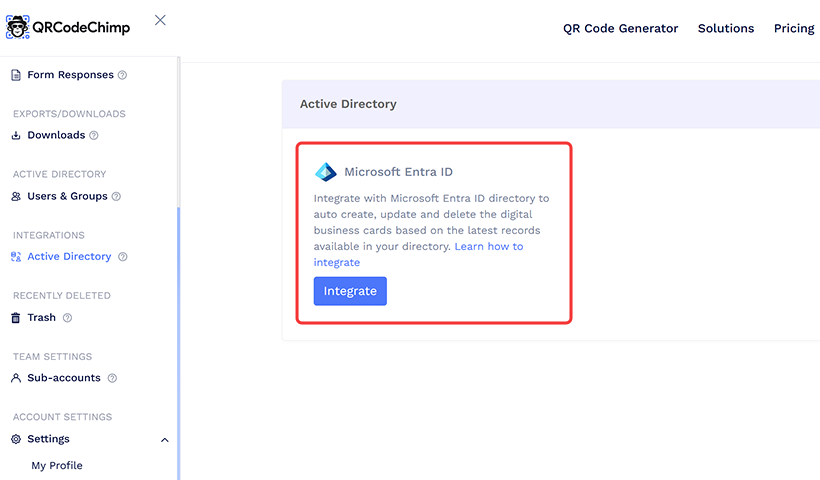
You’ll be redirected to the integration process page.
4. You will see the Status as ‘Not connected.’ Click ‘Connect.’

5. The Microsoft login screen will open in a new tab. Sign in with your admin account credentials.

Note: You must have admin access to Entra ID.
6. After signing in, you will be asked to grant permissions to QRCodeChimp. Tick the ‘Consent’ checkbox and click ‘Accept.’
To proceed, check the box Consent on behalf of your organization and then click Accept.

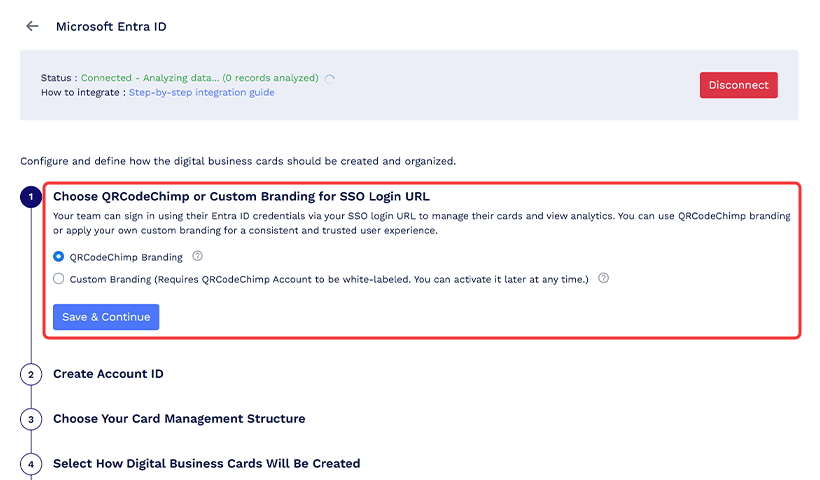
7. Once connected, QRCodeChimp will begin analyzing your directory data. Here, you will see the Status as Connected – Analyzing data… (# records analyzed), which denotes how many records have been analyzed.
This analysis takes some time, depending on the number of records or profiles.

Note: Please refer to this page for further clarification on Active Directory.
Configure your Digital Business Card setup on QRCodeChimp
Now comes the setup section. Follow the steps below to configure and define how your organization’s digital business cards should be created and organized.
Step 1: Choose QRCodeChimp or Custom Branding for SSO Login URL
Once your team members’ digital business cards are ready, share the SSO login URL with them. When they log in using their business emails, a permission prompt will appear. This prompt reflects QRCodeChimp branding by default, or your own brand if custom branding is enabled.

Option A: QRCodeChimp Branding (Default)
- Uses QRCodeChimp SSO URL
- Standard login experience
Option B: Custom Branding (White-label)
- Uses your domain (e.g., yourbrand.com)
- Fully branded login experience
Please note that to use custom branding, your account must be white-labeled. Otherwise, only the standard option will be available.
Let’s see how to set up both options.
Option A: QRCodeChimp Branding (Default)
If you choose QRCodeChimp Branding, click Save & Continue, and you’ll move to the next step.
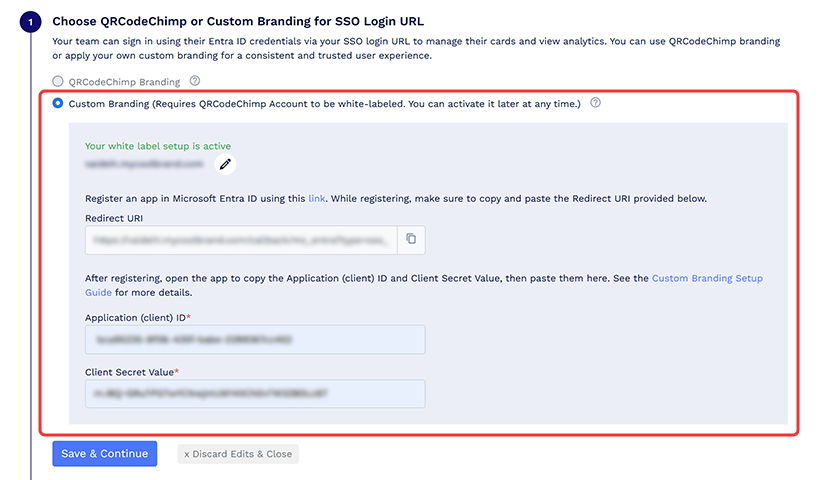
Option B: Custom Branding (White-label)
If you want Custom Branding, you will require a whitelabel setup.
- If you do not have white label enabled, click ‘Set up White Label,’ and you’ll be redirected to the ‘White Label Settings’ page. Come back after enabling the same and continue the process.
Read more: A Complete Guide to QR Code White Labeling
- If you have already set up white-label, go to the next step.
- Once you have completed white-label setup, create an app in Entra ID and connect it to QRCodeChimp. You need to copy the Application (client) ID and Client Secret Value from the app, then paste them into the designated fields in QRCodeChimp.
- Click ‘Save.’
For detailed instructions, see How to Register an App in Microsoft Entra ID for QRCodeChimp.
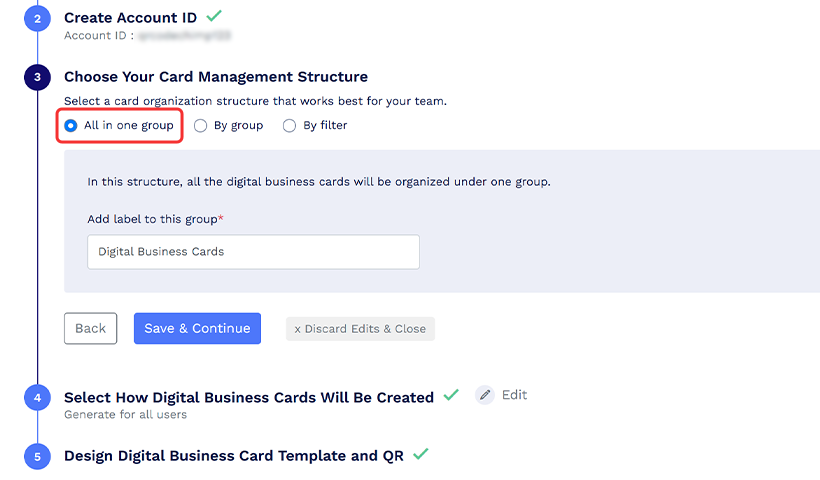
Step 2: Create Account ID
Here, you need to enter a unique account ID for your organization, which acts as a fixed identifier for your setup.
If you’ve already created one earlier, it will appear pre-filled and cannot be changed.
Once confirmed, click ‘Next.’
Step 3: Choose Your Card Management Structure
In this step, you will decide how to group your cards.
Note: If your Entra ID data analysis is still in progress, the card management options will appear locked. Once the analysis is complete, they will unlock automatically. You can click ‘Refresh’ to check the status.
Once your directory data is analyzed, choose how to organize cards from the three given options:
- All in one group: All digital business cards are organized in a single group.
- By group: Our automated system categorizes the cards based on the selected directory fields, including department, location, title, and more.
- By filter: The system groups cards based on filters you define.
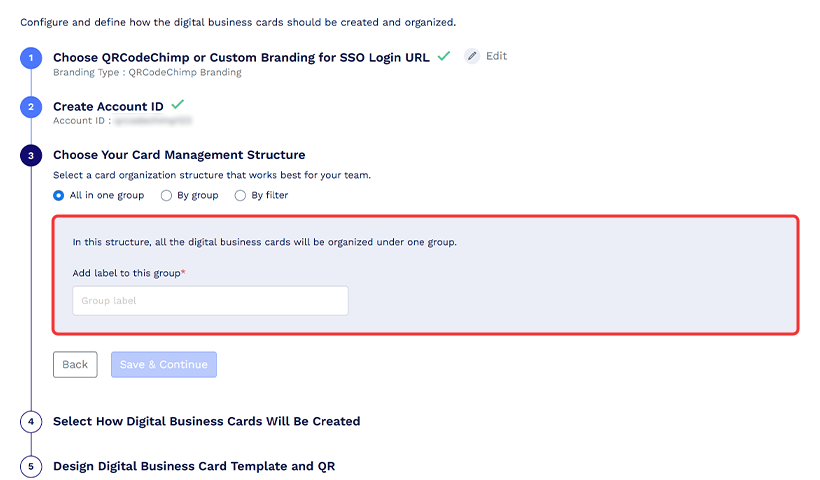
Option A: All-in-one group
If you select the ‘All-in-one group,’ add a label to this group.
Click ‘Save & Continue.’
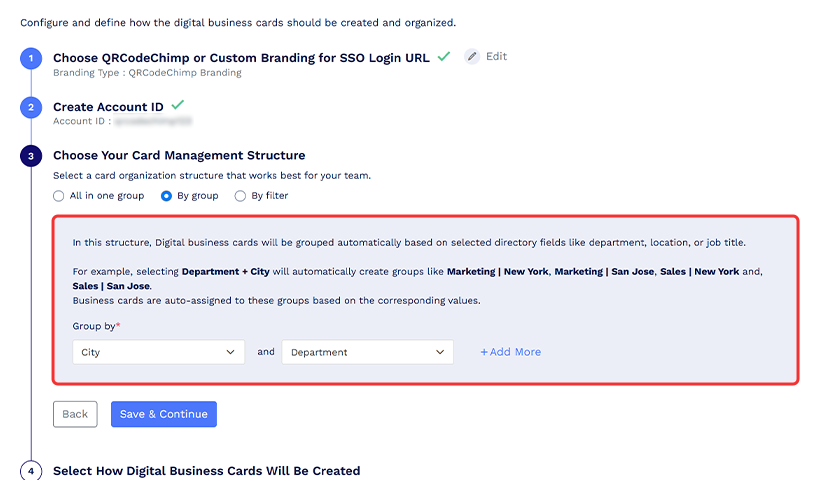
Option B: By Group
If your card organization structure is determined ‘By group,’ click the dropdown and choose the appropriate value. Your Digital business cards will be automatically grouped based on selected directory fields, such as department, location, or job title. To select more fields (a maximum of 3), click ‘Add More.’
Click ‘Save & Continue.’
Option C: By Filter
If you want to select a card organization structure ‘By filter,’ your digital business cards will be grouped based on the filters you define.
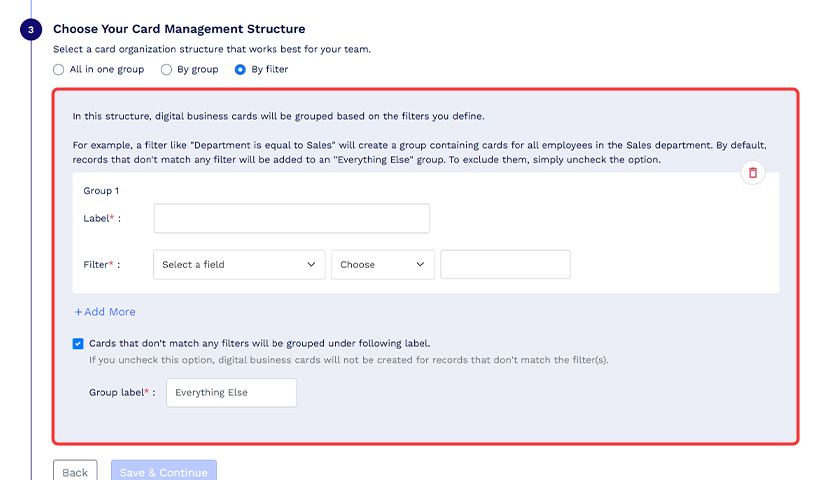
For example, a filter like ‘Department is equal to Sales’ will create a group containing cards for all employees in the Sales department. By default, records that don’t match any filters are added to an ‘Everything Else’ group. To exclude them, simply uncheck the option. If you do so, digital business cards will not be created for records that don’t meet the filter criteria.
Click ‘Save & Continue.’
Step 4: Select How Digital Business Cards Will Be Created
In this step, there are two options:
a. Generate for all users
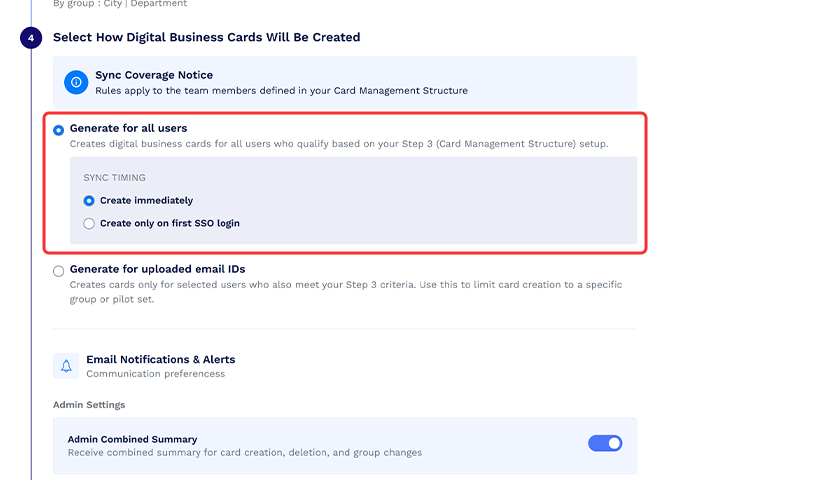
b. Generate for uploaded email IDs, as defined in Step 3 (Your Card Management Structure).
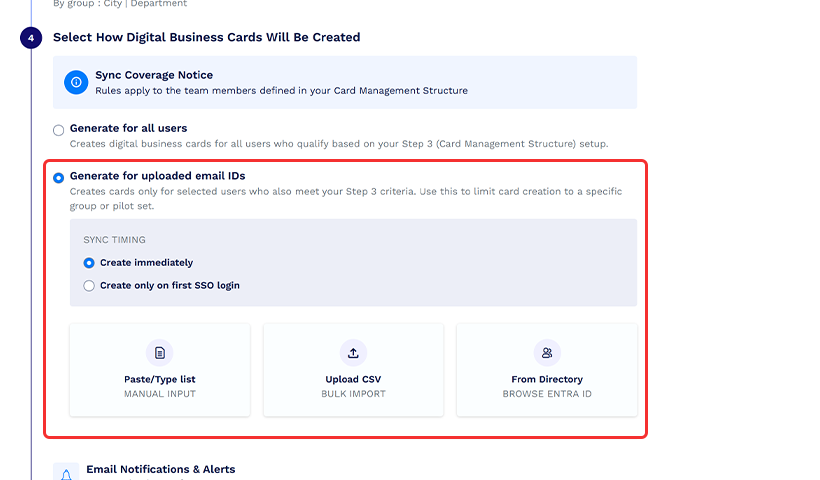
For both options, you need to select ‘Sync timing’ to ‘Create immediately’ or ‘Create only on first SSO login.’
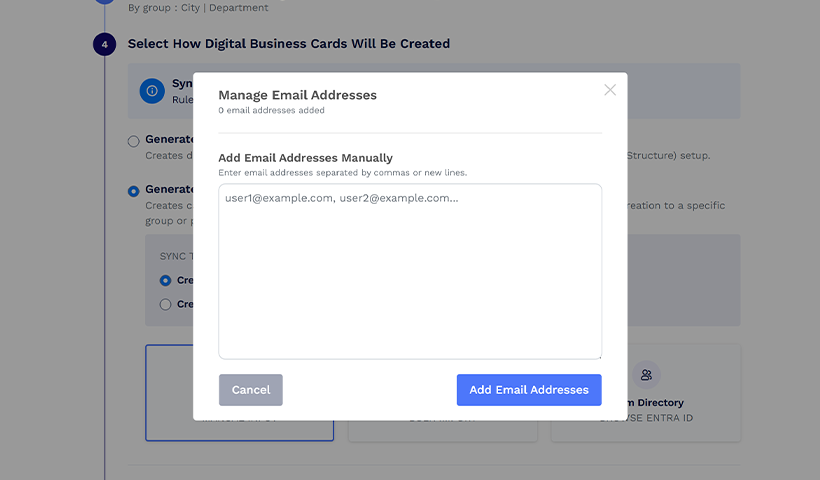
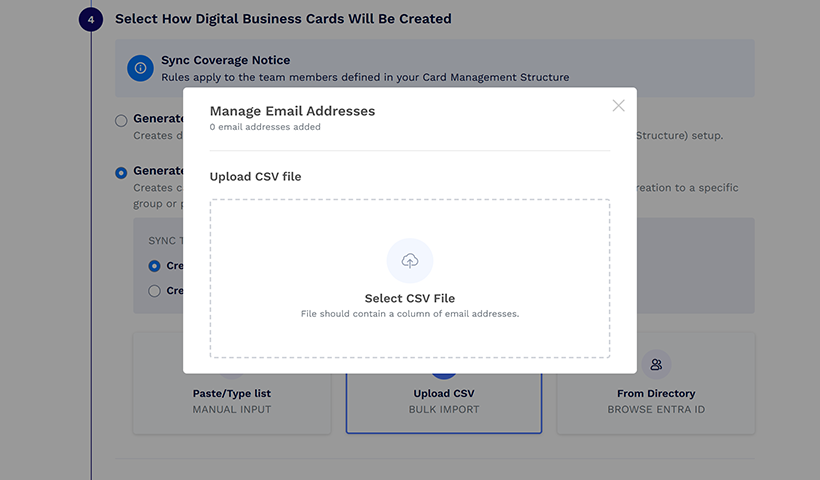
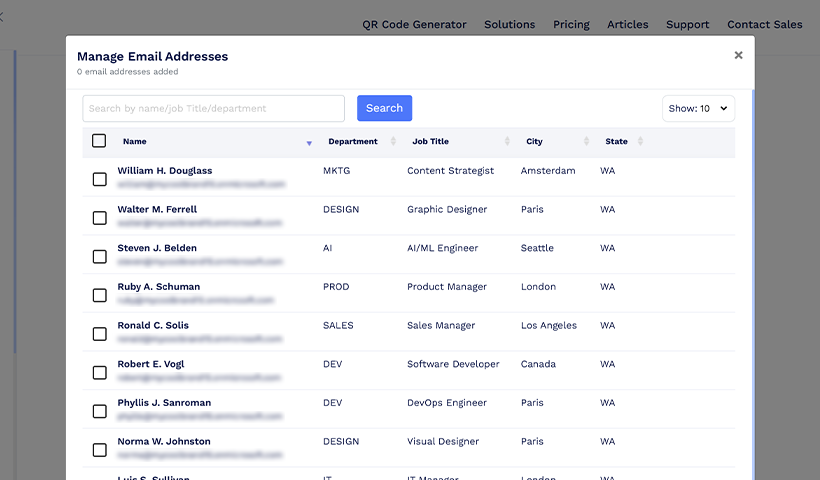
If you want to generate digital business cards only for uploaded email IDs, you can either ‘Paste/Type list,’ ‘Upload CSV,’ or fetch them ‘From Directory.’ For each, you’ll get a pop-up corresponding to the method you choose. If you’re using Active Directory, the user list will reflect the grouping criteria defined in Step 3 (Your Card Management Structure), allowing you to select exactly which users should receive cards.
Email Notifications & Alerts
Here, you can configure notifications for both admins and users.
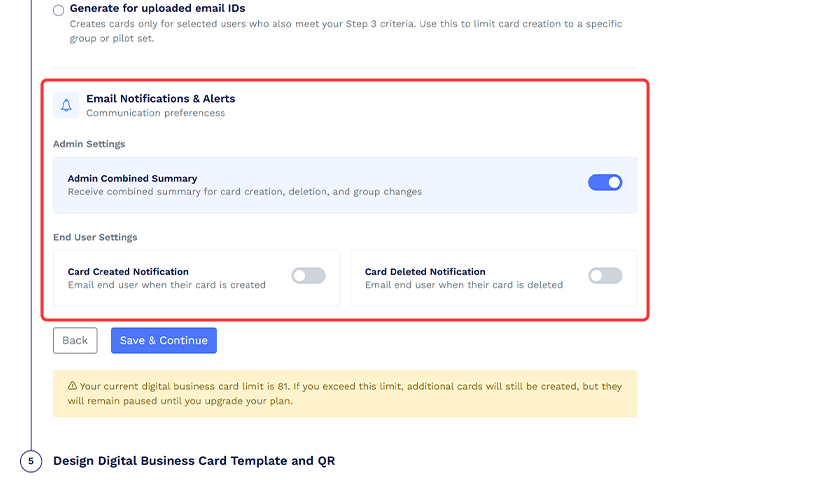
Admins can receive a combined summary of card creation, deletion, and group changes by checking the blue button under the ‘Admin Settings.’ End users can be notified when their cards are created and/or removed by enabling the corresponding toggle buttons.
This setting is optional and does not affect how cards are generated.
Click ‘Save & Continue.’
Important: You’ll see your current digital business card limit below. If the total number of cards to be created exceeds this limit, the additional cards will still be created but will remain in a paused state.
Step 5: Design Digital Business Card Template and QR
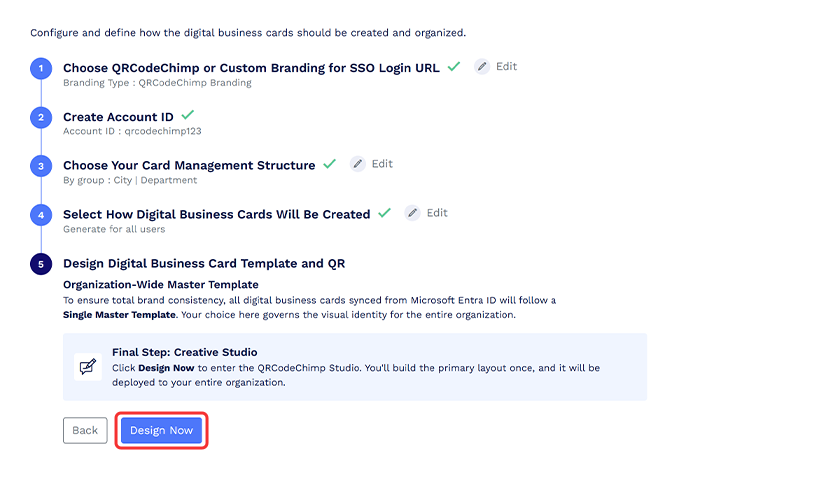
In this step, you’ll be asked to design a Master Template for Digital Business Cards and QR. Only the cards aligned with the groups configured in Step 3 (Your Card Management Structure) and synced from Microsoft Entra ID will follow this Master Template.
Click ‘Design Now’ to open QRCodeChimp studio. Here you can start designing your card.
Note: Digital business cards will not be synced until you have designed the template.
How to design digital business cards for your Microsoft Entra ID directory
Let’s get started with designing your master template. First, we’ll show you how to link the team members’ data from your Entra ID to your digital business cards. For this, you need to map Entra ID columns to the corresponding card fields.
You’ll see fields under different sections of the card. The gray fields with curly brackets are mapped to your Entra ID. This means they will take and show the data from your Entra ID.
Example: The Name field is taking data from the Entra ID. It’ll display the cardholder’s name automatically.
Note: These fields cannot be edited by the cardholders. They will take data only from the Entra ID records.
Designing digital business cards
Step a: Map the preferred Entra ID fields to Digital Business card fields on the content tab.

Step b: Hover the cursor over the field you want to map and click on it.

Step c: Click ‘Choose a field’ and select your field.

Step d: (Optional): Enter a Fallback Value.

Step e: Click ‘Add.’

Now, the business card will automatically retrieve that information (from Entra ID) for all users.
Note: If the field data is missing or blank in Entra ID, the Fallback Value that you enter will be visible.
Step f: Disable the fields you don’t want on your cards.

Step g: Tweak the options per your brand on the Design / Settings tab.

Step h: Customize your QR code on the QR Code tab.

Step i: Once all steps are complete, click ‘Save.’

You’ll see a pop-up ‘Template Saved Successfully.’
Step j: Click ‘Go To Users & Groups.’ You will be taken to your QRCodeChimp dashboard, where you can see your groups.

Click ‘Sync Now.’
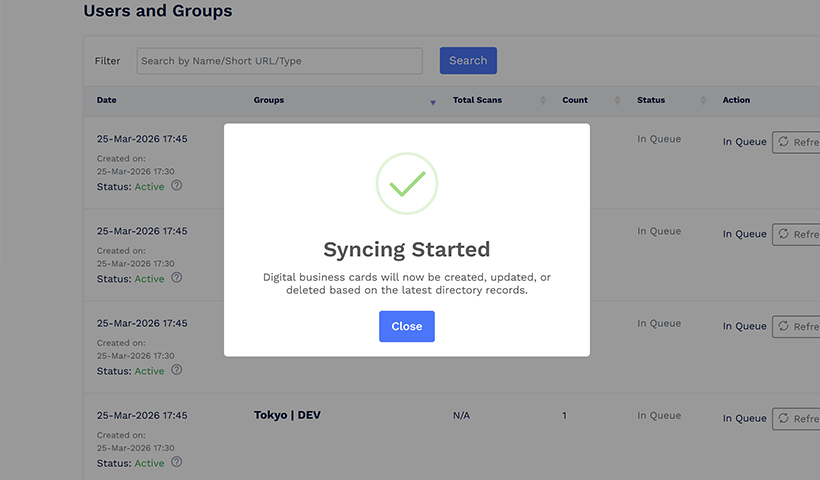
Congratulations. Your digital business cards will now be created. You will now see, share, and edit individual cards. Your cards will also be automatically updated and deleted based on the latest directory records.
Learn how to distribute your cards: Sharing Business Cards with Your Team using AD
Editing Your QRCodeChimp Setup
You can update your setup anytime as your team structure or requirements evolve. However, certain changes can impact existing groups and cards, so it’s important to understand how edits work.
Step a: Access the section you want to edit
Go to your QRCodeChimp Entra ID setup and click ‘Edit’ or the pencil icon next to it the step you want to modify (for example, Card Management Structure).
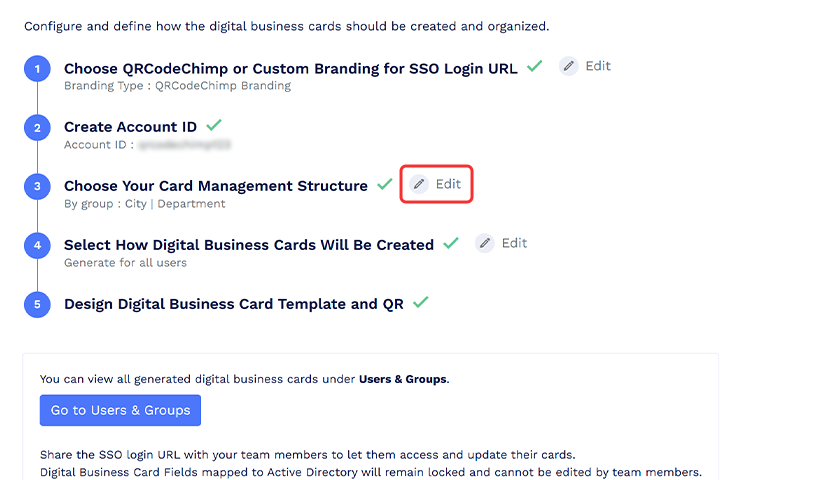
You will get a pop-up asking you to confirm whether you want to proceed.
Step b: Make your changes
Update the configuration based on your needs; for instance, changing how users are grouped (e.g., from “All in one group” to “By Group” or “By Filter”).

Step c: Confirm and apply changes
You will again get a pop-up. In this case, it is ‘Confirm Group Configuration Changes,’ which will prompt you to type ‘DELETE’ in the text box to ‘Save Changes.’
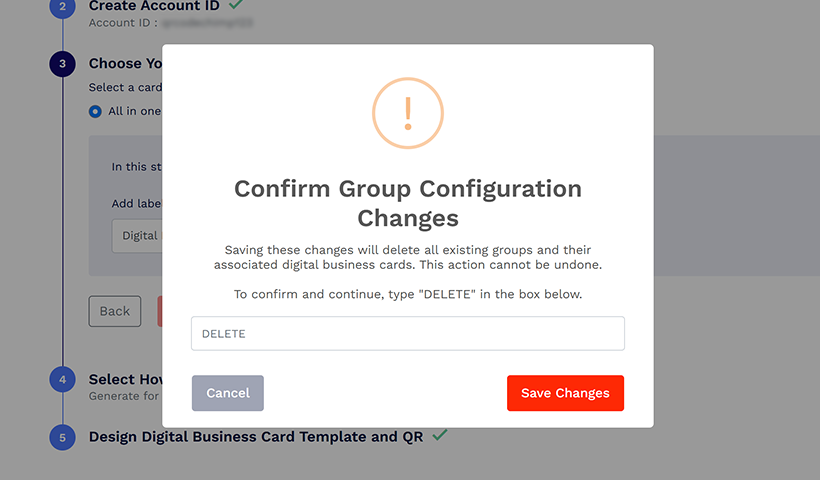
Once you do that, your edits will be applied to both the existing and future cards that fall under your new grouping.
Note: Your existing cards that do not fall under your new grouping will be deleted automatically.
Summing it up
Managing your team’s digital business cards doesn’t need to be a mess of spreadsheets and repeated tasks. Integrating Microsoft Entra ID with QRCodeChimp brings control, security, and consistency to how your teams create and manage digital business cards.
HR and IT save hours by automating routine tasks, and every employee gets an on-brand card instantly. Security improves with direct sync from your identity provider, while onboarding gets faster, smoother, and mistake-free.
It’s not just about IT; this makes life easier across the company.
What to do next?
✅ IT teams: Partner with HR and start the setup.
✅ HR teams: Loop in your IT admin to streamline card distribution.
✅ Want to see it in action? Request a demo or start directly from your QRCodeChimp dashboard.
Frequently asked questions
Do I need tech skills to set this up?
Not much. As long as you have admin access to Entra ID and a ULTIMA (or above) plan on QRCodeChimp, you’re good to go. If needed, your IT team can help with the initial steps.
Will it affect my existing QRCodeChimp setup
No. Your current business cards and users stay as they are. The integration just adds syncing for new users and groups.
What happens when someone leaves the company?
SCIM takes care of it. If a user is removed from Entra, their QRCodeChimp access is automatically revoked; no manual cleanup needed.
Can I set different card designs for different teams?
Yes. You can create team-based groups (like Marketing or Sales) during setup. Each group can have its own design and branding after initial syncing.
Is the integration secure?
Yes. QRCodeChimp uses encrypted endpoints and token-based authentication for SCIM provisioning. Your data stays protected throughout.
How can I confirm it’s working?
After setup, log in with your Entra credentials and check:
- Are new users automatically added to QRCodeChimp?
- Are the right card designs assigned based on the group?
- Do changes in Entra reflect in QRCodeChimp?
If everything looks good, you’re all set; your identity sync is live.
Does QRCodeChimp auto-sync with Microsoft Entra ID after integration?
Yes. Once connected, any user added, updated, or removed in Microsoft Entra ID is automatically synced in QRCodeChimp.
Can I manually sync users or groups if needed?
Yes, visit Users & Groups from the Dashboard and click Sync Now at the top right to sync all groups or click Re-Sync in the Action column of the specific group.
How do I update the content or design of digital business cards after syncing?
You can redesign cards at any time using the Creative Studio. Apply the new design to specific groups or all, and choose whether to resync or notify card owners. Changes can include profile info, sections, styling, and QR code customization.
What happens to a user’s QR code and business card when they leave the company?
If a user is deleted in Microsoft Entra ID, it is automatically deleted in QRCodeChimp. Their digital card and QR code will no longer be active; no manual action is required.
What if I disconnect Microsoft Entra ID from QRCodeChimp?
Disconnecting stops auto-syncing. Existing cards remain as-is, but new users won’t be added, and updates or deletions from Entra won’t be reflected in QRCodeChimp until reconnected.
Can I change the card grouping logic after initial setup?
Yes, you can do that by the edit option in Account setup. Please note that this also deletes all synced data, including digital business cards, and they cannot be recovered.
Can I update groups as my organization grows or restructures?
Absolutely. As new users or teams are added in Entra ID, QRCodeChimp automatically detects and syncs them based on the latest directory data. You can also revise group logic or templates later.
How do I share digital business cards with my team?
Sharing cards with your team is easy. Check the Sharing business cards with your team using AD for detailed steps.
Do I get an SSO link to share with the team?
Yes, once you complete the setup, you’ll find the SSO Login URL at the top & bottom of the setup page.
When will the changes in Entra be reflected in business cards?
The changes in Entra ID will be reflected immediately on business cards. If it doesn’t work, visit Users and Groups from the dashboard and click the Sync Now button.
Which fields can your team members edit in their cards?
Your team members can edit the fields that are not mapped to Entra ID.
You may also like
QR Code Ideas for Restaurants: 9 Practical Uses
Explore practical QR code ideas for restaurants, including menus, online ordering, feedback, reservations, offers, events, and customer engagement.
GS1 Digital Link: What Is It, How It Works, and How to Get Started
Discover how GS1 Digital Link can enhance product information, boost brand image, build customer trust, and streamline logistics management
Touchless Menu QR Code for Restaurants: A Practical Setup Guide
Learn how to create, place, test, and update a touchless menu QR code for your restaurant while giving guests convenient mobile menu access.
How Retail Stores Can Collect Customer Feedback Without Staff Prompts
Set up a feedback QR code for retail stores to collect customer feedback without relying on staff prompts. Learn where to place it and improve responses.
Most Popular
Contact Sales
