Creating digital tickets for an event involves more than generating a QR code.
Event organizers need tickets that clearly display admission details, follow event branding, and can be shared privately with attendees. A well-configured and well-designed Event Ticket QR Code makes important information easy to find and supports smoother ticket distribution and entry validation.
This guide explains how to create Event Ticket QR Codes, customize their design, and share them with attendees. You will learn how to create individual tickets, generate tickets in bulk, create tickets from form submissions, and configure settings such as scan limits and daily resets.
- Choose how you want to create event tickets
- How to create Event Ticket QR Codes in bulk
- How to share Event Ticket QR Codes created in bulk
- How to create an individual Event Ticket QR Code
- How to create Event Ticket QR Codes from form submissions
- Tips for designing your event ticket
- Before you send your event tickets
- Prepare your team for ticket validation
- Conclusion
- Frequently asked questions
Choose how you want to create event tickets
QRCodeChimp gives you three ways to create Event Ticket QR Codes. Choose the method that matches how you collect and manage attendee information.
| Creation method | Best suited to |
|---|---|
| Bulk creation | Conferences, festivals, tournaments, and large events with an existing attendee list |
| Individual creation | VIP guests, speakers, private events, and last-minute additions |
| Form linked to a bulk batch | Open registrations, member events, student events, and approval-based ticket issuance |
Bulk creation is usually the most efficient option when attendee information is already available in a spreadsheet.
Individual creation gives you more control when creating a small number of tickets.
Form-based creation lets attendees submit their own information. Their responses are added as new records to a linked Event Ticket bulk batch, either immediately or after organizer approval.
How to create Event Ticket QR Codes in bulk
QRCodeChimp’s bulk upload feature allows you to create digital tickets for many attendees from one spreadsheet.
Log in to your QRCodeChimp account, open the Event Ticket QR Code Generator, and follow these steps.
Step 1: Enable bulk upload
Turn on the bulk upload feature.
Read the instructions displayed on the screen and click OK to continue.
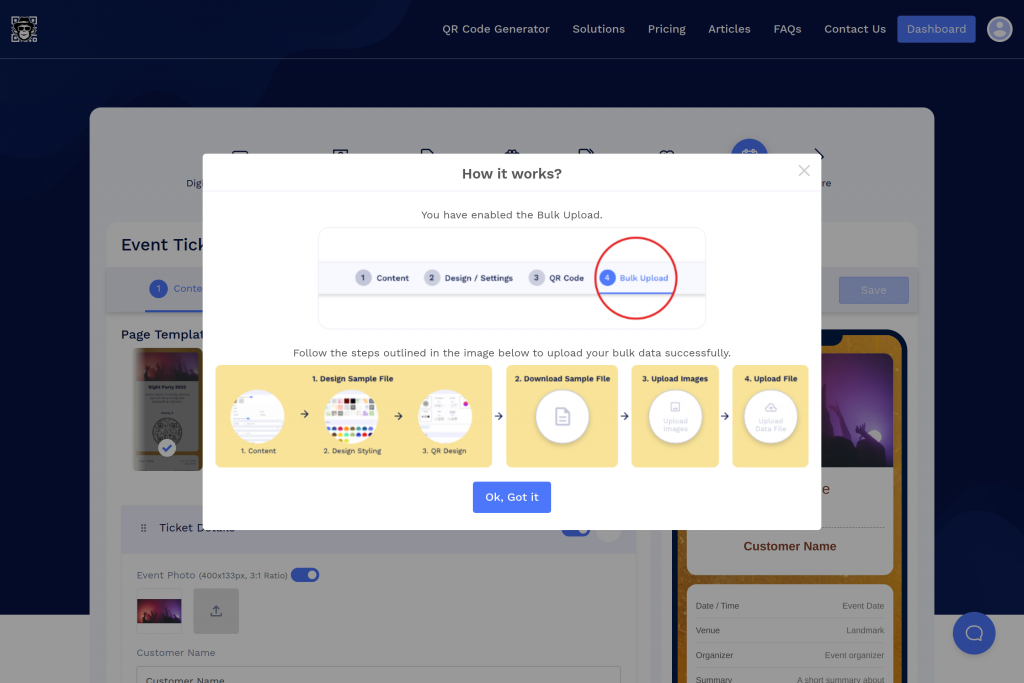
Step 2: Create the ticket template
Create the common structure and design that will be used for every ticket in the batch.
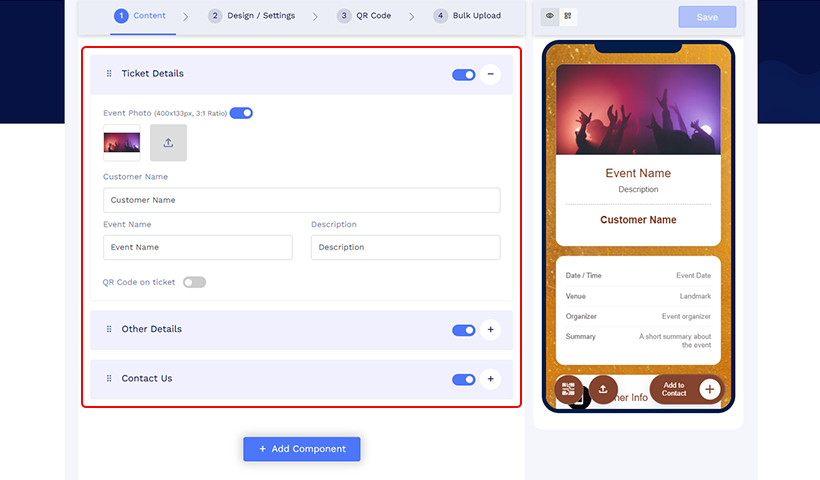
In the Content tab, select and configure the information you want to display. Depending on the event, this may include:
- Attendee name
- Event name
- Date and time
- Venue
- Ticket category
- Seat, row, or zone
- Entry instructions
- Organizer contact details
Information that differs for each attendee will be added later through the bulk upload file.
Step 3: Design the ticket
Set a background image or video for the ticket. You can also customize its colors, fonts, card style, and page loader.
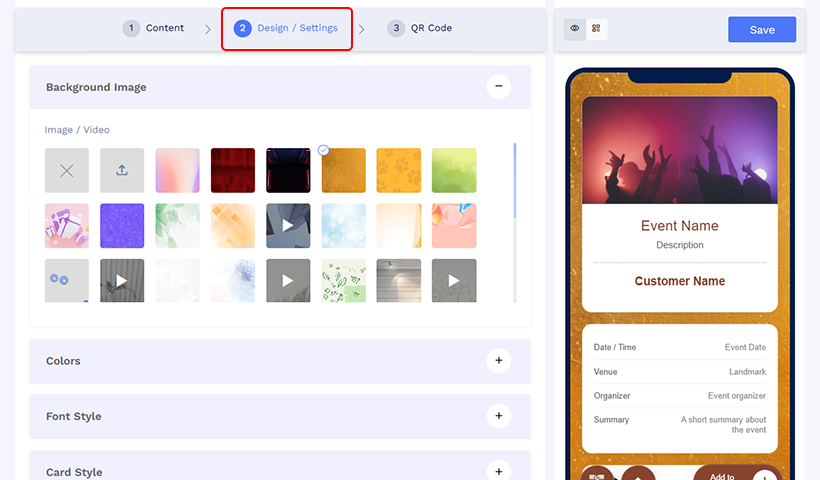
Keep the ticket consistent with your event branding, but make sure the attendee name, event details, and QR code remain easy to locate.
Step 4: Configure entry settings
Enable Lock QR Code to control how many successful validations each ticket permits.
Configure the ticket to lock only when it is scanned by the account owner or an authorized sub-account user by enabling Lock only when scanned from owner/sub-account. This prevents the ticket from locking if an attendee or guest scans it before reaching the entry point.
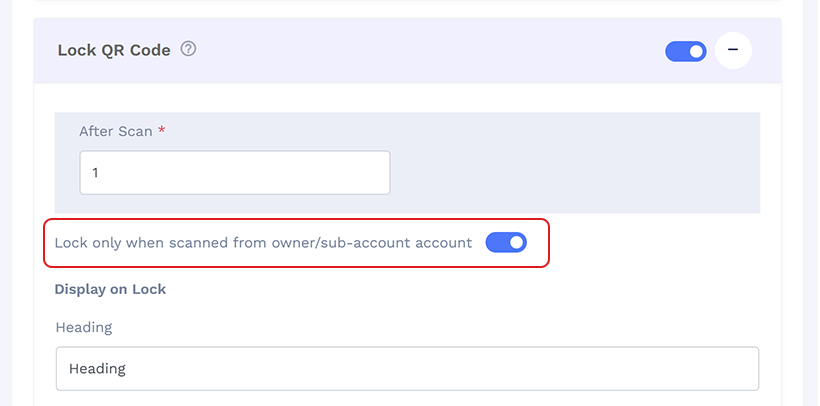
For a single-entry event, configure the ticket to lock after its first permitted validation. Increase the allowed count only when controlled re-entry is part of the event policy.
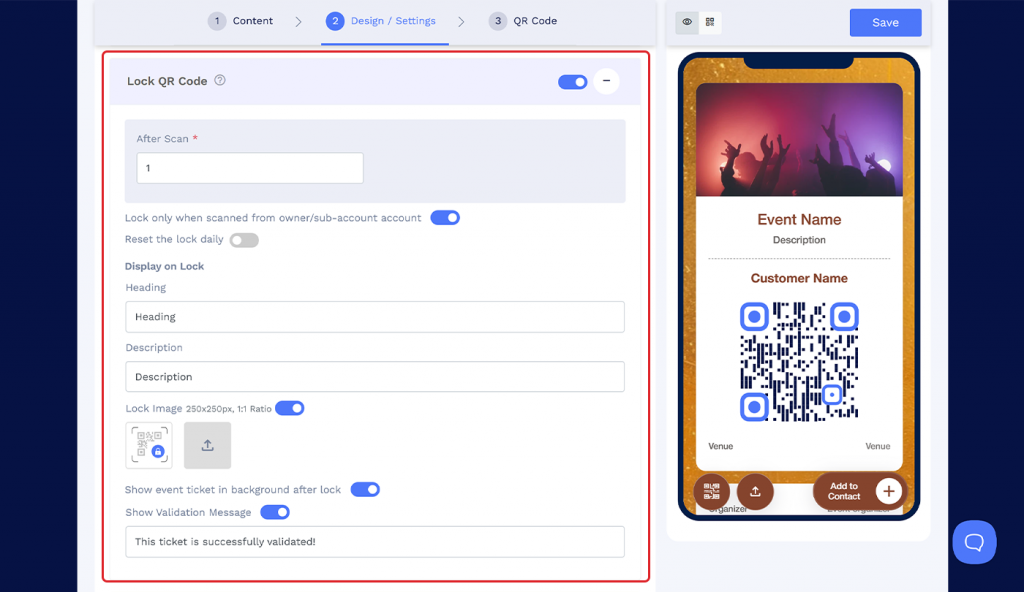
For a multi-day event, enable Reset Lock Daily, then select the appropriate timezone and reset time. The permitted validation count will become available again after the configured daily reset.
Step 5: Customize the QR code
Open the QR Code tab to customize the QR code with shapes, colors, stickers, and a logo.
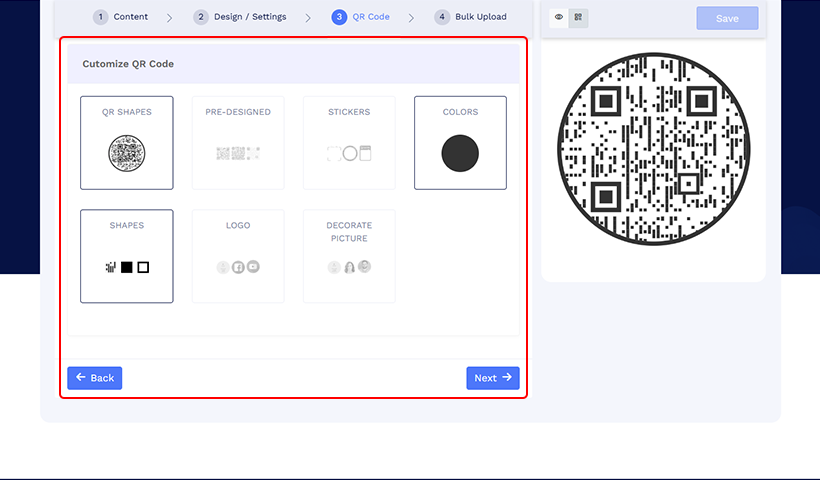
Maintain strong contrast between the QR code and its background. Avoid decorative elements that make the code difficult to detect.
Step 6: Save the bulk ticket template
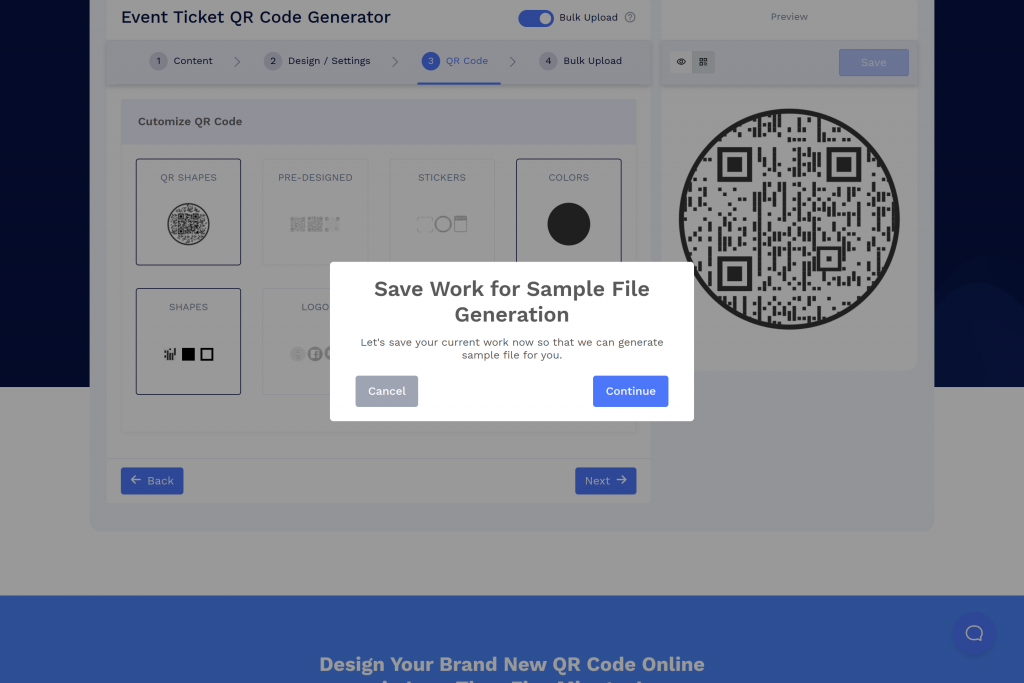
Open the Bulk Upload tab and click Continue under Save Work for Sample File Generation.
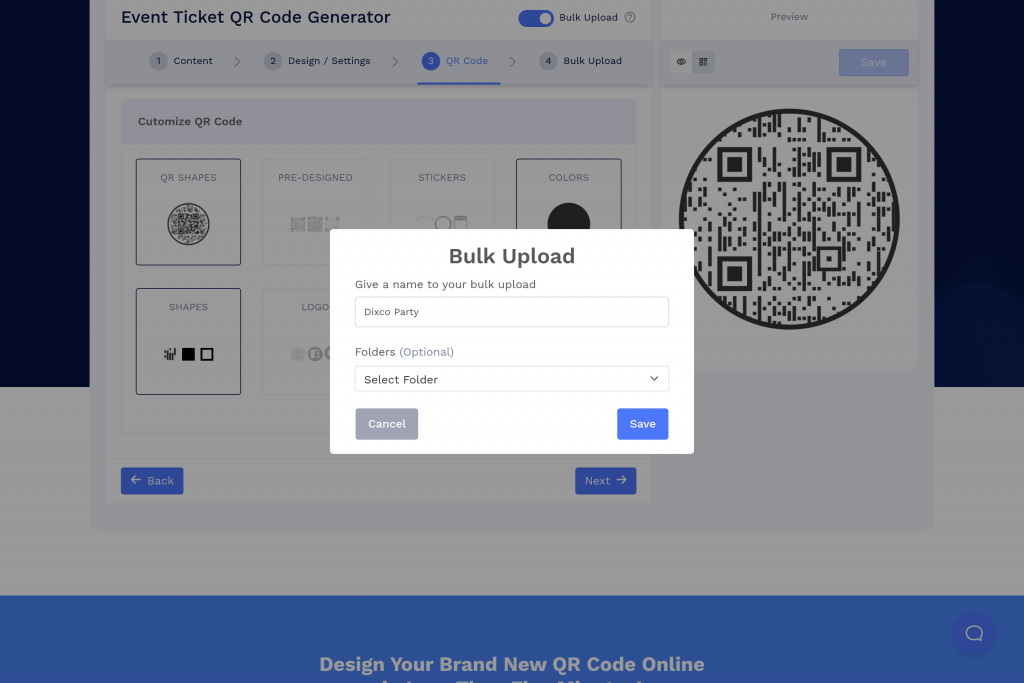
Name the bulk batch, select a folder if required, and click Save.
Step 7: Prepare the bulk upload file
Download the sample file generated by QRCodeChimp.
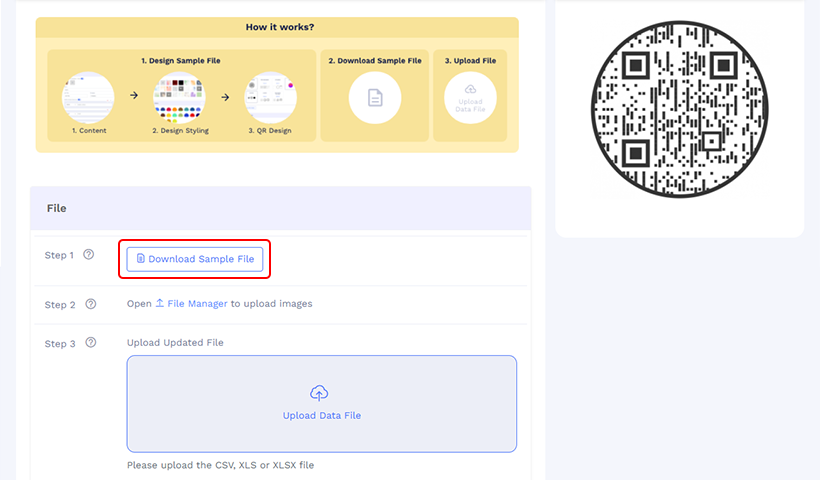
Use the sample data as a reference and enter each attendee’s details in the corresponding columns. Every row creates a separate ticket.
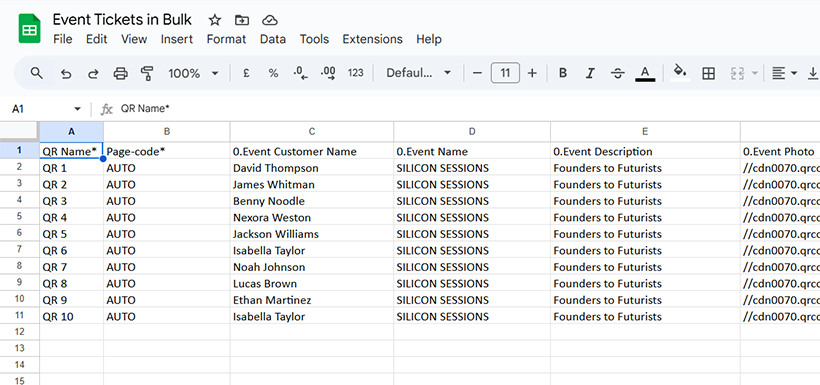
Each ticket requires a unique page code. To let QRCodeChimp generate it automatically, enter AUTO in the page-code column. Do not leave this field blank.
Add the appropriate attendee email address to the email column you plan to use when sharing the tickets.
Save the completed file in CSV, XLS, or XLSX format.
Step 8: Upload the file and generate the tickets
Return to the bulk batch and upload the completed CSV, XLS, or XLSX file.
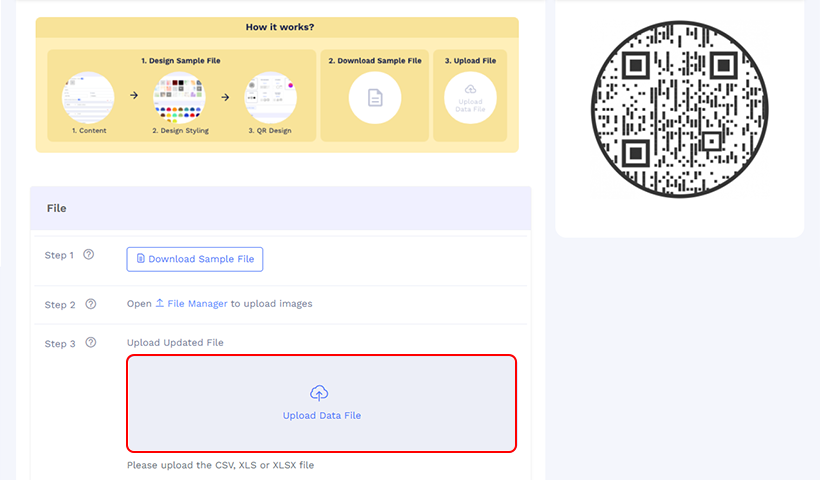
Review the upload status and correct any errors identified in the file. Once the data is accepted, continue to generate the Event Ticket QR Codes.
Step 9: Download the Event Ticket QR Codes
Open the QRCodeChimp dashboard and locate the bulk batch.
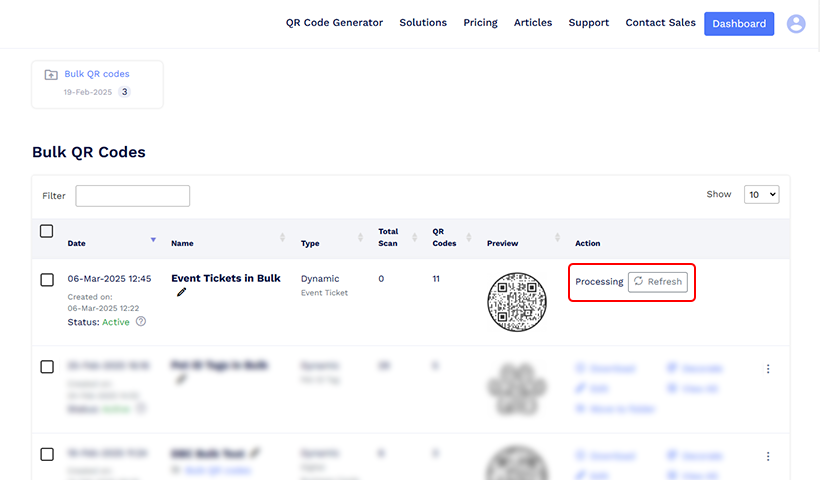
If ticket generation is still in progress, click Refresh after a short interval.
Open the available actions, select Download, and choose the required format and dimensions.
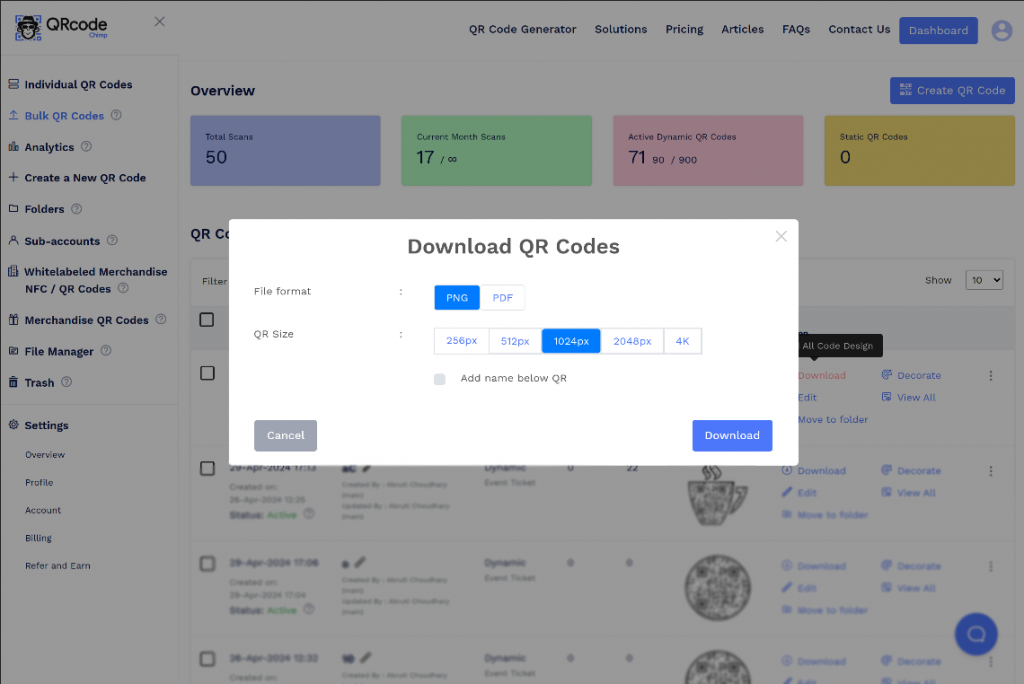
The Event Ticket QR Codes are now ready to be sent privately to attendees.
How to share Event Ticket QR Codes created in bulk
After generating the tickets, you can email them directly to attendees from the bulk batch.
Step 1: Open the dashboard
Go to the QRCodeChimp dashboard and select Bulk QR Codes from the sidebar.
Step 2: Locate the Event Ticket batch
Find the relevant Event Ticket bulk batch and click the three-dot menu to view the available actions.
Step 3: Select Share Ticket via Email
Choose Share Ticket via Email.
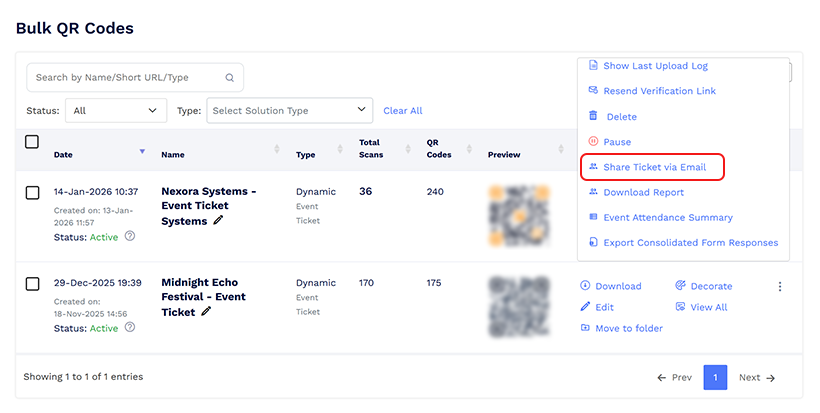
Customize Ticket colors pop-up appears.
Step 3: Customize the ticket PDF colors
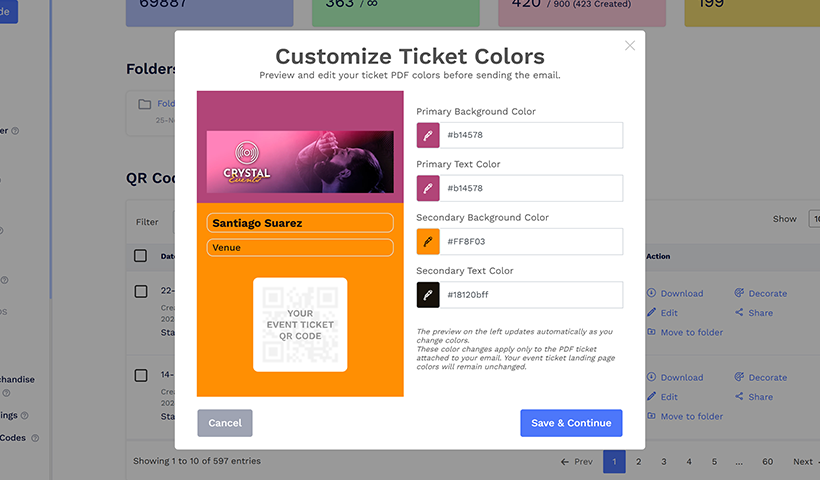
Review the ticket preview and customize the following colors if required:
- Primary background color
- Primary text color
- Secondary background color
- Secondary text color
The preview updates automatically as you change the colors.
These changes apply only to the Event Ticket PDF attached to the email. They do not change the colors of the Event Ticket landing page.
Click Save & Continue.
Step 4: Choose the recipient email field
In the Share Event Ticket in Bulk window, select where QRCodeChimp should retrieve each attendee’s email address.
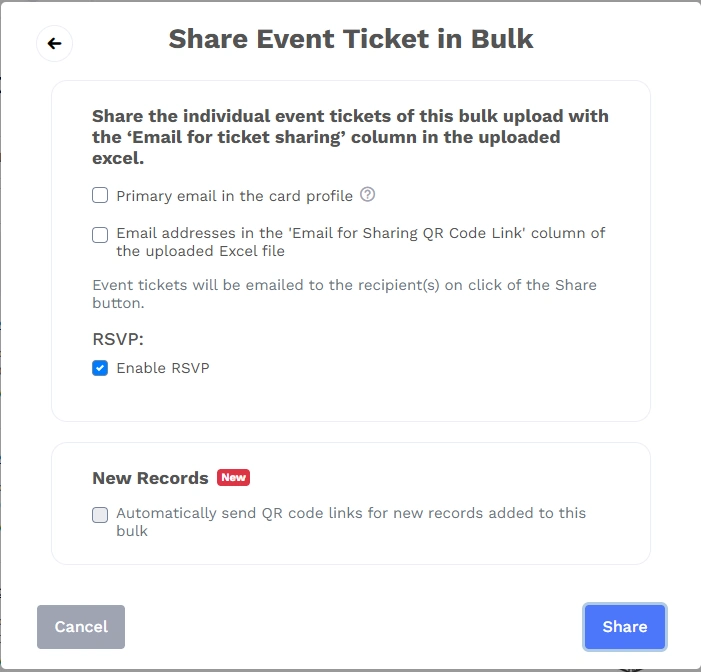
You can choose:
- Primary email in the card profile
- Email addresses in the “Email for Sharing QR Code Link” column of the uploaded Excel file
Select the option that corresponds to the email information included in your bulk records. You may select both when required.
Step 5: Configure RSVP
Enable RSVP if you want recipients to respond with Yes, No, or Maybe from the ticket email.
Leave it disabled when an RSVP response is not required.
Step 6: Configure sharing for future tickets
Under New Records, enable Automatically send QR code links for new records added to this bulk if you want QRCodeChimp to email tickets automatically whenever new attendee records are added to the batch.
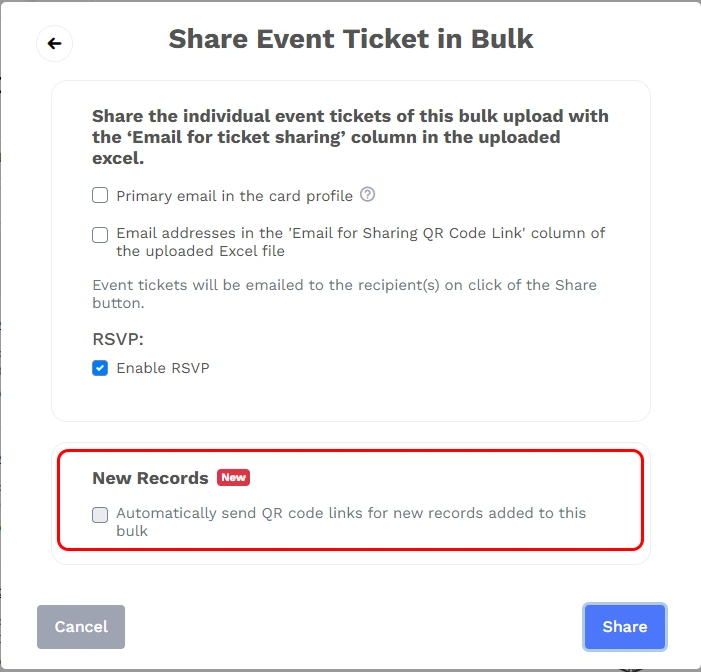
This is especially useful when tickets are created continuously, including through a form linked to the bulk batch.
Leave this option disabled if you prefer to review new records before sending their tickets.
Step 7: Share the tickets
Click Share.
QRCodeChimp will email each attendee the ticket associated with their individual bulk record.
Send attendee-specific tickets only through private channels. Do not publish them on websites, public social media pages, or open group conversations because another person may copy and use the ticket.
How to create an individual Event Ticket QR Code
Individual creation works well for smaller events, VIP guests, speakers, performers, or attendees added after the main bulk batch has been created.
Step 1: Open the Event Ticket QR Code solution
Log in to QRCodeChimp, go to Solutions, and select Event Ticket QR Code.
Step 2: Set the page code
Enter a unique page code or allow QRCodeChimp to generate one automatically.
The page code becomes part of the ticket page URL and cannot be changed after the ticket has been saved.
Step 3: Select a ticket page template
Choose a page template that suits the event and the type of information you want to display.
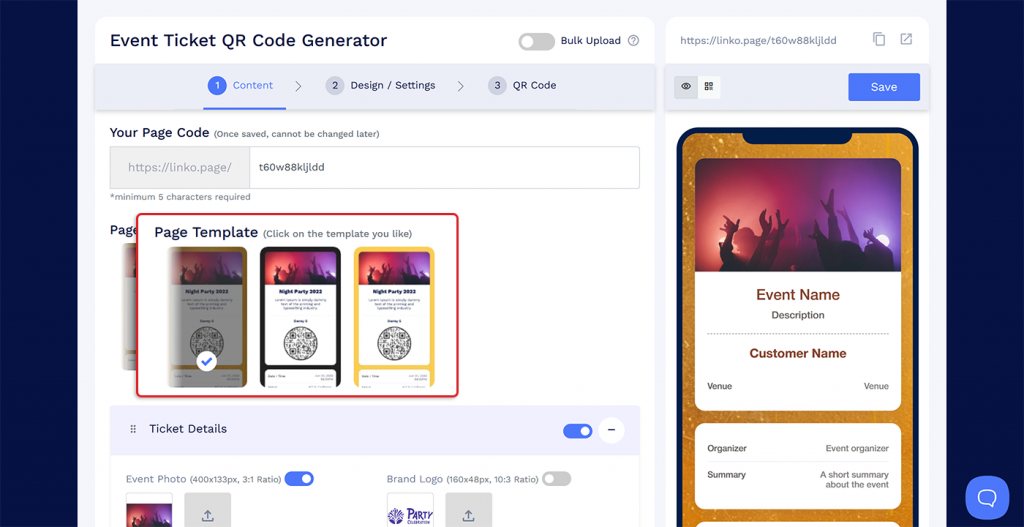
You can customize the template in the following steps.
Step 4: Enter the attendee and event details
In the Content tab, add the information that should appear on the ticket.
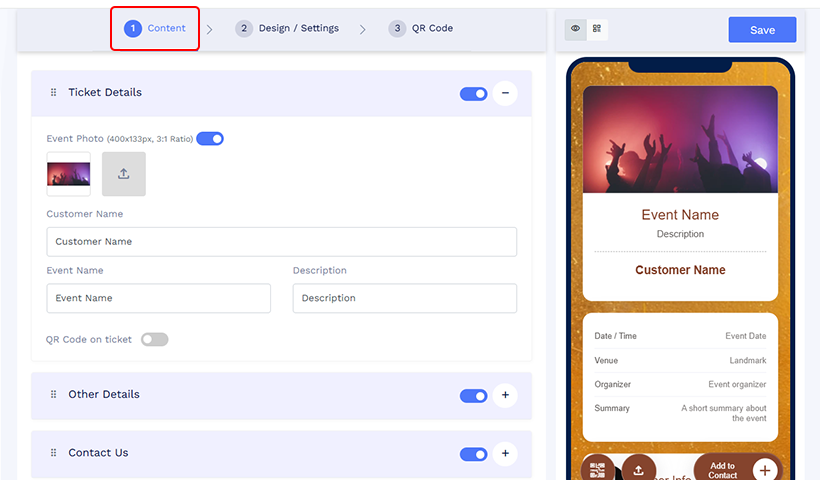
This may include:
- Attendee name
- Event name
- Event date and time
- Venue
- Ticket category
- Seat or access zone
- Entry information
Keep the most important admission details near the top of the ticket.
Step 5: Configure the ticket QR code display
Choose whether the QR code should appear on the hosted ticket page.
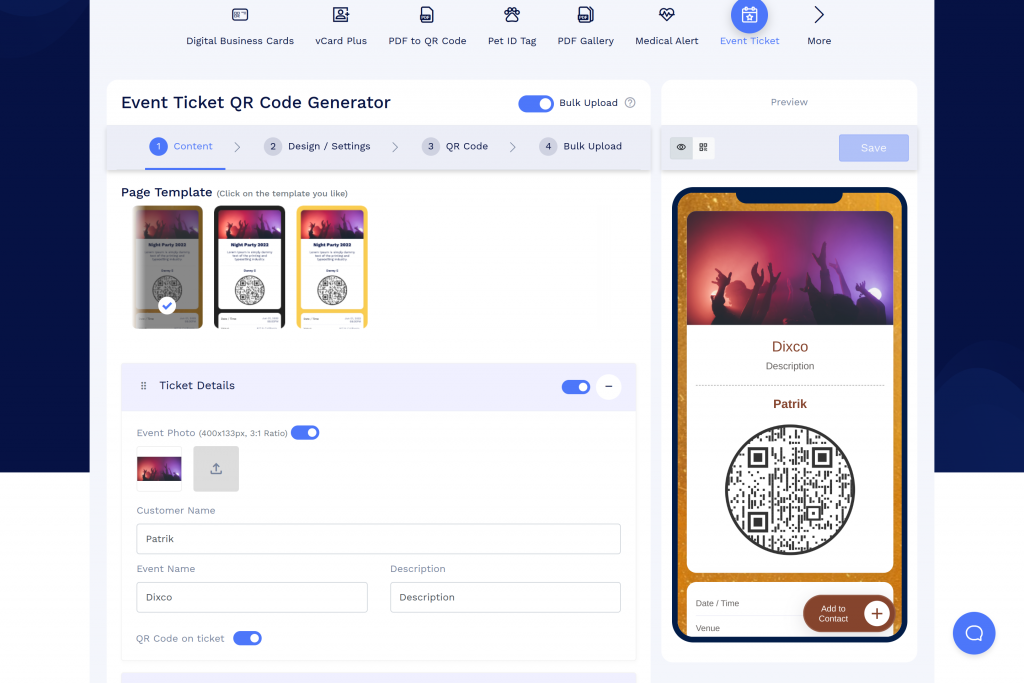
Keep it enabled when attendees will open the ticket page on their phones and present the QR code at the entrance.
Step 6: Add contact details and other components
Add the organizer’s contact information when attendees may need help before or during the event.
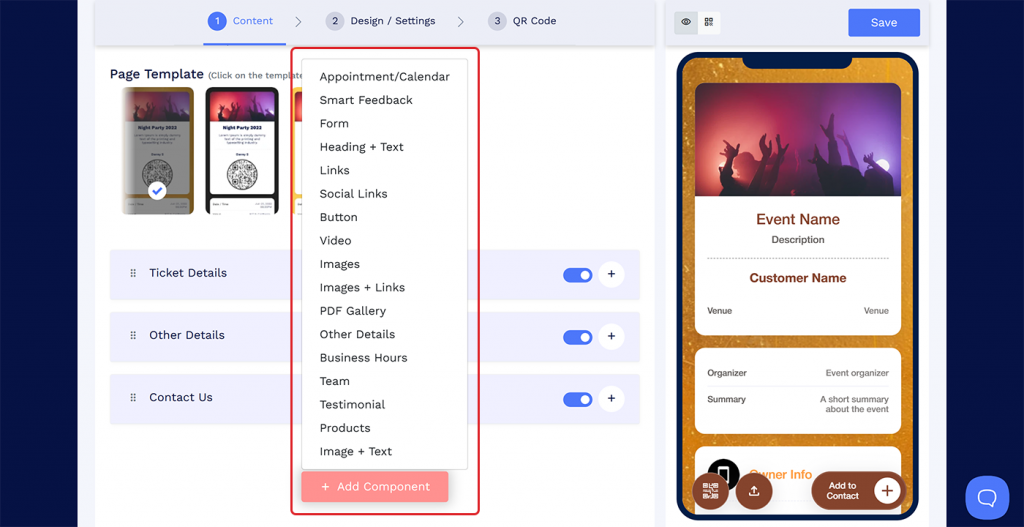
Use Add Component to include relevant images, videos, buttons, or social links.
Avoid adding so much content that the QR code or admission details become difficult to find.
Step 7: Design the ticket
Click Next to open the Design/Settings tab.
Customize the background, colors, fonts, card style, and page loader to match the event identity.
You may also save the page style for reuse when creating similar tickets.
Step 8: Configure the scan limit
Enable Lock QR Code After Scans and enter the permitted number of successful validations.
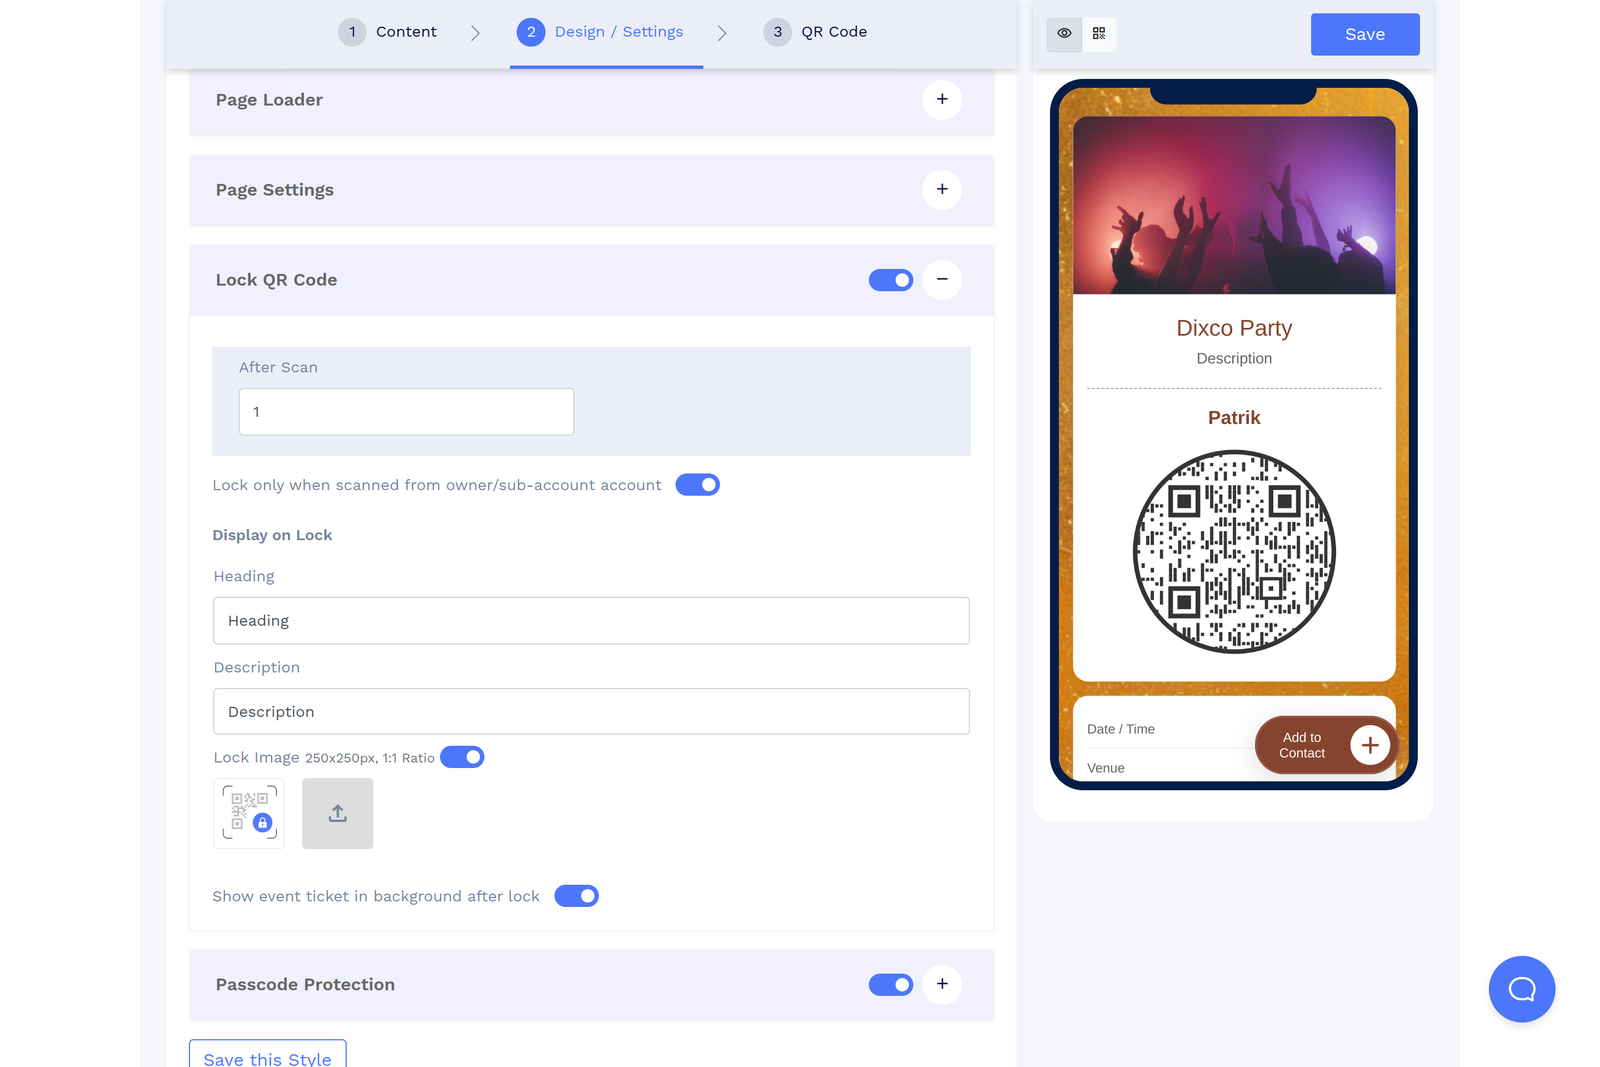
Use one permitted validation for strict single-entry admission. Increase the number only when controlled re-entry is allowed.
You can also configure the QR code to lock only when it is validated by the account owner or an authorized sub-account user.
Step 9: Configure multi-day access when required
For an event running across multiple days, enable Reset Lock Daily.
Choose the relevant timezone and reset time so the same ticket can be used again on the following event day without allowing unrestricted same-day reuse.
Step 10: Add passcode protection when required
Passcode protection can be enabled when access to the hosted ticket page needs an additional control.
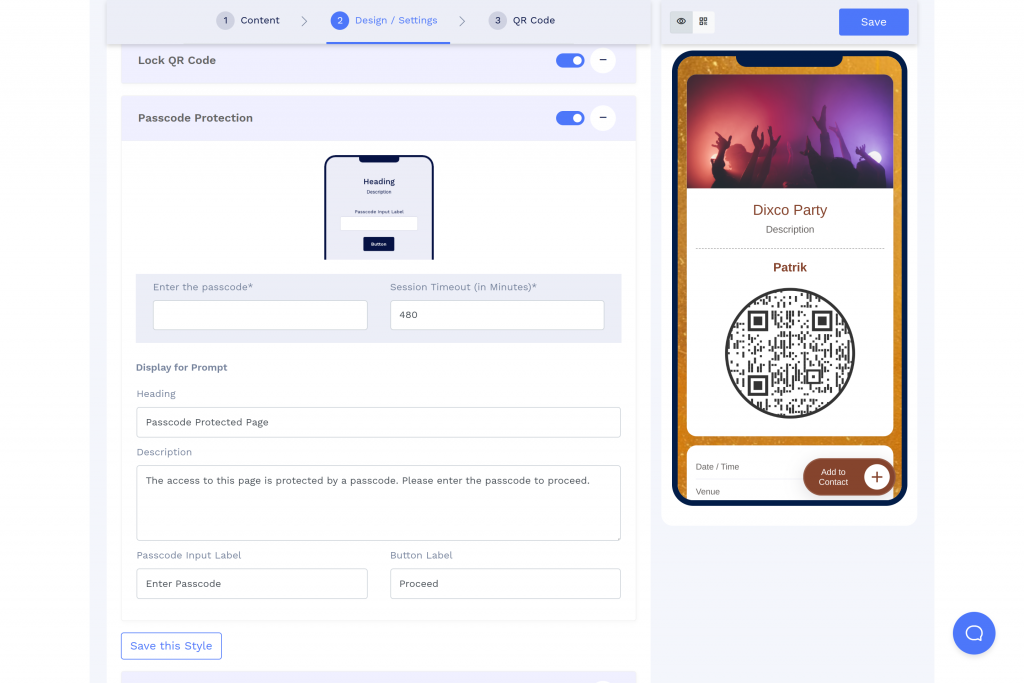
Enter the passcode, set the session timeout, and add an appropriate display prompt.
Passcode protection is optional. It does not replace unique tickets, scan limits, or controlled ticket validation.
Step 11: Customize the QR code
Open the QR Code tab and personalize the QR code with shapes, colors, stickers, and a logo.
Keep the code readable and test it before sharing.
Step 12: Save and share the ticket
Click Save, enter a name for the QR code, select a folder if required, and complete the save process.
Open the saved ticket from the dashboard and send it to the attendee through email, a private message, or another controlled channel.
How to create Event Ticket QR Codes from form submissions
Form-based ticket creation allows attendees to submit their information through a registration form. QRCodeChimp then creates an Event Ticket immediately after submission or only after the organizer approves the response.
The form must be connected to an Event Ticket bulk batch. You can use an existing batch or create a new empty batch before setting up the form.
Step 1: Create an Event Ticket bulk batch if needed
If you already have an Event Ticket bulk batch with the required ticket design and settings, proceed to Step 2.
If you have not created one, complete Steps 1 to 6 under How to Create Event Ticket QR Codes in Bulk. Customize the ticket content, design, QR code, validation settings, and other common details, then save the empty bulk batch without uploading attendee records.
Form submissions will later be added as new records to the selected bulk batch.
Step 2: Create a form
Open the Form QR Code solution and create a new form. Customize form url, choose form template, and customize profile section as you need.
Step 3: Give your registration from a name
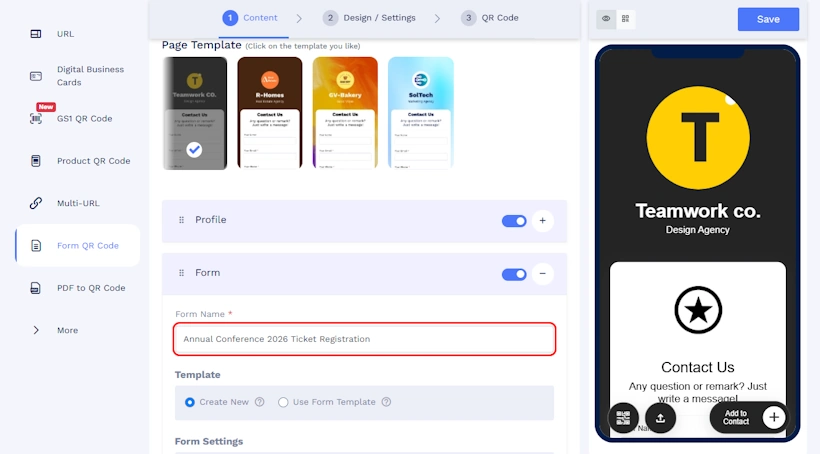
Give the form a clear and descriptive name so you can easily identify its responses later. For example, use a name such as Annual Conference 2026 Ticket Registration instead of a generic name such as Event Form.
Step 4: Customize the form fields
Add and customize the fields needed to create each attendee’s ticket.
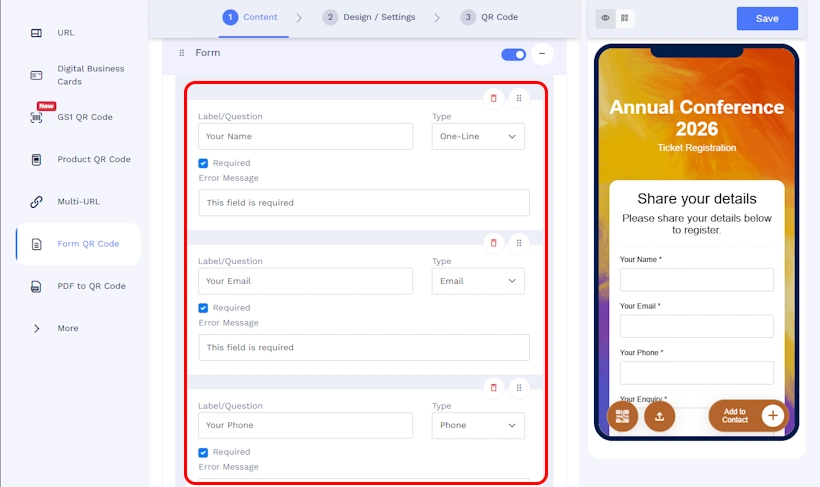
Depending on the event, you may collect:
- Full name
- Email address
- Phone
- Preferred session
- Seat or access-zone information
- Other event-specific details
Collect only the information required for registration and ticket creation.
Also add or verify the following form details:
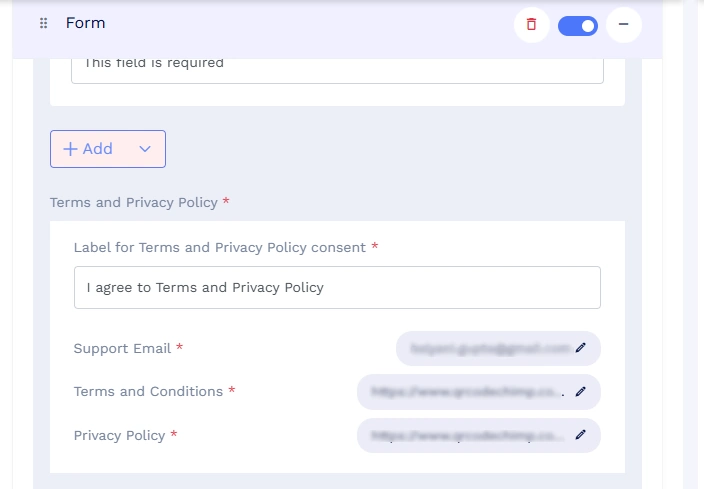
- Terms and conditions
- Privacy policy URL
- Support email address
Step 4: Enable ticket creation from form submissions
Go to Form Integration Settings and enable Enable landing page creation on form submission.
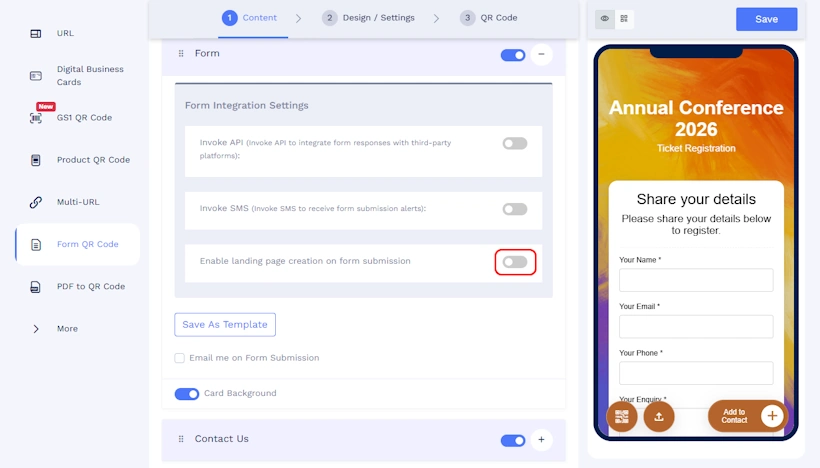
This setting allows QRCodeChimp to create a ticket using the information submitted through the form.
Step 5: Select Event Ticket as the landing page type
Under Select landing page type, choose Event Ticket.
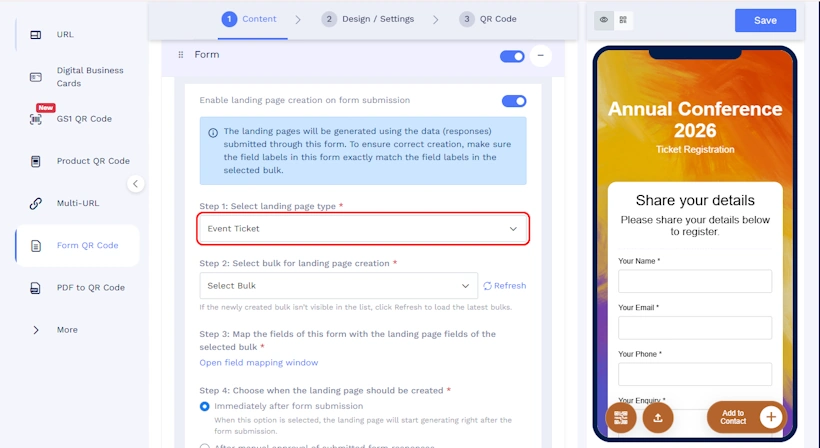
This tells QRCodeChimp that every qualifying form response should create a new Event Ticket record.
Step 6: Select the Event Ticket bulk batch
Under Select bulk for landing page creation, choose the Event Ticket bulk batch selected or created in Step 1.
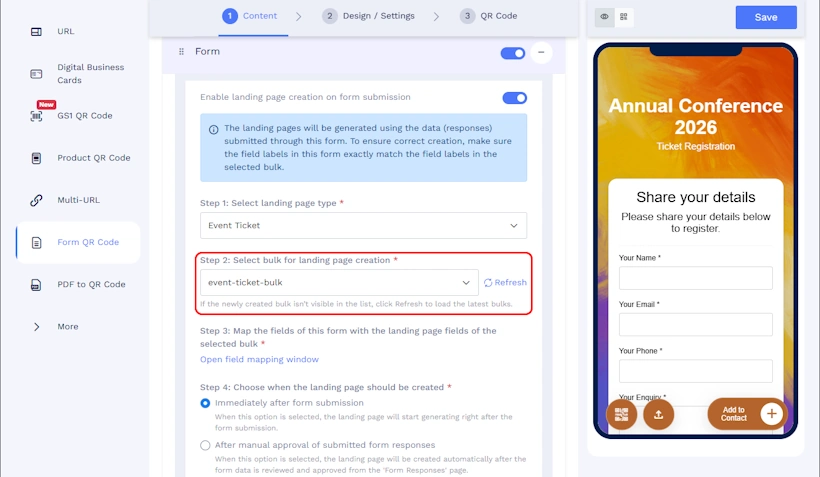
If a newly created batch does not appear in the list, click Refresh to load the latest bulk batches.
The submitted form responses will be added as new records to this batch.
Step 7: Map the form fields to the ticket fields
Click Open field mapping window.
Map each form field to the corresponding field in the selected Event Ticket bulk batch.
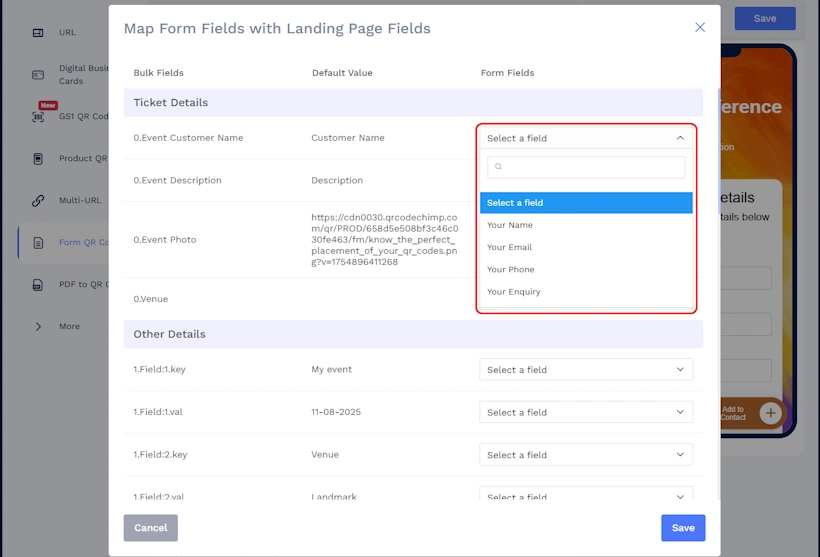
Make sure every field required for ticket creation is mapped correctly. Use clear, matching field labels wherever possible to reduce mapping errors.
Step 8: Configure when the ticket should be created
Choose one of the following options:
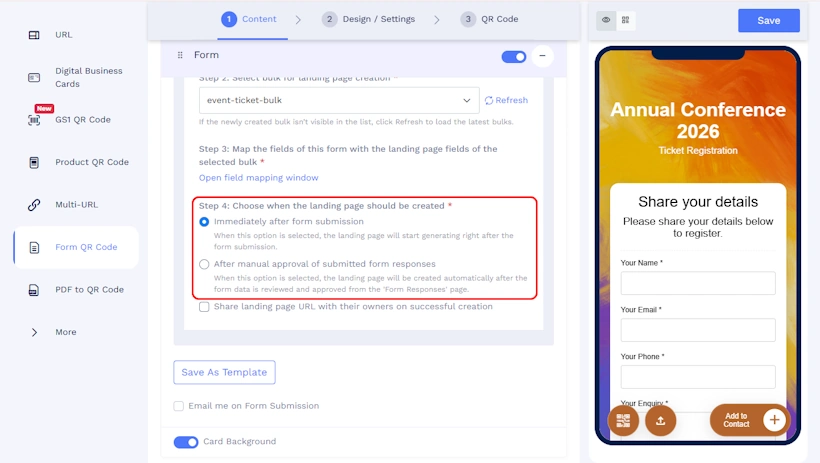
Immediately after form submission
Select this option when every valid submission should create a ticket without manual review.
The submitted response will be added as a new record in the linked bulk batch, and ticket generation will begin immediately.
This option is suitable for open registrations where approval is not required.
After manual approval of submitted form responses
Select this option when the organizer needs to review each response before creating a ticket.
After the response is approved from the Form Responses page, it will be added to the linked bulk batch and the Event Ticket will be created.
This option is better for:
- Invite-only events
- Member registrations
- Student registrations requiring verification
- Events with limited capacity
- Applications requiring document or eligibility checks
Step 9: Configure ticket-link sharing
Enable Share landing page URL with their owners on successful creation if you want the generated Event Ticket page URL to be shared with the respondent after successful ticket creation.
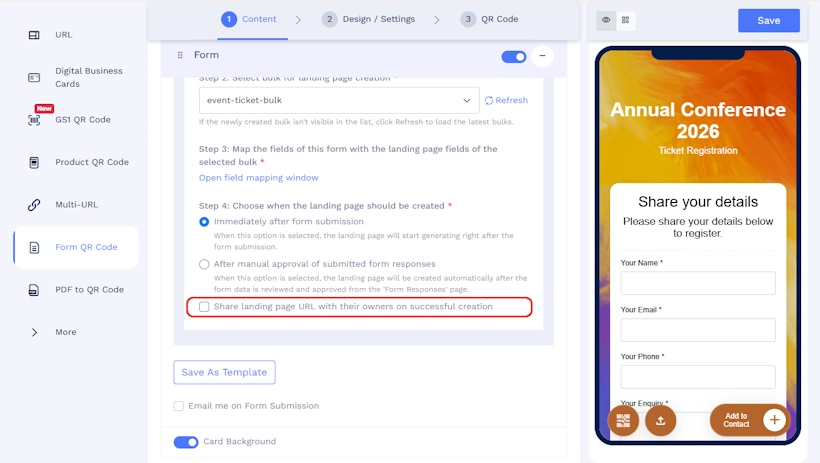
This setting applies after the ticket has been created, whether creation happens immediately or after approval.
If you also want QRCodeChimp to automatically email tickets for every new record added to the bulk batch, configure Share Ticket via Email for that batch and enable Automatically send QR code links for new records added to this bulk.
Step 10: Save and test the workflow
Save the form and submit a test response.
Verify that:
- The response is added to the selected Event Ticket bulk batch.
- Manual approval works correctly when enabled.
- Submitted information appears in the correct ticket fields.
- The ticket is created at the intended stage.
- The Event Ticket URL is shared when that option is enabled.
- Automatic sharing for new bulk records works when configured.
- The QR code and ticket details display correctly.
- The test ticket can be validated successfully.
Use test information rather than a genuine attendee record.
Need to share event details or registration links? Use an event QR code.
Tips for designing your event ticket
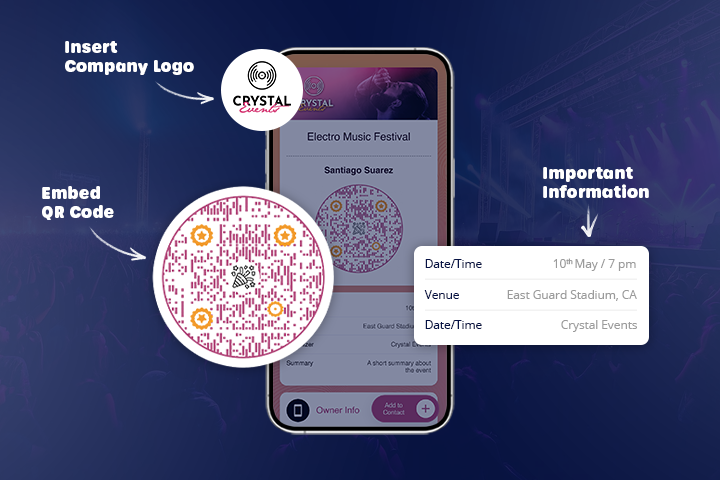
✅ Make admission details easy to find
Display the event name, date, time, venue, entrance details, attendee name, and ticket category prominently.
For assigned-seat events, make the section, row, and seat information easy to locate.
✅ Keep the ticket focused
Include only information that attendees need before or during entry.
Long descriptions, excessive promotional content, and unnecessary components can make the admission details and QR code harder to find.
✅ Match the event branding
Add the event or organization logo and use colors that align with the event identity.
Branding should support the ticket rather than reduce its readability.
✅ Keep the QR code readable
Maintain strong contrast, adequate clear space around the QR code, and a practical size for mobile display and print.
Avoid low-contrast color combinations, overly detailed QR shapes, and background elements that interfere with the code.
✅ Design for phones first
Many attendees will open the ticket on their phones at the entrance.
Check that the QR code, attendee name, event name, date, and access information remain visible on smaller screens without unnecessary scrolling.
✅ Make the entry instruction clear
State in the ticket content or accompanying message that the attendee should present the ticket at the entrance for validation.
✅ Test the final design
Test the ticket on different phones, screen brightness levels, and the lighting conditions expected at the venue.
Use separate test tickets instead of validating genuine attendee tickets during setup.
Before you send your event tickets
A final review can prevent many day-of-event problems.
Check that:
- Attendee names and email addresses are correct.
- Every attendee has a unique ticket.
- The event date, time, venue, and entry details are accurate.
- The permitted validation count matches the entry policy.
- Reset Lock Daily, timezone, and reset time are correct for multi-day events.
- The QR codes remain readable on phones and printed tickets.
- Authorized team members can access the correct event.
- Test tickets work correctly in the Event Ticket Validator.
- Internet connectivity has been checked at each entrance.
- Tickets will be sent privately.
Do not use genuine attendee tickets for repeated validation tests because a successful validation may consume one of their permitted entries.
Prepare your team for ticket validation
After distributing the tickets, give authorized team members access to QRCodeChimp’s browser-based Event Ticket Validator.
Before the event, confirm that they can sign in, select the correct event, access the device camera, and validate separate test tickets. Also check internet connectivity at each entry point and prepare a controlled fallback process.
For detailed instructions, see:
- How to Validate Event Ticket QR Codes
- How to Track Event Attendance With the Event Ticket Report
- QR Code Ticketing Planning Guide
Conclusion
Creating Event Ticket QR Codes is only the first part of the ticketing workflow.
Before sharing them, verify the attendee information, entry settings, ticket design, and recipient email addresses. Use separate test tickets to check the full validation process, then send each attendee’s ticket through a private channel.
QRCodeChimp lets you create Event Ticket QR Codes individually, generate them in bulk, or create them from form responses linked to a bulk batch. You can also collect RSVP responses, control entry validations, support multi-day access, and review attendance through the same ticketing workflow.
Frequently asked questions
Can I create Event Ticket QR Codes for free?
Yes. You can create individual Event Ticket QR Codes on the free plan, subject to its active dynamic QR code and monthly scan limits. Bulk ticket creation requires an eligible paid plan.
Can I create Event Ticket QR Codes in bulk?
Yes. Enable bulk upload, create a ticket template, download the sample spreadsheet, add one attendee per row, and upload the completed CSV, XLS, or XLSX file.
Which spreadsheet formats can I upload?
QRCodeChimp supports CSV, XLS, and XLSX files for bulk Event Ticket creation.
What should I enter in the page-code column?
Enter a unique page code for each ticket. To let QRCodeChimp generate it automatically, enter AUTO in the page-code column. Do not leave the field blank.
How do I email bulk-created event tickets?
Add each attendee’s email address to the appropriate email column in the bulk file. After generating the tickets, open the bulk batch, select Share Ticket via Email, choose the recipient email field, and send the tickets.
How does form-based Event Ticket creation work?
First, create an Event Ticket bulk batch. Then create a form, link it to the batch, and map the form fields to the corresponding batch fields. Submitted responses can be added immediately or only after organizer approval.
Can the same ticket work across multiple event days?
Yes. Enable Reset Lock Daily, select the timezone, and set the reset time. The permitted validation count will become available again after the daily reset.
Should I test genuine attendee tickets before the event?
No. Create separate test tickets for setup and team training. Validating a genuine attendee ticket may consume one of its permitted entries.
You may also like
How To Create an RSVP QR Code for Any Event
Create an RSVP QR code using a customizable form, Event Ticket RSVP, Google Forms, or WhatsApp. Compare four methods and follow the steps.
QR Code Ticketing for Events: Planning, Best Practices, and Mistakes to Avoid
Learn how QR code ticketing works, set entry and re-entry rules, plan multi-day validation, prepare check-in teams, and avoid common event mistakes.
QR Code Printing Requirements: What to Check Before the Print Run
Learn how to print QR codes that scan reliably. Check size, resolution, format, contrast, quiet zone, material, placement, and proof testing.
Dynamic QR Codes: How They Work and When to Use Them
A dynamic QR code lets you change where a printed code points, without reprinting it. Here is how dynamic QR codes work, what they track, and when to use one.
Most Popular
Contact Sales